rkt - yet emerging container runtime
Containers are taking the IT world by storm, instead of re-inventing the wheel, CoreOS wants to offer the next-generation open source app container runtime, designed for security, simplicity and composability. But above all, they want to play fair with the ecosystem by ensuring it is built on common open standards and use what’s readily available like systemd and Kubernetes. rkt is written in Go, it compile to a single static binary, so it is easily portable to any modern system, for the rest read on.
Introduction
Containers are great to run your application isolated in a deterministic environment, without the overhead of a virtual machine.
At the last OpenStack summit in Barcelona, I happily attended a hand’s on workshop on rkt and Kubernetes. I always wanted to write down my findings, so here am I.
First of all rkt (pronounced “rock-it”) download application images from the internet, verify those and run them inside of a container, which is a process running on your host isolated from other processes.
The first prototype (v0.1.0) were released in december 2014, it is now production ready, current stable version as of february 2017 is v1.24.0, check master branch for the latest and greatest one.
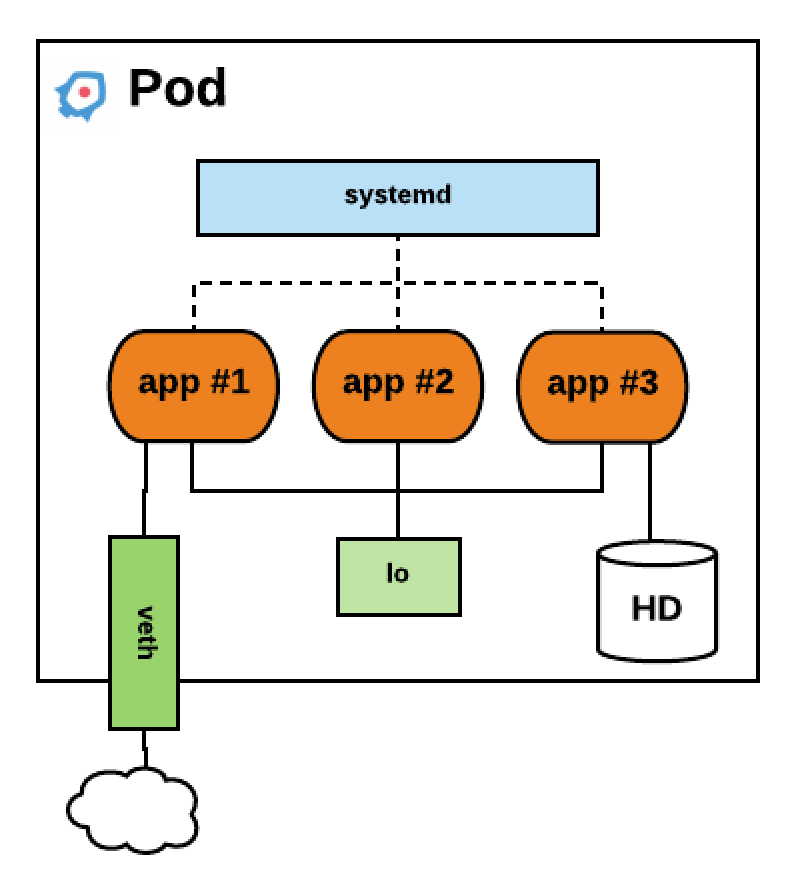
rkt is a pod native container engine, it means that the basic unit of execution is a pod, which is a concept popularised by Kubernetes. A Pod is a group of one or more containers, co-located, co-scheduled which runs in a shared context, including for networking and storage. They also share the same fate, they come and go as a whole. It’s the only execution primitive, single application are modelled as singleton pods.
rkt is currently an implementation of the App Container spec (appc), and use a Application Contain Image format (ACI) defined by appc. This format is a simple compressed tarball of a rootfs bundle with all the required files to execute an application plus an Image Manifest which defines default exec params and resource constraints. This image is uniquely identified by an imageID (hash). Things are evolving rapidly, following Open Container Initiative (OCI) evolution and stabilization, appc will be phased-out and replaced by OCI for runtime. A proposal is also in the works to implement the newly released OCI image format. Overall rkt shoud be fully OCI compliant in 2017.
So simply said, a pod is a grouping of one or more container images with additional optional metadata like resource constraint.
rkt vs Docker
By the way, rkt can also run Docker Images.
Compared to Docker, rkt doesn’t bring any centralized ‘init’ daemon, so you can run containers from clients commands without having to rely on a centralized daemon API endpoint, making it compatible with systemd. When you run a rkt container, it will be executed directly under the process you started it from.
You can easily install docker2aci to convert images:
git clone git://github.com/appc/docker2aci
cd docker2aci
./build.sh
To convert an image
docker2aci docker://alpine
But that may not be necessary, images are converted on the fly when run or by Quay when pulled.
rkt security
CoreOS charter is to fundamentally improve the security of the Internet, it was also the driving force of rkt.
rkt does security by verifying image signatures and integrity by default. It also restrict capabilities by default and apply unix philosophy of separation of duty. For example, downloading an image from the internet should not be ran as root. You have to explicitly opt-out to lower rkt security principles.
rkt leverage classic and modern linux technologies :
- Linux namespaces for process visibility
- cgroups for resource usage and limits
- seccomp is enabled by default to restrict kernel access to application
- SELinux context to isolate individual pods
- support VM containment
- TPM measurements, a tamper proof audit log of what’s running
- mask sensitive /proc and /sys path
rkt stages
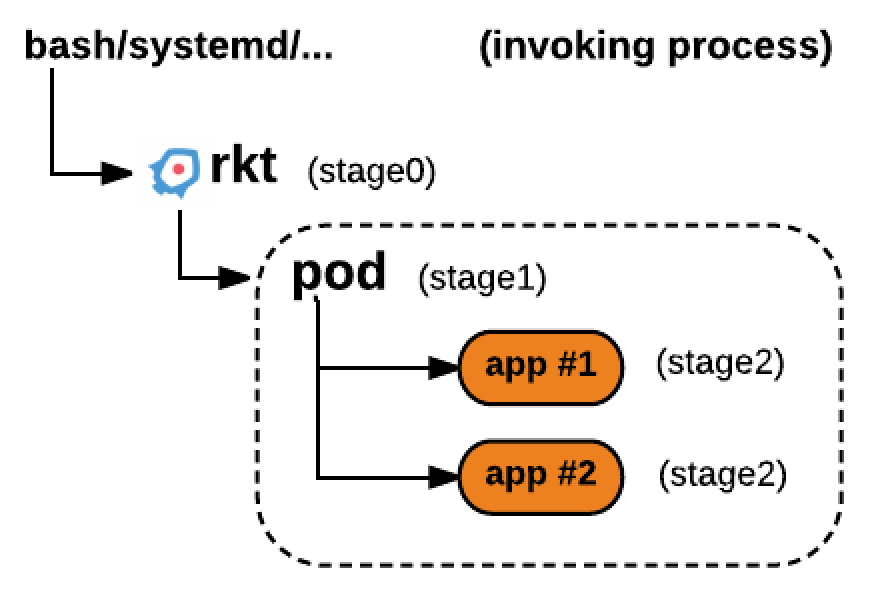
rkt is built around a staged architecture, stage 0 is the rkt command itself, which setup things to invoke stage 1 and gets out of the way by running an exec().
Within stage 1 you have the actual application which is stage 2.
rkt itself can be invoked from the command line (bash), by systemd or kubelet, etc…
cgroups and Linux namespaces is the default stage 1 mechanism and is pretty similar to the way Docker containers works, it will use systemd-nspawn to do the work of launching the container. Another available stage 1 is LKVM which use a very lightweight virtual machine, it can spins up in milliseconds but it will soon be deprecated in favor of QEMU which is currently being optimised to play that role.
rkt installation
Container Linux
CoreOS Container Linux comes bundled with rkt, so you don’t have to do anything if you use this operating system optimized to run containers except if you want to use a different version.
Debian
On debian you can install rkt from CoreOS provided package
gpg --recv-key 18AD5014C99EF7E3BA5F6CE950BDD3E0FC8A365E
wget https://github.com/coreos/rkt/releases/download/v1.25.0/rkt_1.25.0-1_amd64.deb
wget https://github.com/coreos/rkt/releases/download/v1.25.0/rkt_1.25.0-1_amd64.deb.asc
gpg --verify rkt_1.25.0-1_amd64.deb.asc
sudo dpkg -i rkt_1.25.0-1_amd64.deb
This workflow does the following
- download debian package and signing key
- check the authenticity of the package
- install the required dependencies
- adduser, dbus, libc6, systemd, iptables
- put in place the different stage1 aci
- /usr/lib/rkt/stage1-images/stage1-fly.aci
- /usr/lib/rkt/stage1-images/stage1-coreos.aci
- /usr/lib/rkt/stage1-images/stage1-kvm.aci
- put the
rktbinary into/usr/bin/rkt - put bash completion details into
/usr/share/bash-completion/completions/rkt - put man pages below
/usr/share/man/man1and doc into/usr/share/doc/rkt - put systemd unit file for metadata, api services and garbage collector below
/usr/lib/systemd/system/ - add rkt and rkt-admin unix groups
- put temporary files config into
/usr/lib/tmpfiles.d/rkt.conf- setup data directory structure below
/var/lib/rktused for- pod storage
- embedded QL SQL database
/var/lib/rkt/cas/db/ql.db - locks and tmp files
- setup data directory structure below
Other Linux distributions, installation from tar.gz
On any modern linux amd64 kernel, you can use the following pre-build binaries
# wget https://github.com/coreos/rkt/releases/download/v1.25.0/rkt-v1.25.0.tar.gz
# tar xzvf rkt-v1.25.0.tar.gz
# alias rkt="sudo '${PWD}/rkt-v1.25.0/rkt'"
# rkt help
But for a cleant installation, prefer to install it from your linux distribution package.
Mac or Windows
If you aren’t on linux you can use a Vagrant VM, on mac or windows it is as simple as
> git clone https://github.com/coreos/rkt
> cd rkt
> vagrant up
> vagrant ssh
> rkt help
Note: If you want to use the vmare_fusion Vagrant plugin, you’ll have to use this box instead in your Vagrantfile bento/ubuntu-16.04
rkt run
Lets now run our first container, the below operation will fetch the container image from quay.io repository, verify its signature, run it and drop you into the container
# sudo rkt run quay.io/coreos/alpine-sh --interactive
You can also run docker images directly from a docker registry, verifying isn’t an option so we have to specify not to verify it.
# sudo rkt run docker://alpine --insecure-options=image --exec=/bin/sh
Run multiple applications in the same pod
# rkt run example.com/app1 example.com/app2
Run from a ACI url
# rkt run https://github.com/coreos/etcd/releases/download/v3.1.1/etcd-v3.1.1-linux-amd64.aci
rkt volumes
When you start a container you can tell rkt to present volumes to it. You can define where your container is expected external data to be mounted in its ACI image manifest
{
"acKind": "ImageManifest",
"acVersion": "0.8.10",
"name": "example.com/app1",
...
"mountPoints": [
        {
            "name": "work",
            "path": "/var/lib/work",
            "readOnly": false
        }
    ],

...
}
"name" - indicates a label to refer to a mount point to abstract away the host’s filesystem layout, the same image can then be used on a variety of hosts by defining the exact host location at runtime only.
"path" - stipulates where it is to be mounted inside the rootfs.
To fulfill these mount points, --volume flag is used when running the container
# rkt run --volume=work,kind=host,source=/opt/tenant1/work example.com/app1
Which tells the runtime to mount host directory /opt/tenant/work in the container rootfs at /var/lib/work
If your image manifest doesn’t provide any mountPoints, you can specify it with --mount
# rkt run --volume=work,kind=host,source=/opt/tenant1/work \
    example.com/app1 --mount volume=work,target=/var/lib/work
If you run multiple app in your pod, you can put each mountpoint after its corresponding app name if they differs.
If you don’t intend to persist the data and you just want to have a volume shared between all the apps in the pod, you can use an empty volume:
# rkt run --volume data,kind=empty,mode=0700,uid=0,gid=0 example/app1
That’s all for volumes, we’ll now switch to container networking.
rkt networking
rkt uses Container Network Interface (CNI) plugins that conform to the CNI specification for network connectivity. The upstream CNI plugin binaries are built into and shipped with the stage1 flavor named coreos. So lets review the different options available.
A simple way to connect a rkt pod would be to share the host network with it, you can achieve that easily by using the following argument --net=host. Your pod will then inherit the network namespace of the process that is invoking rkt. Pod apps are then able to access everything associated with the host’s network interfaces but won’t be able to change host network configuration.

Without such an argument, by default, rkt will create a virtual ethernet pair, one on the host, the other one placed in the pod. Your pod will get an IP from a private address range (172.16.28.0/24) and Network Address Translation will be enabled to allow him to reach any other network (0.0.0.0/0 route for IPv4)
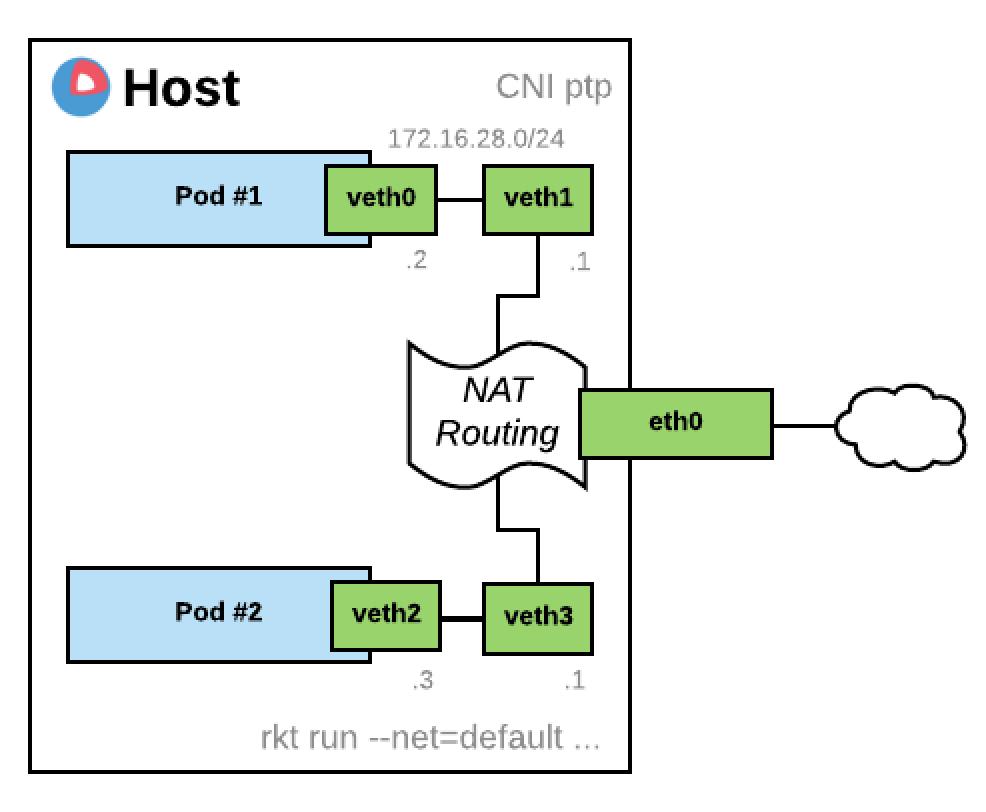
This default mode only allows a maximum of 253 pod per host. If you don’t want your Pod to access the outside world but only other local pods, you can pass --net=default-restricted or any net name other then host, none and default. By the way multiple networks can be provided separated by commas.
Ultimately you can isolate a pod from the network with --net=none, the pod will end up with only the loopback network interface.
If you want the DNS resolution to work within your pod, you can provide the resolver with --dns 8.8.8.8
Morover some Container Image Manifest define port, they can then be forwarded from the host IP by declaring them on the CLI with --port
Other CNI plugins exists like Bridge, macvlan and ipvlan, and a DHCP plugin also exist for container IPAM. The bridge plugin is re-used by external plugins like Flannel or Weave Net to setup final networking.
Build your first ACI image
You can easily convert docker images to ACI using docker2aci command, or rkt can even convert them on the fly, great isn’t it. So lets focus instead on creating an ACI image from scratch.
acbuild is the main command used to build ACIs. Instead of a domain specific language like in Dockerfile, building ACI images is using a bash script.
If you don’t already have acbuild on your system, you can grab it there
# wget https://github.com/containers/build/releases/download/v0.4.0/acbuild-v0.4.0.tar.gz
Lets imagine you have a service written in go that you want to package in a container.
package main

import (
    "fmt"
    "log"
    "net/http"
    "net/http/httputil"
)

func handler(w http.ResponseWriter, r *http.Request) {
    b, _ := httputil.DumpRequest(r, false)
    log.Println(string(b))
    fmt.Fprintln(w, "Hello World")
}

func main() {
    http.HandleFunc("/", handler)
    http.ListenAndServe(":8080", nil)
}
Go is really a nice language to use within containers, it can do static linking. So as you’ll see below it becomes really trivial to package it. No wonder why both Kubernetes and Go were both created by Google to solve their own application deployment problems while using Python or Ruby for example.
Now this is what you need to package this app in an ACI container, extracted from Sergiusz Urbaniak great rktnetes workshop. I hope he don’t mind me reproducing his content here :/
#!/usr/bin/env bash
set -e
set -x

name=app
os=linux
version=0.0.1
arch=amd64

acbuildend () {
    export EXIT=$?;
    acbuild end && exit $EXIT;
}

acbuild begin
trap acbuildend EXIT

GOOS="${os}"
GOARCH="${arch}"
CGO_ENABLED=0 go build

acbuild set-name workshop/app
acbuild copy "${name}" /"${name}"
acbuild set-exec /"${name}"
acbuild port add www tcp 8080
acbuild label add version "${version}"
acbuild label add arch "${arch}"
acbuild label add os "${os}"
acbuild annotation add authors "Your Name <your@email.com>"
acbuild write --overwrite "${name}"-"${version}"-"${os}"-"${arch}".aci
When building our app we want to make sure it will be statically linked, so we build it with CGO_ENABLED=0
Yo can check that by running
# ldd ./app
    not a dynamic executable
# file ./app
./app: ELF 64-bit LSB executable, x86-64, version 1 (SYSV), statically linked, not stripped
The above ACI build script is pretty obvious. We create a new build context from scratch with acbuild begin. Set the name of the ACI in its manifest with set-name, copy our go binary to the rootfs, define 8080 as www port. This port will then be plugged into a host port with something like --port=www:80 when running the container.
You can also add some annotations to your manifest, and finally define your image filename. We use --overwrite to make sure the image will get written even if it already exist.
You should end up with a container image that you can validate with actool
# actool validate workshop/app-0.0.1
Run your service on port 80
# sudo rkt run ./app-0.0.1-linux-amd64.aci --port=www:80
Is it really working ? on another shell window run
# wget http://localhost
Yeah !!! On the shell where you’ve started your container, quit it by pressing ^] three times and check your app image manifest, you should find back what you’ve put in your build script.
# sudo rkt image cat-manifest workshop/app:0.1.1
Well done !!! one last thing, this ACI is not signed yet, but you could add something like this at the end of your build script to sign it
gpg2 --yes --batch \
--armor \
--output "${name}"-"${version}"-"${os}"-"${arch}".aci.asc \
--detach-sign "${name}"-"${version}"-"${os}"-"${arch}".aci
If you don’t have any gpg key yet, create one. You can now tell rkt to trust your key for your workshop prefix.
$ gpg2 --armor --export your@email.com >public.asc
$ sudo rkt trust --prefix=workshop ./public.asc
If you host your image and its corresponding .asc file, in a repository like Quay.io, it will be automatically verified by rkt before it can run your container, except if you specify --insecure-options=image on the cli.
You can also verify it manually
But that’s not the end of it, we now want to orchestrate a fleet of rkt containers, lets call Kubernetes to the rescue :)
Kubernetes + rkt = rktnetes
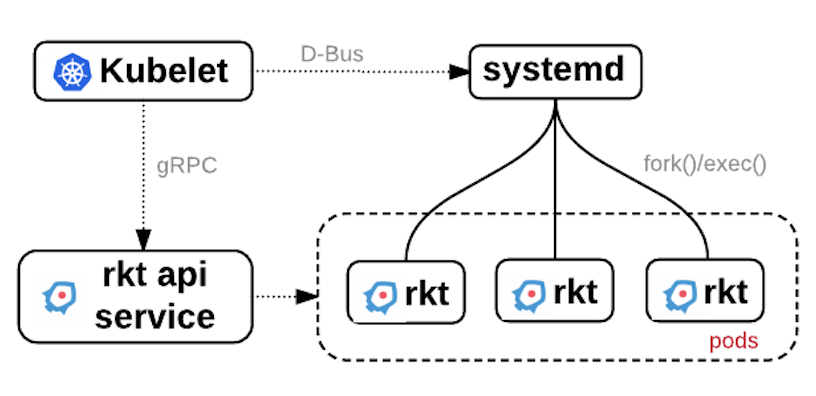
Now with rktnetes it’s not any more necessary for Kubernetes to talk to Docker daemon. Instead Kubelet which is the daemon that runs on every worker node in a kubernetes cluster, can delegate to rkt all container related operations. So rkt handles image discovery, fetching, and pod execution. Kubelet talk to systemd to run pods via rkt.
This has been mode possible by the introduction of the Container Runtime Interface (CRI) an API specification for low-level interaction between kubelet and contrainer runtimes.
Kubelet can run on the worker node as a container. A script located at /usr/lib64/coreos/kubelet-wrapper on a Container Linux OS can be used to start such a container from an hyperkube image located at quay.io/coreos/hyperkube. Before running it, you just have to make sure the following environment variable is set KUBELET_VERSION, as of february 2017 it could be set to v1.4.9_coreos.0
The stage1 used when launching it, stage1-fly, will simply use the chroot syscall and won’t setup any namespaces, so the kubelet will be able to access host filesystems mounts and network configuration which is necessary to run the containers for the kubernetes cluster. In this case it will be a single process running on the system not a pod any more.
This wrapper script can be used in the cloud init file of a virtualized worker node. So it will easily and automatically start a kubelet container.
minikube
Great news minikube have been made compatible with rkt, it’s a simple way to test drive rkt and Kubernetes.
Start by installing kubectl
# curl -Lo kubectl https://storage.googleapis.com/kubernetes-release/release/$(curl -s https://storage.googleapis.com/kubernetes-release/release/stable.txt)/bin/linux/amd64/kubectl && chmod +x kubectl && sudo mv ./kubectl /usr/local/bin/
Continue on by downloading minikube binary, on Linux do
# curl -Lo minikube https://storage.googleapis.com/minikube/releases/v0.16.0/minikube-linux-amd64 && chmod +x minikube && sudo mv minikube /usr/local/bin/
Configure the driver that you want to use
# minikube config set vm-driver kvm
Other alternative drivers exists: virtualbox, vmwarefusion, xhyper and hyperv.
Now start minikube with rkt as the container runtime.
# minikube start \
--network-plugin=cni \
--container-runtime=rkt \
You should now be good to go for your test drive.
# kubectl run hello-minikube --image=gcr.io/google_containers/echoserver:1.4 --port=8080
# kubectl expose deployment hello-minikube --type=NodePort
# kubectl get pods
Wait until your pods runs and access the service
# curl $(minikube service hello-minikube --url)
Now lets check it’s really using rkt
# minikube ssh
$ rkt list
UUID      APP             IMAGE NAME                              STATE   CREATED          STARTED   NETWORKS
97ec01bc  hello-minikube  gcr.io/google_containers/echoserver:1.4 running 15  minutes ago  15 minutes ago
...
You can also check that from k8s dashboard
# minikube dashboard
Click on Nodes > minikube
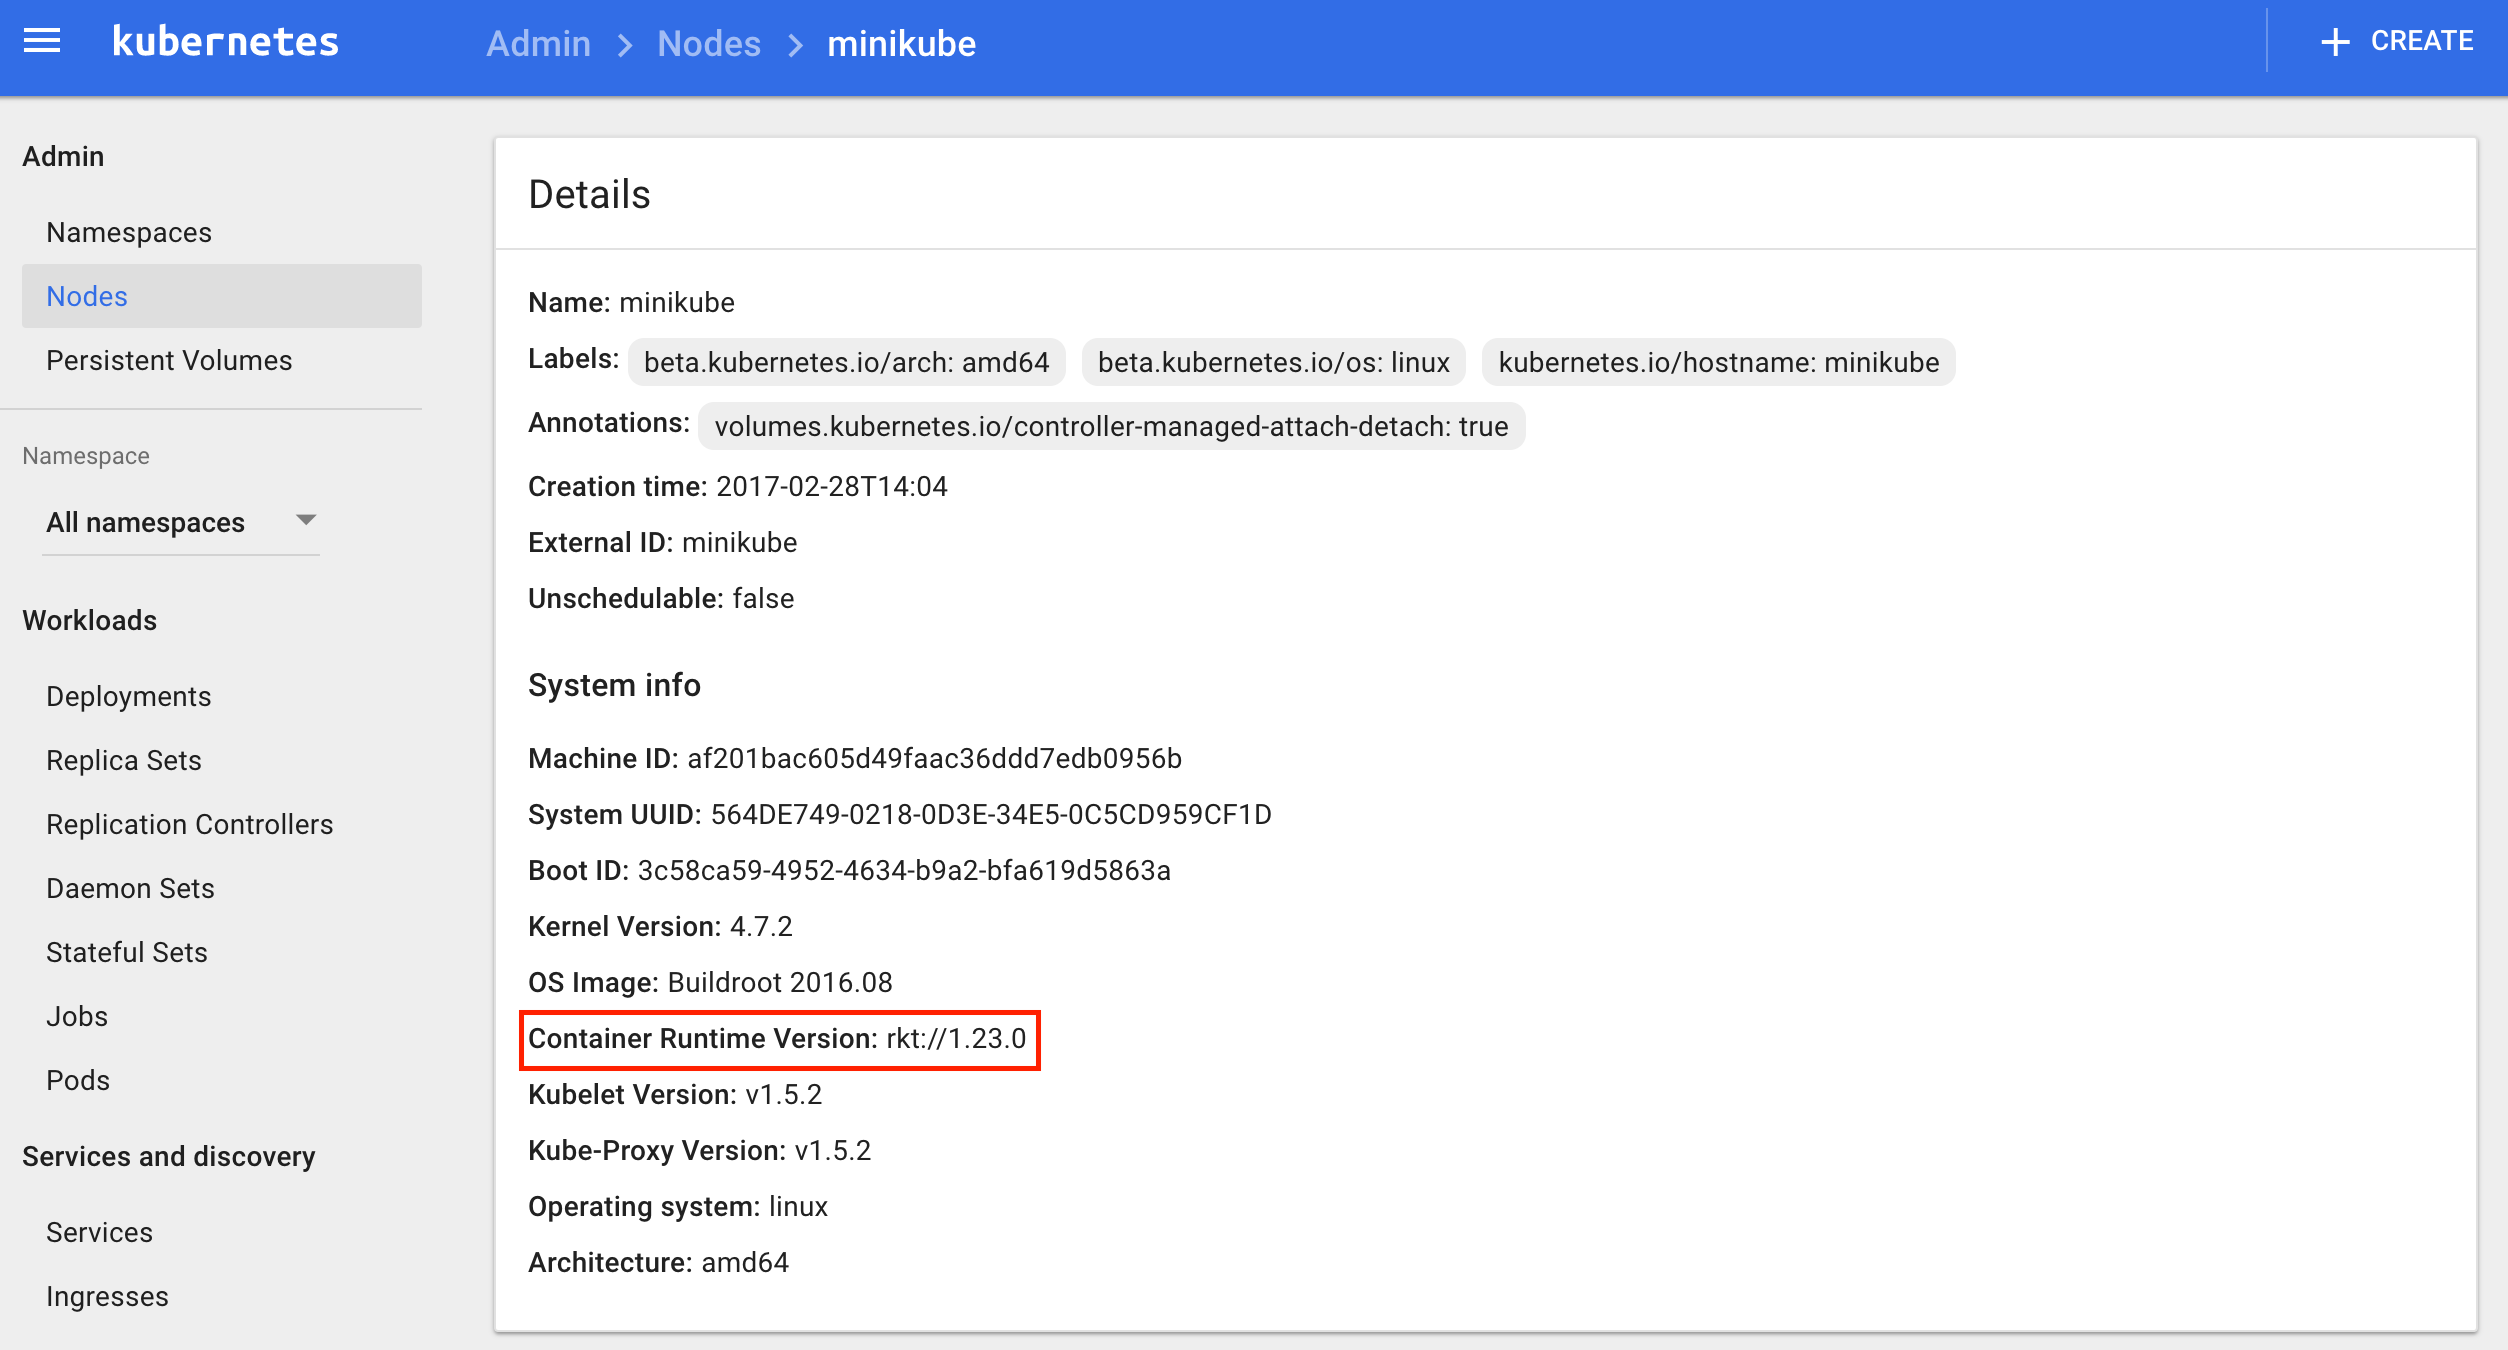
Nice, in just few commands we were able to deploy a Kubernetes environment and a demo app. It’s a good way to learn about k8s and rkt.
If you want a full blown Kubernetes cluster, read our articles on Tectonic (free 10-node cluster license available at CoreOS) or the one on Kargo.
rkt and systemd
You can use systemd to better manage the lifecycle of your pods, to start/stop them as required
First test running your pod using systemd as shown below, it’s way better then running rkt in the background.
# systemd-run --slice=machine rkt run yet.org/yetblog:v1.1.0
Running as unit run-u232.service.
Inspect logs
# journalctl -u run-u232.service
Stop it
# systemctl stop run-u232.service
The above service is transient, it won’t start on reboot, to make it permanent create a unit file like this one
# vi /etc/systemd/system/yetblog.service
[Unit]
Description=yetblog
Documentation=https://github.com/planetrobbie/www.yet.org
Requires=network-online.target
After=network-online.target


[Service]
Slice=machine.slice
MemoryLimit=1G
ExecStart=/usr/bin/rkt run --dns=8.8.8.8 --volume  mnt,kind=host,source=/var/www/yet,readOnly=false  /mnt/yetblog-latest-linux-amd64.aci
ExecStopPost=/usr/bin/rkt gc --mark-only
KillMode=mixed
Restart=always
rkt inherits resource limits configured in the systemd service unit file.
Once you have the above unit file in place you can easily enable the service, start and stop it.
# systemctl enable yetblog
# systemctl start yetblog
# systemctl status yetblog
# systemctl stop yetblog
You can look at your container log
# journalctl -u yetblog
We’ve defined our slice as machine.slice which should contain all vm and containers, you can get an overview of the hierarchy of slices like this
# systemd-cgls
Or look at a top view
# systemd-cgtop
To introspec container registration manager machines
# machinectl list
You can then use the ID from the above output to look at log files
# journalctl -M <UUID>
rkt metadata service
A running application can then introspect its execution environment and assert their pod identity by interacting with rkt metadata service. This service provides cryptographically verifiable Pod identity and exposes manifest and annotations.
The rkt metadata service can be started on socket activation on systemd based distributions or simply with
# rkt metadata-service
It will then listen on /run/rkt/metadata-svc.sock Unix socket for container registration and on TCP port 18112 available for apps to query over HTTP with TLS optionally enabled.
rkt api service
This rkt service is an optional api which currently provides a read-only interface over gRPC and run without root priviledges. By default it listen on the loopback interface on port number 15441 but that can be changed at startup, for example, to listen to all interfaces on port 8989
# rkt api-service --listen=0.0.0.0:8989
It will traditionnaly be run by systemd using an init file.
It is still experimental but important design decision, the stop or crash of this service won’t affect any pods or images :)
rkt cheatsheet
list images
# rkt image list
fetching an image
Fetching a docker image, with insecure-options because some docker images cannot be verified.
# rkt fetch --insecure-options=image docker://nginx
looking at an image manifest
# rkt image cat-manifest <IMAGE_UUID>
exporting to ACI
# rkt image export registry-1.docker.io/library/nginx:latest nginx.aci
extracting an image to a directory
# rkt image extract quay.io/coreos/alpine-sh <DIRECTORY>
removing an image
# rkt image rm quay.io/coreos/alpine-sh
running a Docker container
# rkt run --insecure-options=image --interactive docker://progrium/busybox --dns=8.8.8.8
enter a running container
# rkt enter <CONTAINER_UUID>
garbage collect a pod
Exited pods should be garbage collected, default grace period is 30m but can be changed, run something like that from your crontab.
# rkt gc --grace-period=10m
But you can also simply remove a pod
# rkt rm <CONTAINER_UUID>
or do a total cleanup
# rkt gc --grace-period=0s
Checking container status
# rkt status <CONTAINER_UUID>
Stopping a container
# rkt stop <CONTAINER_UUID>
Inspect and print the pod manifest
# rkt cat-manifest <CONTAINER_UUID>
Conclusion
rkt is a container runtime with no daemon, secure and composable. Different implementation exist for the stage 1, which allow for example to run apps with hardware virtualization. rkt will soon be fully OCI compliant and already integrate well with Kubernetes.
If you think about implementing containers in your organisation, I really think you should look into rkt and maybe join us at the CloudNativeCon + KubeCon event in Berlin March 29–30, 2017.
Mirantis is a silver sponsor, stop by our booth, ask for me (s.braun), I’ll be please to talk you thru what we are working on.
rkt Links
- official rkt site
- Getting Started with rkt
- rkt Network Modes and Default CNI Configurations
- rkt roadmap
- Open Container Intiative
- OCI runtime spec
- OCI image spec
- rkt API v1alpha protobuf definition
- CoreOS Container Linux release channels
k8s links
- Running Kubernetes with rkt k8s doc
- Using rkt with Kubernetes (aka rktnetes) CoreOS doc
- Minikube and rkt
- The rkt implementation of a Kubernetes Container Runtime
- Networking in Kubernetes
books
- Mastering CoreOS - february 2016
- Learning CoreOS - march 2016
- CoreOS cookbook - to be published may 4, 2017
- CoreOS in action - to be published around march 2017