Mirantis OpenStack 7.0 - Contrail 3.0 Fuel Plugin
Software Defined Networking (SDN) is often qualified as immature and tagged as complicated. Amongst the many solution available on the market, some of them can do a tremendous job of decoupling physical networking from logical networks used by cloud consumers. It then empower end users to deploy whatever architecture they need on their own. So deploying OpenStack without making sure to tackle the networking requirements of your team could be a recipe for failure.
In this article we’ll show you one way to address such a SDN requirement by showing you, step by step, the way to deploy Juniper Contrail 3.0 on top of Mirantis OpenStack 7.0 (Kilo).
A bit of reading first
Before you can start getting things done, make sure you have a good understanding of the different technologies involved. Please spend a bit of time to read some materials:
- Mirantis OpenStack documentation
- Juniper Contrail architecture
It will be hard for you to fix anything if you don’t know the innerworking of things and their are lots of moving parts. So have a good reading.
Briefly said, extracted from Juniper Quickstart guide:
Juniper Networks Contrail is an open, standards-based software solution that delivers network virtualization and service automation for federated cloud networks. It provides self-service provisioning, improves network troubleshooting and diagnostics, and enables service chaining for dynamic application environments across enterprise virtual private cloud (VPC), managed Infrastructure as a Service (IaaS), and Networks Functions Virtualization use cases.
In terms of architecture, Contrail is composed of
- Control nodes implement a logically centralized control plane that is responsible for maintaining ephemeral network state. Control nodes interact with each other and with network elements to ensure that network state is eventually consistent. Control Nodes Communicates over XMPP with vRouters.
- Configuration nodes keep a persistent copy of the intended configuration state and translate the high-level data model into the lower-level model suitable for interacting with network elements. This information is kept in a NoSQL database.
- Analytics nodes collect, store, correlate, and analyze information from network elements, virtual or physical. This information includes statistics, logs, events, and errors.
- Gateway nodes are physical gateway routers or switches that connect the tenant virtual networks to physical networks such as the Internet, a customer VPN, another data center, or non-virtualized servers.
- Database nodes runs Cassandra and Zookeeper.
- Service nodes are physical network elements providing network services such as DPI, IDP,IPS, WAN optimizers, and load balancers. Service chains can contain a mixture of virtual services (implemented as VMs on compute nodes) and physical services (hosted on service nodes).
- Compute nodes contains vRouter Forwarding Plane Linux Kernel Module with a vRouter Agent in user space that communicate back with two Control Nodes (for redundancy) over XMPP Protocol. This agent is in charge of exchanging routing information, receives low-level configuration state, report analytics (logs, stats, events) to the analytics nodes, install forwarding state into the forwarding plane, discover VMs attributes in cooperation with Nova Agent, applies forwarding policy for the first packet of each new flow and installs a flow entry into the forwarding table, proxies ARP, DNS, DHCP, MDNS.
While the Contrail Neutron Plugin
- Provides an implementation for the following resources: Network, Subnet, Port
- implements the following standard and upstream Neutron extensions: Security Group, Router IP, Floating IP, per-tenant quota, allowed address pair
- adds the followwing contrail specific extensions: Network IPAM, Network policy, VPC table and route table, Floating IP Pools
But enough theory for now ;)
Requirements
To follow this article you’ll first need the following pre-requisites
- Mirantis Fuel 7.0 deployed
- Mirantis Contrail Fuel Plugin downloaded (as of now, the plugin is not yet released)
- Juniper Contrail 3.0 binaries in .deb format
In terms of Hardware or VMs, you will also require at a minimum
- 1 x OpenStack Controller Node
- 1 x Compute (KVM)
- 1 x Contrail Controller with at least 500GB Operating System drive
- 1 x Contrail Database with at least 256 GB Hard Disk.
- 1 x Contrail Config
Each node will require a dedicated network connectivity (Nics or Bond) to the data network.
Plugin Installation
Mirantis Fuel Plugins are delivered as RPM packages, start by transfering the Contrail Fuel Plugin to your Fuel Master Node
$ scp contrail-3.0-3.0.0-1.noarch.rpm root@<Fuel-IP>:/tmp/
Install the plugin
$ ssh root@<Fuel-IP>
# fuel plugins --install /tmp/contrail-3.0-3.0.0-1.noarch.rpm
You should see the following message
Plugin /tmp/contrail-3.0-3.0.0-1.noarch.rpm was successfully installed.
You can check the plugin was correctly installed
id | name     | version | package_version
---|----------|---------|----------------
1  | ldap     | 1.0.0   | 2.0.0
2  | contrail | 3.0.0   | 3.0.0
As you can see, I still have the Fuel LDAP Plugin installed from my previous article.
Juniper Contrail Binaries
The Fuel Contrail Plugin is great because it’s not only configuring OpenStack Neutron Driver for Contrail but also deploys all of the Juniper Contrail components: Controllers, Databases and Config Nodes plus the parts on the compute nodes themselves.
To do so, The plugin needs access to the Juniper Contrail Binaries, so copy them to your Fuel Master Node.
$ scp contrail-install-packages_3.0-2652-kilo_all.deb \
      root@<Fuel-IP>:/var/www/nailgun/plugins/contrail-3.0/
Now run the Install script which will install contrail packages to the proper paths and generates repo metadata
$ ssh root@<Fuel-IP>
# /var/www/nailgun/plugins/contrail-3.0/install.sh
OpenStack Environment and Contrail Plugin Configuration
Now that you have the plugin installed and the binaries available, you can create a new OpenStack environment from Fuel Web UI.
Consult the workflow I posted a while back on how to create and configure a Mirantis OpenStack environment. While creating your environment you need to select Neutron with tunneling segmentation
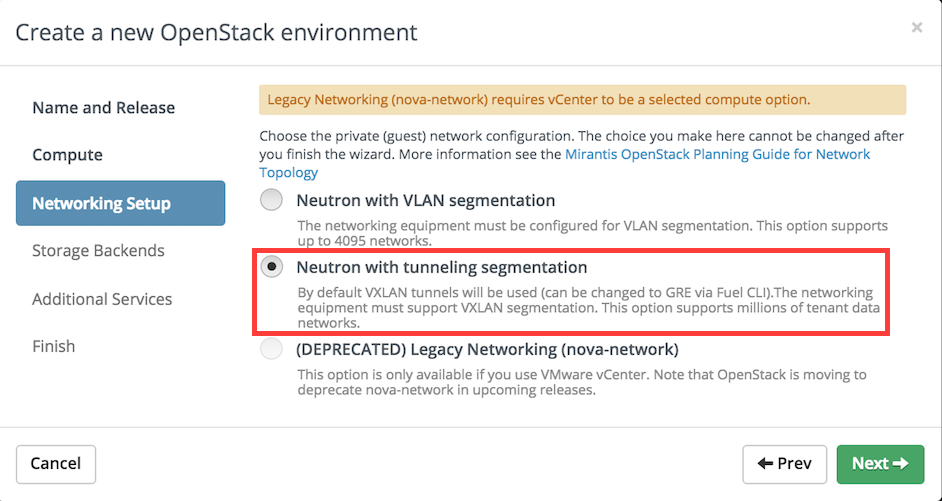
You can also choose to install Ceilometer if you plan to use Heat orchestration with autoscaling.
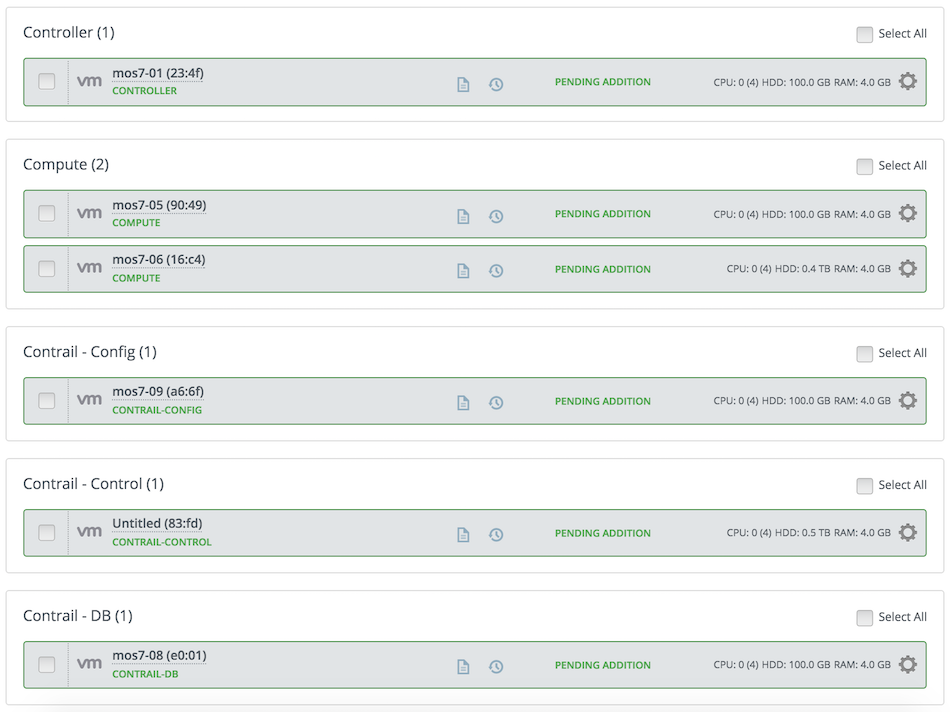
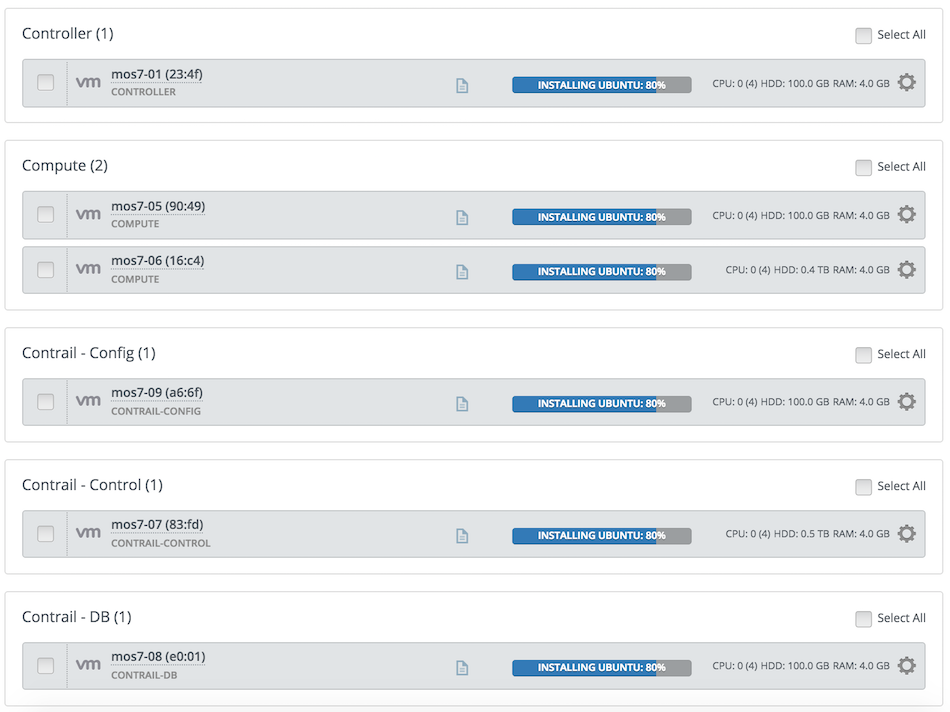
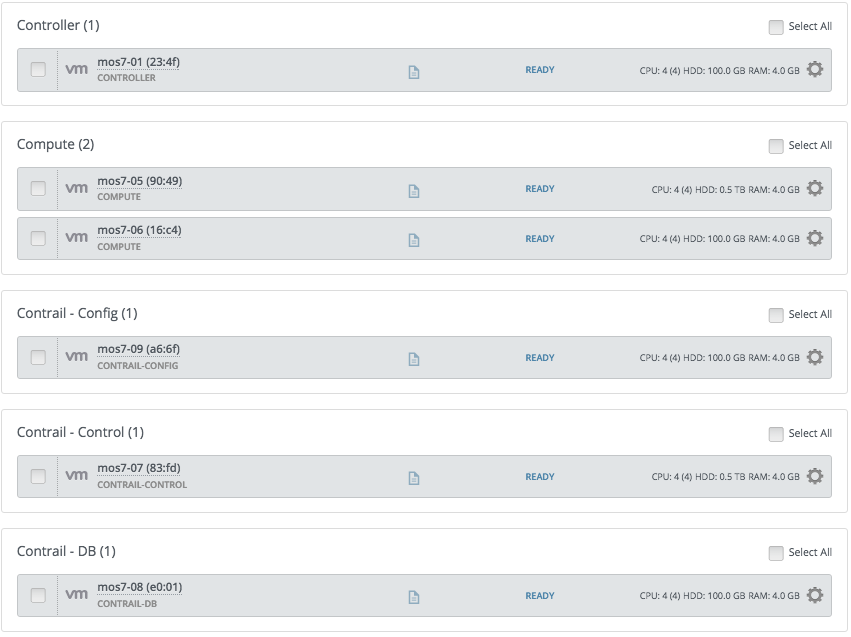
Once your environment is created make sure you have at least the following roles assigned:
- 1 x OpenStack Controller
- 1 x Compute
- 1 x Contrail-Control + Contrail-Config + Contrail Database
I have a bit more nodes in my setup, here is how it looks like
Beware
- The Contrail Database Node require at least 256 GB HD or deployment will fail. It’s a Juniper requirement.
- Each of your node need to use a dedicated Nic or Bond for their Private Network connection. And MTU should be increased up to 9000 if possible to enhance network performance.
This isn’t an Highly available deployment. Config Node HA rely on a majority of nodes agreeing to the view of the system and therefore the formula for node failure tolerance says: To tolerate the failure of “n” nodes, there need to be “2n+1” nodes of that kind in the system.
So A minimum HA configuration for Juniper SDN solution requires following:
- 3 Contrail Database nodes (Zookeeper needs minimum of 3 nodes in a high availability deployment)
- 2 Contrail Control nodes
- 3 Contrail Config nodes (incl. Analytics & Webui)
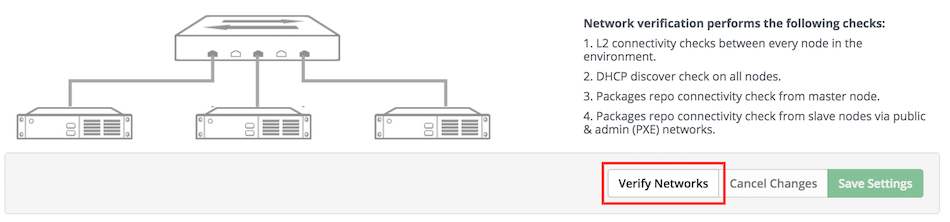
Next check your network settings by clicking on Network Verify at the end of the Networks tab. This is an important step if you don’t want to discover a typo afterward and have to redo the deployment one more time.
Now reach the Settings tab and click in the left column on Fuel Contrail plugin
Enable the plugin and input something like this.
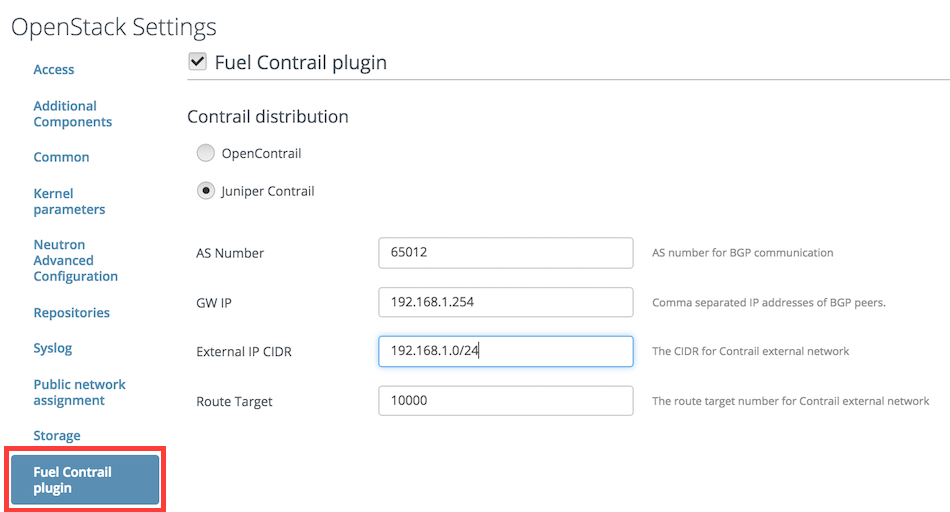
Just replace the values with yours, the GW IP parameter can be a comma-separated list of IP Addresses.
If you’ve verified everything, you can deploy your environement and continue on while it’s deploying.
OpenStack Fuel Deployment
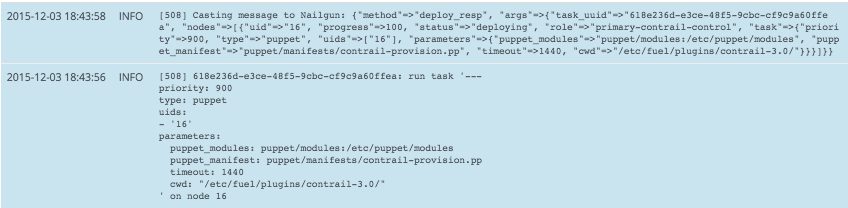
It’s nice to see six systems installed in parallel while you take a break ;)
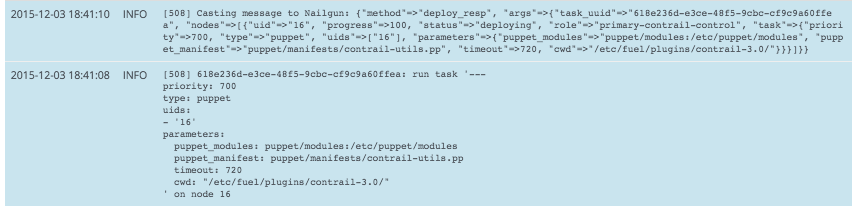
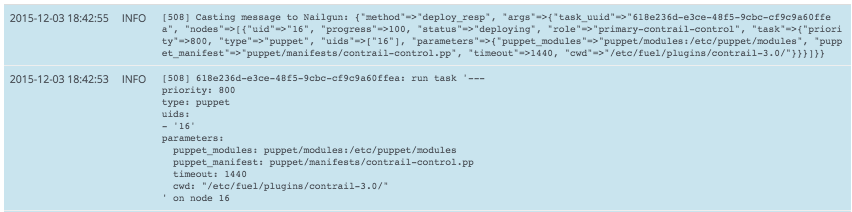
At the very end of the Fuel deployment, the Juniper Contrail plugin will be executed, as you can see below
After a short time you should see all the nodes ready
And a message indicating the deployment was successful
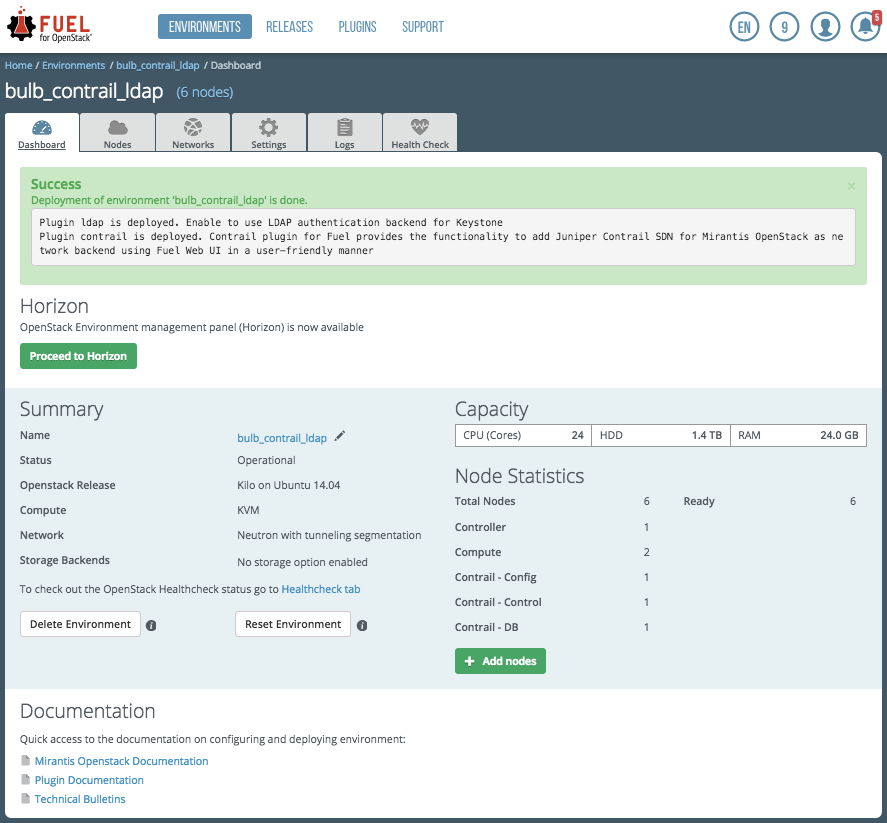
You now have a fully working OpenStack/Juniper Contrail IaaS Environment.
Juniper Web UI
Ok we’ve got a green light from Fuel, but lets make sure everything looks good. The first thing you should do is connecting to the Contrail Web UI available at
https://<PUBLIC IP>:8143
The PUBLIC IP is the same as the one for Horizon Dashboard Access and is normally the second IP in the Public Range. Mirantis architecture load balance access to the Juniper UI using HA Proxy deployed within OpenStack Controllers.
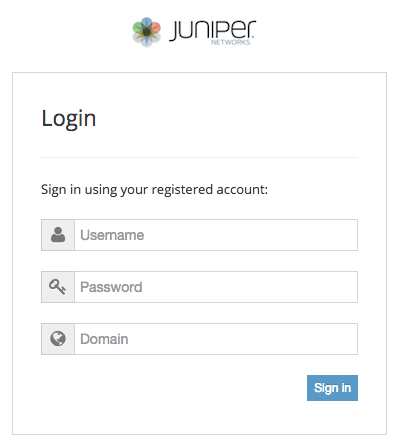
You can login using your OpenStack credentials that you’ve provided in your OpenStack Environment configuration [admin/admin if you haven’t changed it]. Leave the domain empty. You should see now.
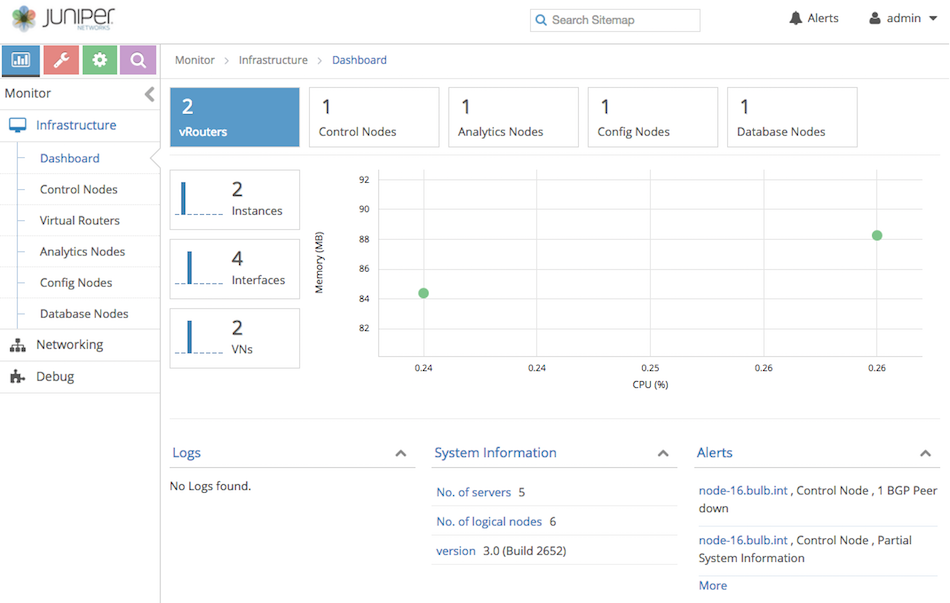
It’s a good overview of your environment, as expected we have one of each: control, analytics, config and database and two vRouters, one on each compute node.
Network Policy
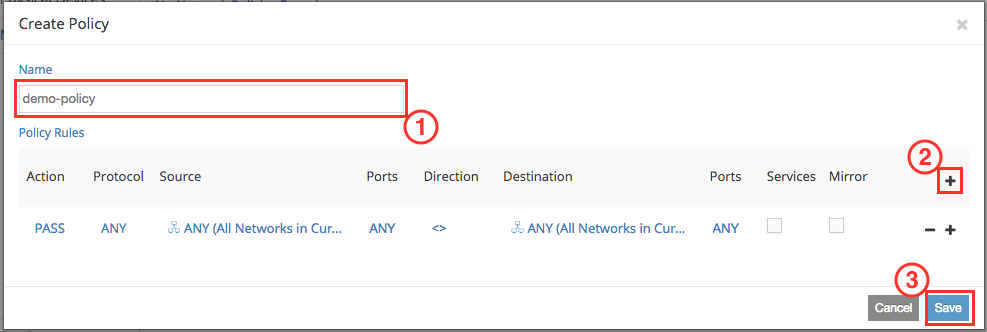
Lets put the environment to good use by creating a new network policy. Click on Configure icon and on Networking > Policies And then on the + sign to create a new network policy
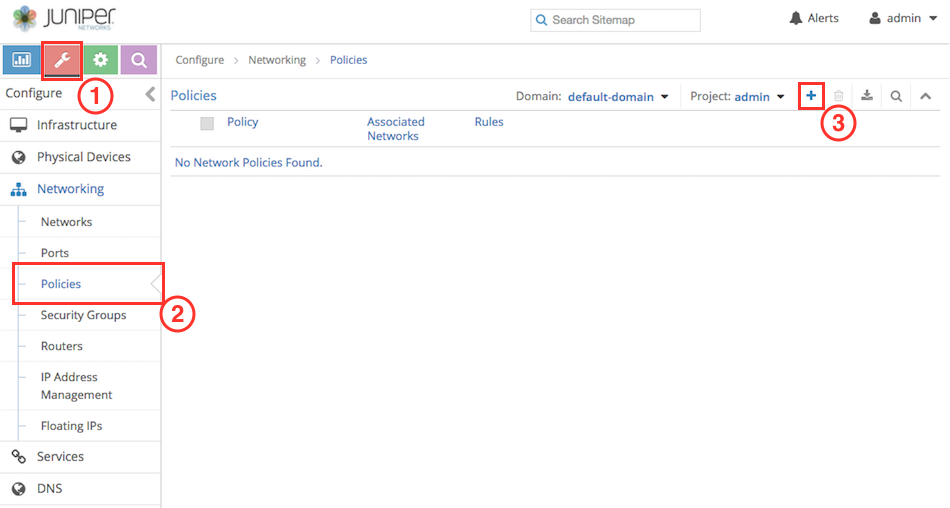
You just have to
- name your policy
- add a default allow rule by clicking on the + sign
- save it
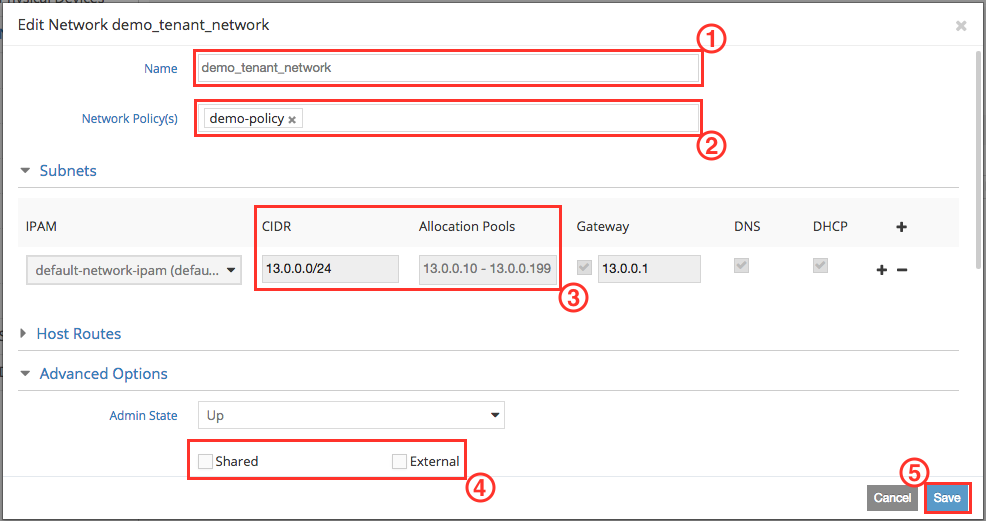
Virtual Network
It’s now time to create a virtual network. Click on Configure Icon and on Networking > Networks. And then on the + sign to create a new virtual network.

To create it you need to
- Name it
- Select the network policy you just created
- Add a subnet, configure the Subnet CIDR and Allocation Pools.
- If you want this network can be shared and declared as external
- Save it.
Note: Don’t forget to provide a proper routing mark in Route Targets section to announce it to public routing table. it is two numbers divided by a semicolon, e.g. 64512:10000.
Here we show how to create logical objects using the Juniper Contrail Web UI, but you could instead use the Neutron abstraction layer to create virtual networks, routers, security groups using OpenStack Horizon Dashboard, CLI or API intead. They will then be implemented by Juniper Contrail Technology leveraging the Contrail OpenStack Neutron plugin.
Floating
Using Juniper Contrail UI, you can specify the exact floating IP you want to make available for your tenant.
Click on Configure > Networking > Floating IPs and click the + sign.
Troubleshooting
Services
supervisord manage Contrail services
contrail-status gives you the status of Contrail services
you can run the following command on any Contrail node to get the current status of all services:
compute# contrail-status
== Contrail vRouter ==
supervisor-vrouter:           active
contrail-vrouter-agent        active
contrail-vrouter-nodemgr      active

contrail-db# contrail-status
== Contrail Database ==
contrail-database:            active
supervisor-database:          active
contrail-database-nodemgr     active
kafka                         active

contrail-config# contrail-status
== Contrail Analytics ==
supervisor-analytics:         active
contrail-alarm-gen            active
contrail-analytics-api        active
contrail-analytics-nodemgr    active
contrail-collector            active
contrail-query-engine         active
contrail-snmp-collector       active
contrail-topology             active

== Contrail Config ==
supervisor-config:            active
contrail-api:0                active
contrail-config-nodemgr       active
contrail-device-manager       active
contrail-discovery:0          active
contrail-schema               active
contrail-svc-monitor          active
ifmap                         active

== Contrail Web UI ==
supervisor-webui:             active
contrail-webui                active
contrail-webui-middleware     active

== Contrail Support Services ==
supervisor-support-service:   inactive (disabled on boot)
unix:///tmp/supervisord_support_service.sockno

contrail-control# contrail-status
== Contrail Control ==
supervisor-control:           active
contrail-control              active
contrail-control-nodemgr      active
contrail-dns                  active
contrail-named                active
To stop/start/restart any of them
service <service-name> <action>
contrail-config# service contrail-webui restart
tap interfaces
When you can’t ping from an OpenStack instance, first open up the Contrail Web UI and go to
Monitor > Infrastructure > Virtual Routers > click on a compute node > Interfaces
to check the status of each virtual machine tap interface.
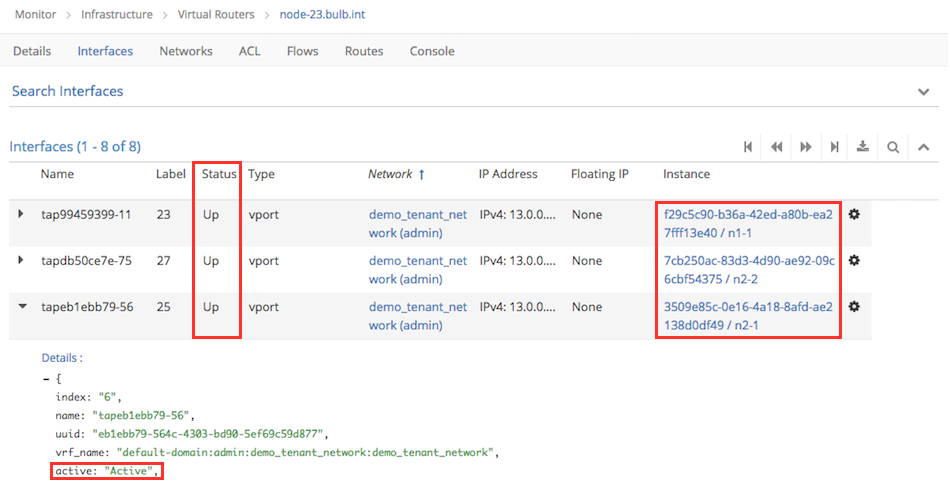
For all my VMs UUID/name listed in the right most column, I can verify their tap are Up and if I open up the details, I also see if it’s active or not. If you have no issues here, you can now focus on other factors that affect traffic, including routing, network policy, security policy and service instances with static routes.
Policies
Network Policies can be the cause of connectivity issues, so check that rules for the attached policies. Permit at least ICMP traffic. Actions are applied in the order in which they are listed, so the allow rule should be on the top. If multiple policies are attached verify ordering is correct.
Click on Monitor > Infrastructure > Virtual Routers > click on a compute node > ACL
to check ACLs rules applied to your compute node.
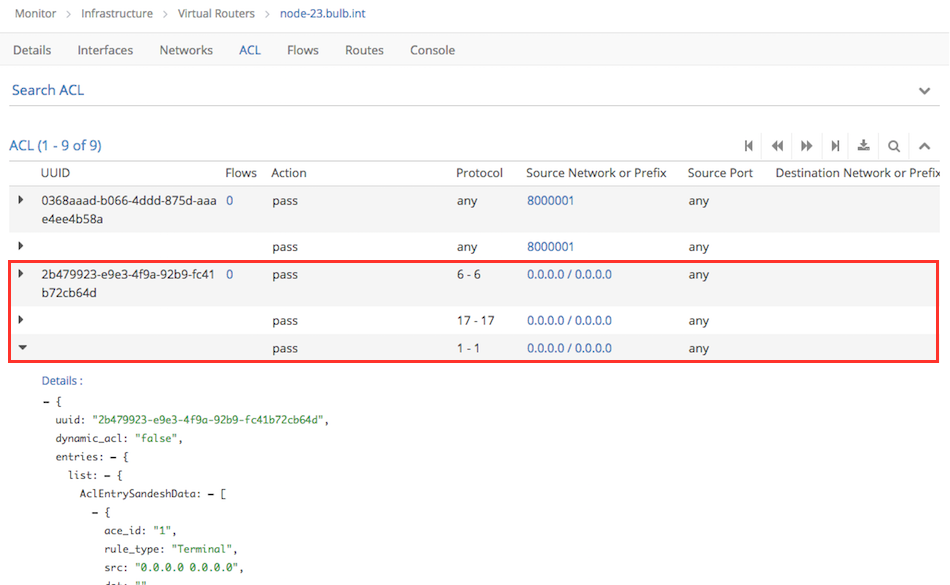
If I open up any of the lines above I see the ACL rule details including traffic direction. Make sure you have all the required ACLs in place to accept the traffic you generate.
Flows
Now open up Monitor > Infrastructure > Virtual Routers > click on a compute node > Flows
If everything is fine you should see your Ping flows
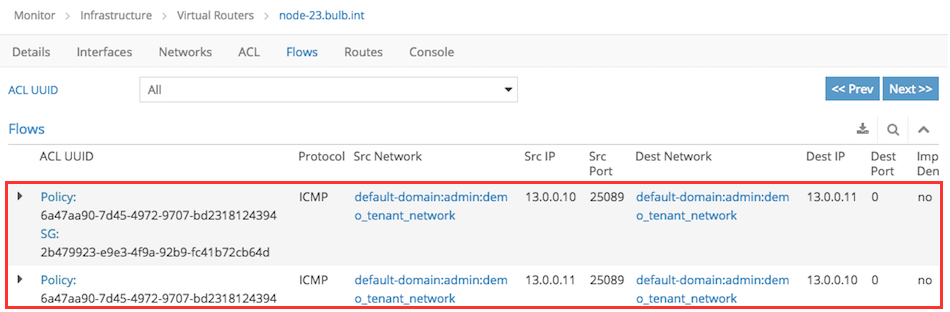
Check the column named Dest Network to make sure you don’t have flows categorised as _UNKNOWN_
You can also look at flows from a compute shell
compute# flow -l
An important metric is the dropped packets statistics that can indicate a wrong configuration
compute# dropstats
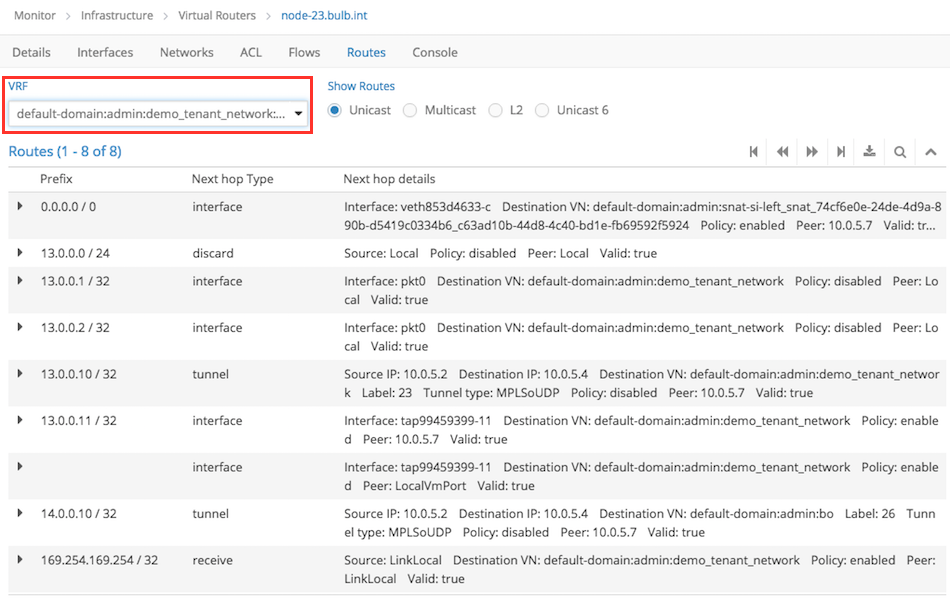
Routes
Have a look at Monitor > Infrastructure > Virtual Routers > click on a compute node > Routes
Select your VRF, demo_tenant_network in my example and verify the routing table.
Good luck ;)
Conclusion
Having an engineered plugin to automate complicate things like SDN deployment and integration will reduce the human factor in the process and greatly increase the overall quality of your cloud.
We aren’t good at repetitive tasks. Fuel Plugin Framework is a really good development environment to ease the integration efforts for technologies like Juniper Contrail.
But Mirantis isn’t stopping there, plugins for MidoNet, Calico, NSX, etc… if not already there will soon be released. Stay tuned …