CoreOS Container Linux
Evolution is drastic in IT, we now see applications running in containers, public clouds eating the world with self-service offerings. The world of computing has to adapt and provide a foundation for this constant innovation. This is exaclty what the CoreOS team have been doing for almost four years. It all started with CoreOS a minimalistic Linux operating system which have recently been renamed Container Linux, which gives a quick overview of what it is built for. It’s only purpose is to be a foundation layer to run your containerized and distributed cloud-native application. Having such a reduced footprint makes it way more secure, it was the driving force behind it. Also by reducing the adherence between your application and the infrastructure operating system, updates becomes way easier, so your environment will be kept secured. Container Linux offer a minimum set of binaries, mostly systemd, etcd, rkt and flannel for networking. Anything else can run as containers on top of Container Linux.
Introduction
Container Linux does not have any package management like apt or yum, it is distributed as an entire disk image which contains just the barebone stuff around the linux kernel. Traditional linux distribution are packaging thousands of Open Source related projects but some users may not want the exact release offered by their vendor. So what could be done to avoid that dependency problem ?
Has I’ve said in the article headline, CoreOS choosed to only package the kernel with sytemd, etcd, rkt, flannel. Plus they offer a mechanism for users to add their own stuff on top, with their choosen version. The mechanism is a container runtime which isolate the application from the operating system, allowing a user to deploy his own application without having to think about what’s already there.
This was pioneered by Google, who’s following this model for years. It is now possible to run different applications with conflicing dependencies on the same host without too much troubles.
If you add on top of that, a transport mechanism for your host to easily fetch the application that he needs to run, a container orchestration solution like Kubernetes, you understand the key role that Container linux plays in that new immutable infrastructure story.
But that’s not the only operating system build on that model, there is the Atomic Host from Project Atomic, Ubuntu Core from Canonical, RancherOS from Rancher, VMware Photon but it was the first to be introduced in 2013.
We’ll talk about other problems Containers and Container Linux solves in the remaining of this article. But first let see how to deploy this operating system.
Deploying Container Linux
Image verification
Before running your own instance of Container Linux, you can verify the image to see if its pristine. First grab CoreOS GPG public key
# curl -O https://coreos.com/security/image-signing-key/CoreOS_Image_Signing_Key.asc
And import it
# gpg --import --keyid-format LONG CoreOS_Image_Signing_Key.asc
Download a Container Linux image and it’s signature file for your environment
# curl -O https://stable.release.core-os.net/amd64-usr/current/coreos_production_qemu_image.img.bz2
# curl -O https://stable.release.core-os.net/amd64-usr/current/coreos_production_qemu_image.img.bz2.sig
In the following command you should now have a message saying Good Signature as shown below, it proves your image wasn’t tampered with in transit.
# gpg --verify coreos_production_qemu_image.img.bz2.sig
gpg: assuming signed data in 'coreos_production_qemu_image.img.bz2'
gpg: Signature made Tue Feb 28 01:12:58 2017 UTC
gpg:                using RSA key 48F9B96A2E16137F
gpg:                issuer "buildbot@coreos.com"
gpg: Good signature from "CoreOS Buildbot (Offical Builds) <buildbot@coreos.com>" [unknown]
gpg: WARNING: This key is not certified with a trusted signature!
gpg:          There is no indication that the signature belongs to the owner.
Primary key fingerprint: 0412 7D0B FABE C887 1FFB  2CCE 50E0 8855 93D2 DCB4
     Subkey fingerprint: 07F2 3A2F 63D6 D4A1 7F55  2EF3 48F9 B96A 2E16 137F
Lets do the real deal now, and deploy Container Linux in different environments.
Vagrant
In the verification step above, we used a QEMU image but there are many other ways to deploy this OS, from ISO or on public clouds for example.
One of the quickest way would be to use Vagrant. Clone the corresponding repository
# git clone https://github.com/coreos/coreos-vagrant.git
# cd coreos-vagrant
Specify your user-date information for your Vagrant virtual machines
# cp user-data.sample user-data
# vi user-data
For example replace the discovery URL
# curl -w "\n" 'https://discovery.etcd.io/new?size=3'
Select the Container Linux chanel (alpha, beta, stable) and the number of nodes you need in
# cp config.rb.sample config.rb
# vi config.rb
Now start your cluster with
# vagrant up
Instead, if you’ve purchased the Vagrant VMware Fusion provider and want to use it instead of VirtualBox
# vagrant up --provider vmware_fusion
When the provisoning process ends, you should be able to check status and connect to your nodes
# vagrant status
# vagrant ssh core-01 -- -A
Check etcd status with, it should have been started by systemd upon boot, and the discovery token should have been used for the 3 nodes to join the cluster.
# etcdctl cluster-health
# etcdctl member list
Done.
OpenStack
If you have an OpenStack cloud account, you can download an image to upload it to Glance
 # wget https://stable.release.core-os.net/amd64-usr/current/coreos_production_openstack_image.img.bz2
 # bunzip2 coreos_production_openstack_image.img.bz2
 # glance image-create --name Container-Linux \
    --container-format bare \
    --disk-format qcow2 \
    --file coreos_production_openstack_image.img \
    --visibility public
To launch a cluster of three instances, first grad the image and network ID and create a cloud config file as documented, then boot them with
# nova boot \
    --user-data ./cloud-config.yaml \
    --image <CONTAINER_LINUX_IMAGE_ID> \
    --key-name coreos \
    --flavor m1.medium \
    --min-count 3 \
    --security-groups default,coreos
    --nic net-id=<NETWORK_ID>
Connect to one of the instance, as core user
# ssh -i core.pem core@<IP_ADDRESS>
Done.
Bare metal
A Complete step by step guide about installing and using matchbox, an HTTP and gRPC service which deploy Container Linux on bare metal using PXE/TFTP/DHCP is the subject of a futur article.
It’s also possible to deploy bare metal nodes using the ISO image provided by CoreOS.
VMware Fusion
We’ve shown earlier how to deploy Container Linux on VMware Fusion while deploying CoreOS Tectonic
Cloud Providers
Google Compute Engine (GCE)
You just need to install gcloud and follow the following guide.
Amazon Web Services (AWS)
Look at the details on the official documentation to deploy Container Linux on Amazon EC2. Tectonic is also fully supported there.
Packet
Packet is a bare metal cloud provider, Container Linux is supported there by the community. It’s possible to easily deploy it thru Packet API or UI.
OVH
They also have available CoreOS stable available on their public OpenStack cloud. Container Linux release is a bit old but due to the nice autoupdate feature, detailled later, you won’t wait long enough before your OpenStack instance reboot in the latest stable version which is 1298.5.0 (Ladybug) as of today, March 15, 2017.
Other public clouds, like Azure or DigitalOcean are also supported.
cloud-config
You can read the official documentation about cloud-config format which is used to configure your node easily at provisioning time. Once done you can validate your file before using it.
If you need to troubleshoot it, log into your node and run
# journalctl -b _EXE=/usr/bin/coreos-cloudinit.
If you make any change after the initial node setup, you can re-run it
# sudo coreos-cloudinit --from-file <USER-DATA-PATH>
Ignition
If you prefer to use the latest tooling instead, called Ignition, it’s documented over here. It runs earlier in the boot process, once in the initramfs when coreos.first_boot=1, it could then do more then it’s counterpart, like disk partitionning and network config for example.
Ignition is being actively developed, consult the list of supported platforms to see if your platform is supported.
Cloud-config uses YAML while Ignition Config is using JSON. But CoreOS provides a Config transpiler (ct) to simplify the process of writting such a configuration file in YAML instead, now called the Container Linux Config, which is a more human readable format then JSON.
Here is an example of such a Container Linux Config file for Packet bare metal cloud
systemd:
  units:
    - name: etcd2.service
      enable: true
      dropins:
        - name: metadata.conf
          contents: |
            [Unit]
            Requires=coreos-metadata.service
            After=coreos-metadata.service

            [Service]
            EnvironmentFile=/run/metadata/coreos
            ExecStart=\nExecStart=/usr/bin/etcd2 \
                --advertise-client-urls=http://${COREOS_PACKET_IPV4_PRIVATE_0}:2379 \
                --initial-advertise-peer-urls=http://${COREOS_PACKET_IPV4_PRIVATE_0}:2380 \
                --listen-client-urls=http://0.0.0.0:2379 \
                --listen-peer-urls=http://${COREOS_PACKET_IPV4_PRIVATE_0}:2380 \
                --discovery=https://discovery.etcd.io/<token>
Such a YAML file cannot use variables, instead you can specify systemd unit file which leverage an Environment file populated by coreos-metadata which fetches information about the machine from the hypervisor or cloud provider. This is currently compatible with Azure, DigitalOcean, Amazon ec2, Google Compute Engine and Packet.
If you have any issues with Ignition, you troubleshoot it like this
# sudo journalctl --identifier=ignition --all
Partitionning
As you’ve seen in the previous section, you’ll find Container Linux almost anywhere you can imagine.
Container Linux brings a nice trick from the way it’s partitionned. So lets talk about that.
When you install Container Linux for the first time, it’s going to create a partition scheme as shown below.
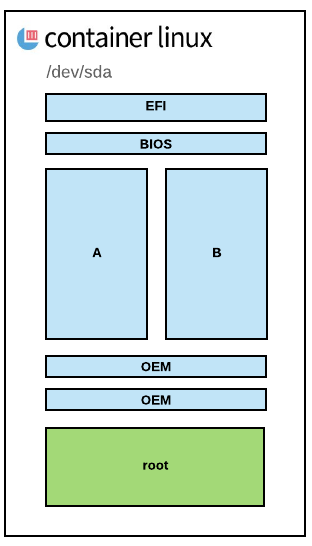
EFI partition is where the boot loader is actually living, it has a small secondary partition so that legacy hosts that have only a BIOS but not EFI on them can still boot.
/usr
On top of that, Container Linux create two main partitions, USR-A and USR-B, to enable seamless upgrade of the OS. The first time an update gets published by CoreOS, the system will download and stage the image in a /temp directory and do GPG validation to make sure it hasn’t been compromised. It will then place that file in the USR-B partition, when it’s done, we will get a message back that an update is ready to be rolled out with a reboot, signaled by a D-Bus message. During the reboot the EFI bootloader will look at the metadata on USR-A and USR-B, and will make a decision on which one to actually boot, extracted from GRUB configuration. If for some reason the USR-B partition fails to boot, we can fall back to USR-A if necessary. Later on, similarly if another update comes in, same process applies on Partition USR-A which gets a new release. Container Linux is pivoting between these two partitions.
Container Linux will check for updates 10 minutes after booting and every hour but you can trigger a manual update with
# update_engine_client -check_for_update
To see the update happening
# journalctl -fu update-engine
This update mechanism is based on Google’s open source Omaha protocol. This client/server update protocol is used to updates products like ChromeOS, Chrome Browser, Google Earth. CoreOS have developed Open Source bindings in Go.
/usr/share/oem
Next the purpose of the OEM partitions is to store small amount of data specific to the mechanism used to deploy Container Linux. On VMware hypervisors, you’ll get the vmware tools daemon in that partition which is unecessary on other environment. It offers an ability to make slight changes while still keeping the majority of what Container Linux is actually doing static across all environments.
/
And finally one large last root partition which is expanded at boot time to the end of the disk. So that if you deploy a 5Gb image into a 20GB disk, the root partition will then expand to the remaining available disk space without changing the location of any of the rest of the partitions. The root partition is where all the content that you write to that host is going to live. For example container are going to be stored in that partition, like temporary files or etcd content, they are all going into the root partition which persist across reboots.
Cheatsheets
Container Linux is pretty similar to any Linux operating system, lets review in this chapter some specific commands, good to know to operate a cluster of machines. I’ll expand this section as soon as I find out some other important commands to remember.
CoreOS
Check the Container Linux release, number of days from July 13, 2013 (CoreOS epoch)
# cat /etc/os-release
Check components versions
# etcd2 --version
# rkt version
# docker --version
Locksmith is a daemon used to set locks for controlling the reboot strategy which is defined in /etc/coreos/update.conf as follows
-
etcd-lock- reboot only after taking a successful lock -
reboot- reboot immediately without taking a lock -
best-effort- if etcd is running, then useetcd-lockotherwise fall back to simple reboot -
off- no reboot
You can check its status
# locksmithctl status
Locksmith is backed by etcd and works in tandem with the update-engine. Simply said it’s the thing that tells the system to reboot.
Files
In this section we’ll give you a list of the important Container Linux files, helpful for troubleshooting
| Path | Comment |
|---|---|
/usr/lib64/systemd/system |
systemd unit files |
/usr/lib64/systemd/network |
network unit files |
/usr/share/oem |
provider cloud-config.yaml executed before the user-provided one |
/etc/coreos/update.conf |
release channel and update strategy |
/etc/machine-id |
machine ID for this node |
/etc/systemd/system |
user-written unit files in here and drop-ins in foo.service.d/*.conf
|
/etc/systemd/network |
user-written network unit files |
/etc/environment |
public COREOS_PUBLIC_IPV4 and private COREOS_PRIVATE_IPV4 IP address |
/var/log/journal |
systemd-journal |
/run/systemd/system |
runtime units |
/run/flannel |
flannel network configuration |
Systemd
Tail the etcd logs
# Journalctl –u etcd2.service –f
list 100 errors
# journalctl –p err –n 100
Find out the amout of space the journal is currently occupying on disk
# journalctl --disk-usage
show failed systemd units
# systemctl --failed
reload systemd configuration
# sudo systemctl daemon-reload
update-engine service status / restart
# sudo systemctl start update-engine.service
# sudo systemctl restart update-engine.service
restart networkd
# sudo systemctl restart systemd-networkd.service
Conclusion
Container Linux is a disruptive Operating system built from the ground up for the cloud era, lightweight in terms of memory and disk utilization, embedding just the required components to become a foundation layer for microservices.
Its elegant and efficient update mechanism set it apart from the crowd and keep it secure. Its integrated distributed key-value store, etcd, allows to have a single source of thruth for all the required configuration metadata.
It’s heavily based on systemd, so with Container Linux you have just enough building blocks to deploy your cloud native application on a distributed cluster on bare metal, or on the many supported public or private clouds.
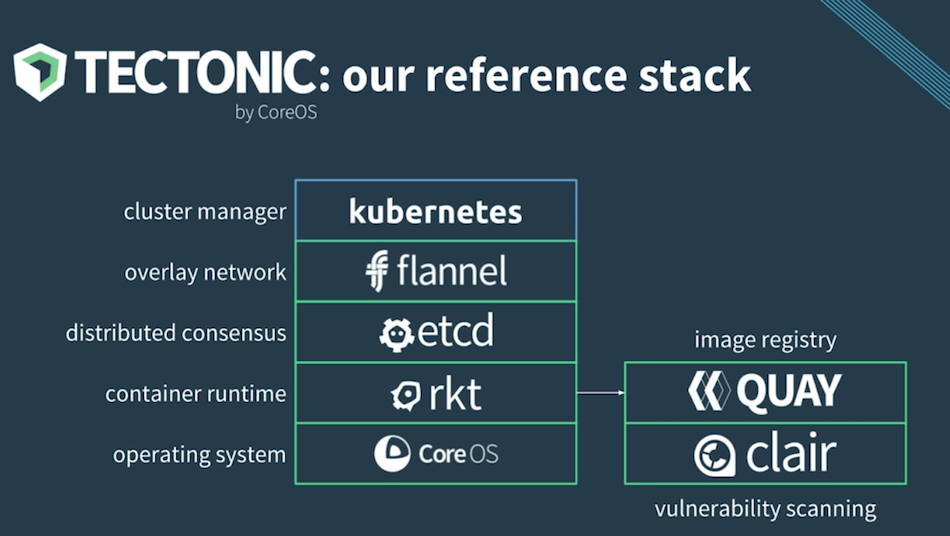
Container Linux is a nice piece of the CoreOS Tectonic puzzle which also include Kubernetes, flannel, etcd, rkt, Quay, Clair and many other Open Source projects.
Links
- Container Linux documentation
- Container Linux release channels
- Systemd documentation
- Ignition documentation
- Container Linux Config Transpiler overview
- coreos-metadata repository
books
- Mastering CoreOS - february 2016
- Learning CoreOS - march 2016
- CoreOS cookbook - to be published may 4, 2017
- CoreOS in action - to be published around march 2017
youtube
- CoreOS an overview - Brian Harrington (1h)
- Anatomy of a CoreOS update - Brian Harrington (30’)