OpenStack Salt
After having reviewed Salt, Salt Formulas and reclass, it’s now time to put everything together to deploy OpenStack from openstack-salt project which use an elegant Model-Driven Architecture stored in a git repository which can be used for the life cycle management, auditing and documenting your infrastructure.
Imagine a service oriented, repeatable, documented tooling to deploy OpenStack which also can be used to
- Deploy monitoring
- Update OpenStack config
- Audit the deployment through git workflow
- Document it from a single source of truth
- Upgrade OpenStack
With the following core principles
- Atomicity - services can be spread around as you wish
- Reusability/replacibility - service definition are reusable and can be replaced without affecting neigbouring services.
- Roles - services implement various roles, most often client/server variations.
- Life Cycle Management - never at rest your cloud environment will easily evolve.
Wouldn’t it be nice ? That’s exactly what we’ll show you in this article. With Salt, formulas and reclass we will store the data model of our infrastructure in a git repository. Making change to the instracture will then consist of git workflow:
- Fork the Model Driven Architecture (MDA) git repository which contain all the reclass data (classes and control node)
- Clone it
- Update it
- Commit your changes to the repository
- Create a pull request
- Apply changes to your infrastructure.
So from now on you’re making your changes in one place, and obviously never touching again any nodes directly. Isn’t it DevOps at its core ?
We improve the way we provision and operate the infrastructure, with a single toolset, but the general principles of the OpenStack Control Plane architecture stays almost the same with 3 controllers, stateless API endpoint load balanced by HAProxy, MySQL deployed with a single node for write and 2 more for reads.
But we also simplify the HA architecture by removing Pacemaker and Corosync, all the services are now active/active, there is only keepalived which migrate the VIP when necessary. It’s possible because instead of using Neutron L3 Agent which require active/passive mode, OpenContrail is used.
Services can now be spread on different servers, for example MySQL Galera can be running in its own VMs, we can model the infrastructure as required.
Salt Master installation
As a starter we need to prepare our Salt Master with the required information to drive the deployment. We could have automated this process but doing it step by step helps to understand the different moving parts involved. But if you prefer you’ll find a Heat template which does all of this for you on top of an OpenStack Cloud. A howto guide is available if you want to deploy OpenStack on top of OpenStack.
Provision a Ubuntu 14.04 server anywhere you want and follow our step by step approach to build your Salt Master node.
Update your system and make sure you have curl and wget installed
# apt-get update
# apt-get upgrade
# apt-get install curl wget
Note: Each command that start only with # should be executed on the Salt Master, if a hostname is specified make sure you switch to this node to run the specified command.
Add the tcpcloud nightly built repository
# echo "deb [arch=amd64] http://apt.tcpcloud.eu/nightly/ trusty main security extra tcp tcp-salt" > /etc/apt/sources.list
# wget -O - http://apt.tcpcloud.eu/public.gpg | apt-key add -
# apt-get clean
# apt-get update
Install Salt master and reclass
# apt-get install -y salt-master reclass
Install all the required Salt Formulas
# apt-get install -y salt-formula-linux salt-formula-reclass salt-formula-salt salt-formula-openssh salt-formula-ntp salt-formula-git salt-formula-graphite salt-formula-collectd salt-formula-sensu salt-formula-heka
# apt-get install -y salt-formula-horizon salt-formula-nginx salt-formula-memcached salt-formula-python salt-formula-supervisor salt-formula-sphinx
Configure your master file_root where the above formulas have been installed /usr/share/salt-formulas/env. And tell Salt to use reclass as an external node classifier.
# cat << 'EOF' >> /etc/salt/master.d/master.conf
file_roots:
  base:
  - /usr/share/salt-formulas/env
pillar_opts: False
open_mode: True
reclass: &reclass
  storage_type: yaml_fs
  inventory_base_uri: /srv/salt/reclass
ext_pillar:
  - reclass: *reclass
master_tops:
  reclass: *reclass
EOF
Clone your Model Driven Architecture repository. A production environment would use its own forked repository, but lets keep it simple for now.
# git clone https://github.com/tcpcloud/workshop-salt-model.git /srv/salt/reclass -b master
Configure reclass
# mkdir /etc/reclass
# cat << 'EOF' >> /etc/reclass/reclass-config.yml
storage_type: yaml_fs
pretty_print: True
output: yaml
inventory_base_uri: /srv/salt/reclass
EOF
Import all Salt Formulas service metadata into your reclass subdirectory
# mkdir -p /srv/salt/reclass/classes/service
# for i in /usr/share/salt-formulas/reclass/service/*; do
for> ln -s $i /srv/salt/reclass/classes/service/
for> done
Install and configuring the minion side of your Salt Master
# apt-get install -y salt-minion
# mkdir -p /etc/salt/minion.d
# cat << "EOF" >> /etc/salt/minion.d/minion.conf
id: cfg01.workshop.cloudlab.cz
master: localhost
EOF
id should reflect the config node name declared in /srv/salt/reclass/nodes/.
Restart your Salt Master and Minion services
# service salt-master restart
# rm -f /etc/salt/pki/minion/minion_master.pub
# service salt-minion restart
Finish by generating your nodes into the /srv/salt/reclass/nodes by running the following state
# salt 'cfg01*' state.sls reclass.storage
Refresh the Pillar data on all your nodes
# salt '*' saltutil.refresh_pillar
Before applying your states to your control node, check that everything looks good
# reclass-salt --top
Also try getting information out of your Minion
# salt "cfg01.workshop.cloudlab.cz" grains.get ipv4
cfg01.workshop.cloudlab.cz:
- 127.0.0.1
- 172.16.10.100

# salt-call state.show_top
local:
    ----------
    base:
        - git
        - linux
        - ntp
        - salt
        - openssh
        - reclass
        - horizon
        - nginx
        - collectd
        - sensu
        - heka

# salt-call pillar.items
<snip>

# salt-call grains.items
<snip>
You should be good to go !!!
Salt Master provisioning
Great, it is now time to apply our Salt States to our Master.
To better understand the provisioning of our Master node, let’s now run our Salt States (SLS) one by one
Start by the linux state which configure the linux OS, things like
- apt repository and corresponding keys
- timezone
- /etc/hosts add mon01, mtr01, log01, web01, ctl[1|2|3], cmp[1|2] with [domainname workshop.cloudlab.cz]
- http/https/ftp proxies
- Install packages: python-apt, vim-nox and apt-transport-https
- users
- networking
For our first state run, I’ll show you 2 tricks, first look at the details of the state
salt-call state.show_sls linux
Run a test dry
salt-call state.sls linux test=True
Lets do the real deal now
salt-call state.sls linux
Everything should be green, re-run it if that’s not the case.
update Timezone
The model repository which I used configured my node in the Europe/Prague timezone, it’s a good example to show you how to update your infrastructure.
It’s pretty simple, just add the correct Europe/Paris timezone in /srv/salt/reclass/nodes/cfg01.workshop.cloudlab.cz.yml, it will override the one inherited from the model metadata, it’s the base principle of the hierarchical node classifier, reclass.
# vi /srv/salt/reclass/nodes/cfg01.workshop.cloudlab.cz.yml
<snip>
linux:
system:
  name: cfg01
  domain: workshop.cloudlab.cz
  timezone: Europe/Paris
<snip>
re-run your state, you should see 1 changed, details below
# salt-call state.sls linux
<snip>
----------
      ID: Europe/Paris
Function: timezone.system
  Result: True
 Comment: Set timezone Europe/Paris
 Started: 17:46:29.187478
Duration: 98.14 ms
 Changes:
          ----------
          timezone:
              Europe/Paris
<snip>
Check it has been configured
ctl01# cat /etc/timezone
Europe/Paris
It is really easy to audit your environment by looking at the repository diff.
# cd /srv/salt/reclass
# git diff
diff --git a/nodes/cfg01.workshop.cloudlab.cz.yml b/nodes/cfg01.workshop.cloudlab.cz.yml
index ac4372f..0eb95c2 100644
--- a/nodes/cfg01.workshop.cloudlab.cz.yml
+++ b/nodes/cfg01.workshop.cloudlab.cz.yml
@@ -30,6 +30,7 @@ parameters:
     system:
       name: cfg01
       domain: workshop.cloudlab.cz
+      timezone: Europe/Paris
In a production environment we would have sent a Pull request to update the upstream repository to version control our changes.
OpenSSH state ensure there is a proper setting of OpenSSH as well as injecting the SSH key for users
# salt-call state.sls openssh
The next step configure our Salt Minion
# salt-call state.sls salt.minion
Now that our minion is configured you should find the following grains
# salt-call grains.item roles
local:
----------
roles:
    - git.client
    - reclass.storage
    - sensu.client
    - ntp.client
    - linux.storage
    - linux.system
    - linux.network
    - salt.minion
    - salt.master
    - collectd.client
    - heka.server
    - horizon.server
    - openssh.client
    - openssh.server
    - nginx.server
salt-master state ensure our master is up to date and running, create a directory structure, /srv/salt/env/ and symlink /srv/salt/env/prd to /usr/share/salt-formulas/env. It also ensure our formulas packages are up to date.
# salt-call state.sls salt.master
Finish all of this by restarting your Salt Minion
# service salt-minion restart
Maybe next time you’ll run the heat template but at least you know what’s happening and you can provision a control node everywhere you want, including on vSphere where heat templates aren’t welcome.
Next time, once your Salt Master is installed and configured, you can provision it like this
# salt 'cfg01*' state.sls linux,openssh,salt
# salt 'cfg01*' state.sls reclass.storage
# salt '*' saltutil.refresh_pillar
Salt Formulas
Let me give you a quick overview of the important directories within your Salt Master
/srv/salt/env/prd contain all the reusable Salt formulas, always the same for all deployments, delivered as packages for production, or from git repositories for development, to avoid to have to rebuild the packages each time.
You can list all of them with
# dpkg -l | grep formula
or get a list of what’s inside a specific one
# dpkg -L salt-formula-ntp
Note: Each formula contains support metadata, to define which support services should be configured, which metrics should be collected using collectd, which logs should be collected by Heka, which check should be run by Sensu, how to document this component, etc. All of this is defined in the salt-formula-<name>/meta directory, and then automatically generated from the model.
reclass model
/srv/salt/reclass is a clone of the infrastructure metadata model repository. You can check the origin with
# git remote -v
This content is specific for each deployment and contains IP Addresses, encrypted password, roles assignement, etc… which should be edited to fit your infrastructure requirements.
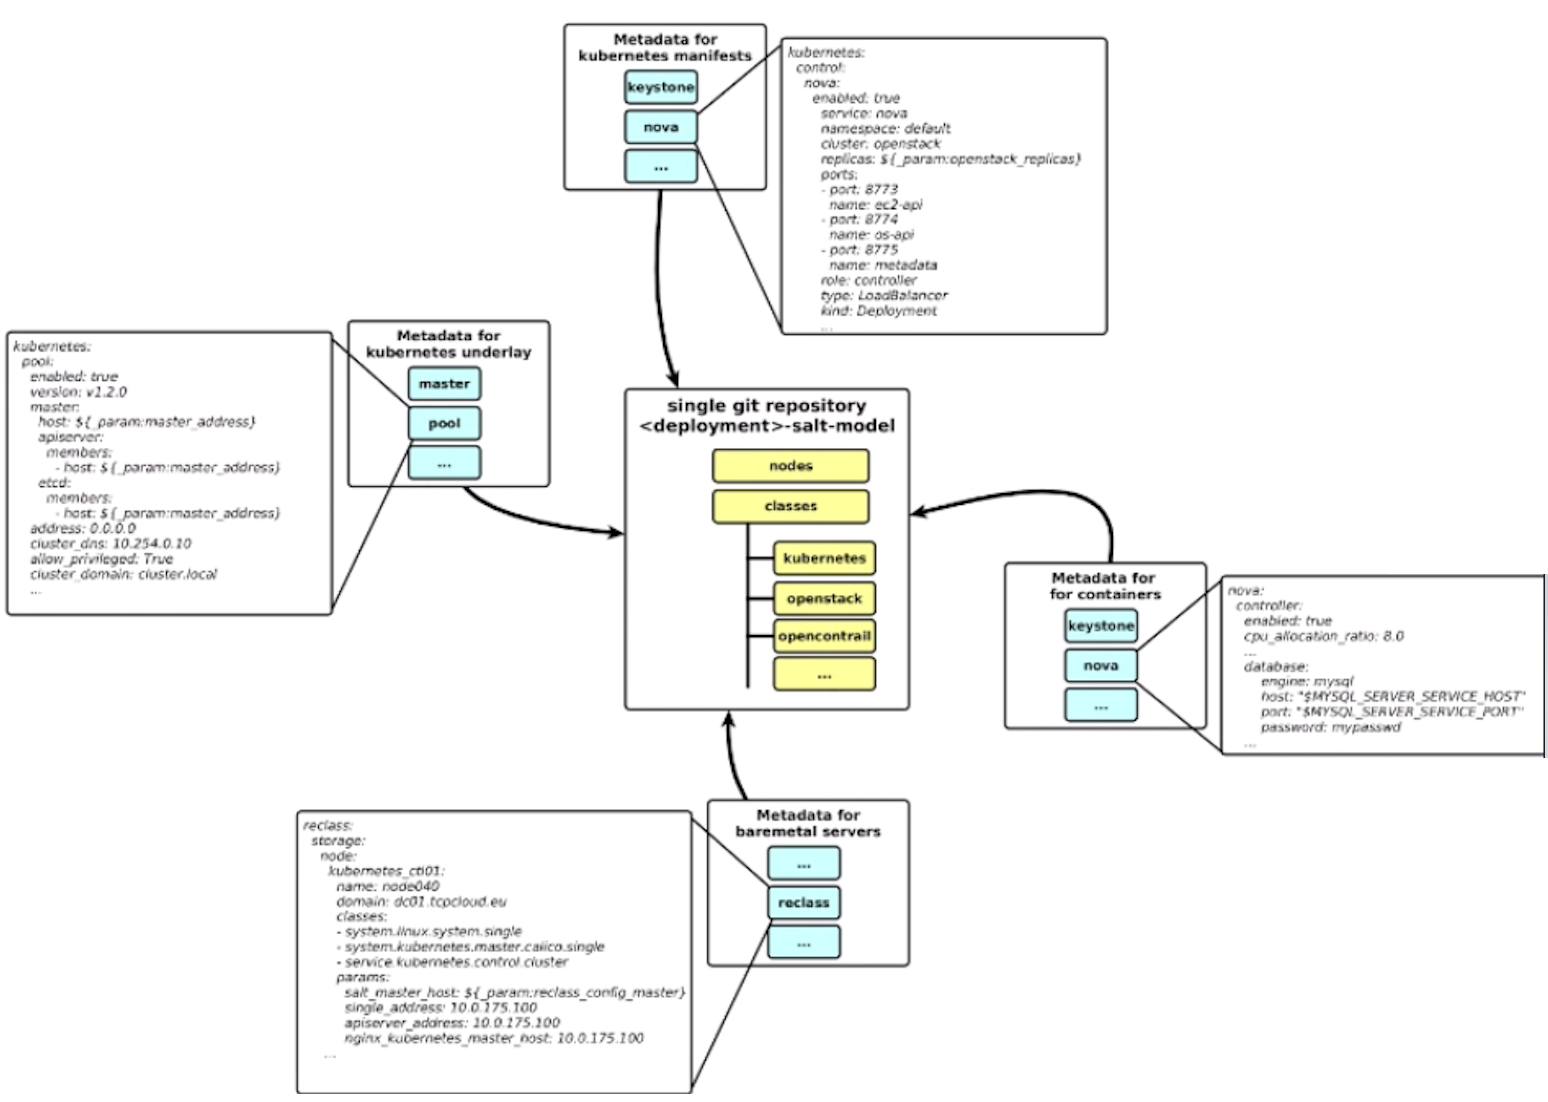
Our Model-driven Architecture is structured like shown below. I’m just showing the relevant stuff that you may have to touch for your deployment after forking the repo, see the README.rst for further details.
/srv/salt/reclass
|-- classes/
|   |-- service/
|   `-- system/
|       `-- reclass/storage/system/
|                            `-- workshop.yml
|       `-- openssh/server
|                     `--  single.yml
|       `-- openstack
|           |-- common
|           |-- compute
|           `-- control
|       `-- billometer/server
|                     `--  single.yml
|       `-- graphite/
|-- nodes/
|   |-- cfg01.domainname.
|   `-- _generated
|-- verify.sh
`-- README.rst
| path | details |
|---|---|
classes/service/... |
symlinks to salt formulas metadata folder, created at Salt Master provisioning time. Do not touch that part which comes from Salt Formulas packages |
classes/system/reclass/storage/system/workshop.yml |
nodes definitions used to populate nodes/_generated directory, IP addresses, domain name. This yaml file is defined in our Salt Master Node, nodes/cfg01.workshop.cloudlab.cz.yml definition when we attach the class system.reclass.storage.system.workshop to it |
classes/system/openssh/server/single.yml |
linux users and ssh keys |
classes/system/openstack/common |
all openstack parameters, available to all nodes, passwords, IP addresses, domain name |
classes/system/openstack/compute |
openstack compute related parameters, e.g. novnc proxy |
classes/system/openstack/control |
openstack controller specific parameters, e.g. id router for keepalived. |
classes/system/billometer/server/single.yml |
passwords |
classes/system/graphite/ |
passwords |
nodes/cfg01.domainname. |
definition of Salt Master itself, model repository, timezone, hostname, domainname, IP addresses, repository, Salt accept policy |
_generated |
all nodes definitions, dynamicaly generated on Salt Master from classes/system/reclass/storage/system/workshop.yml which is declared in the classes of nodes/cfg01.workshop.cloudlab.cz.yml. So the filename can be changed there. |
verify.sh |
generate and validate reclass-salt-model in isolated environment (docker, kitchen-docker) |
Note: Text in bold above is something you should edit to customize to your environment.
OpenStack deployment
Let start by deploying the OpenStack Control Plane. From your Salt Master check that all Ubuntu 14.04 Minion keys has been accepted
# salt-key
Accepted Keys:
cfg01.workshop.cloudlab.cz
ctl01.workshop.cloudlab.cz
ctl02.workshop.cloudlab.cz
ctl03.workshop.cloudlab.cz
<snip>
Denied Keys:
Unaccepted Keys:
Rejected Keys:
We could orchestrate the overall deployment with salt orchestrate
# salt-run state.orchestrate orchestrate
but for learning purpose, we’ll do it step by step instead.
Controllers > ntp
Start the deployment by installing and configuring ntp on the control plane
# salt "ctl*" state.sls ntp
You can check the metadata associated with this formula
# salt "ctl*" pillar.item ntp
To check ntp status
# salt 'ctl*' service.status ntp
ctl02.workshop.cloudlab.cz:
    True
ctl01.workshop.cloudlab.cz:
    True
ctl03.workshop.cloudlab.cz:
    True
Controllers > linux | salt.minion | openssh
Start by applying the following states to your controllers
salt 'ctl*' state.sls linux,salt.minion,openssh
We’ve already detailed the linux state which does basic operating system configuration.
The salt.minion state install salt-minion and python-m2crypto packages, configure from a template your minion in /etc/salt/minion.d/minion.conf, and create a /etc/salt/grains.d/ directory.
Finally the openssh state does the following
- install openssh server and client
- can update the SSH banner
- ensure the server is running
- create
/root/.ssh - inject a private key into
/root/.ssh/id_rsa - configure ssh server and client
- ensure the server is running
- add
git.tcpcloud.euknown host from its fingerprint which can be modified inclasses/system/openssh/client/lab.yml
Controllers > keepalived
Provision keepalived, a daemon for cluster VIP based on VRRP, on the first controller for now
# salt 'ctl01*' state.sls keepalived
Check the IP Addresses on this controller
# salt 'ctl01*' cmd.run 'ip a'
<snip>
2: eth0: <BROADCAST,MULTICAST,UP,LOWER_UP> mtu 1500 qdisc pfifo_fast state UP group default qlen 1000
    link/ether 00:0c:29:ca:d4:c1 brd ff:ff:ff:ff:ff:ff
    inet 172.16.52.201/24 brd 172.16.52.255 scope global eth0
       valid_lft forever preferred_lft forever
    inet 172.16.10.254/32 scope global eth0
       valid_lft forever preferred_lft forever
    inet6 fe80::20c:29ff:feca:d4c1/64 scope link
       valid_lft forever preferred_lft forever
It confirm that our 172.16.10.254 VIP is on eth0, if you need to change where the VIP gets created just edit /srv/salt/reclass/classes/system/reclass/storage/system/workshop.yml.
If you edit this file you’ll have to update your generated nodes definitions by running again
# salt 'cfg01*' state.sls reclass.storage
This command also tries to pull from your git repo.
You can check the VIP address definition which comes from Pillar data defined in our model /srv/salt/reclass/classes/system/openstack/common/workshop.yml
# salt 'ctl01*' pillar.get keepalived:cluster:instance:VIP:address
ctl01.workshop.cloudlab.cz:
    172.16.10.254
You can now run it on controllers 2 and 3
# salt 'ctl0[23].*' state.sls keepalived
Controllers > Gluster
Gluster is used to store Keystone fernet tokens to avoid to copy the signed tokens all around, it’s only few small files. Gluster is also used by Glance to store images for small deployment to avoid to deploy swift or any other backend like Ceph for example, images are instead distributed around by Glusterfs.
Gluster provisioning is done over several steps. The first one install packages, ensure it is running, and create the required volume directories
# salt 'ctl*' state.sls glusterfs.server.service
Now Prepare the Glusterfs volumes, beware run this only on one controller.
Note: This time we will run the state locally from the controller itself, it’s not a best practice but it’s a good way to learn. You’ll get a detailled live reporting of the the actions taken on the controller by running it locally. While doing a production deployment you should not SSHing to any node to change anything but run everything from your Salt Master.
ssh in to ctl01 to run
ctl01# salt-call state.sls glusterfs.server.setup
Check Gluster status
ctl01# gluster peer status
Number of Peers: 2

Hostname: 172.16.10.103
Uuid: 622f8b69-cf0e-411f-be29-bbf40fe3cc8f
State: Peer in Cluster (Connected)

Hostname: 172.16.10.102
Uuid: 9878a625-7011-4e28-9070-c58f7960acd1
State: Peer in Cluster (Connected)

ctl01# gluster volume status
Gluster process                                 Port  Online  Pid
------------------------------------------------------------------------------
Brick 172.16.10.101:/srv/glusterfs/glance       49152   Y   3063
Brick 172.16.10.102:/srv/glusterfs/glance       49152   Y   8022
Brick 172.16.10.103:/srv/glusterfs/glance       49152   Y   7047
<snip>
In the output of the last command above, everything should be online (Y).
If any volume provisioning fails or isn’t online, delete the volume and re-run the above setup state
ctl01# gluster volume stop glance
ctl01# gluster volume delete glance
ctl01# gluster volume stop keystone-keys
ctl01# gluster volume delete keystone-keys
ctl01# salt-call state.sls glusterfs.server.setup
These two volumes will be mounted later on, when we will run the glusterfs.client state in the following directories
/srv/glusterfs/glance is mounted on /var/lib/glance/
/srv/glusterfs/keystone-keys is mounted on /var/lib/keystone/fernet-keys
Controllers > RabbitMQ
Let’s now install and configure RabbitMQ on our cluster, which is a critical component of the overall architecture, it takes few minutes.
# salt 'ctl*' state.sls rabbitmq
Metadata is defined in
# vi /srv/salt/reclass/classes/service/rabbitmq/server/cluster.yaml
Note: ${_param:cluster_local_address} is defined out of the single_address parameter which is the IP of the current node defined in /srv/salt/reclass/classes/system/reclass/storage/system/workshop.yml, this is used by all formulas.
When your Rabbitmq cluster is deployed, you can check its state
# rabbitmqctl cluster_status
[{nodes,[{disc,[rabbit@ctl01,rabbit@ctl02,rabbit@ctl03]}]},
 {running_nodes,[rabbit@ctl02,rabbit@ctl03,rabbit@ctl01]},
 {cluster_name,<<"openstack">>},
 {partitions,[]},
 {alarms,[{rabbit@ctl02,[]},{rabbit@ctl03,[]},{rabbit@ctl01,[]}]}]
Compared to Fuel the deployment of Rabbitmq here is pretty similar, apart from Pacemaker which is now gone, so starting/stopping the message bus is simpler
# service rabbitmq-server [status|stop|start]
Controllers > MySQL Galera
Let’s now deploy our database cluster, starting locally on ctl01, with -l info to get more details on what’s happening.
ssh to ctl01 to run
ctl01# salt-call state.sls galera -l info
Galera deployment impose to start it on one node first, others will then join the cluster afterward.
Once the previous command terminate, deploy the remaining controllers
# salt 'ctl0[23]*' state.sls galera
Galera state also creates the database tables and users for OpenStack services.
Check Galera status
ctl01# salt-call mysql.status
<snip>
wsrep_incoming_addresses:
    172.16.10.103:3306,172.16.10.102:3306,172.16.10.101:3306
<snip>
or with
ctl01# mysql -pworkshop -e'SHOW STATUS;'
<snip>
| wsrep_local_state_comment                | Synced                                                   |
| wsrep_cert_index_size                    | 2                                                        |
| wsrep_causal_reads                       | 0                                                        |
| wsrep_incoming_addresses                 | 172.16.10.103:3306,172.16.10.102:3306,172.16.10.101:3306 |
<snip>
If the status is wrong, take a look at the troubleshooting doc.
Controllers > HAProxy
Now comes HAProxy
# salt 'ctl*' state.sls haproxy
This state starts HAProxy on each controller and load balance Keystone, Nova, Glance, Cinder, Neutron, Heat, Rabbitmq, OpenContrail services. Special load balancing rules are configured for the Galera cluster which is in active/backup mode to avoid consistency issues. You can review its configuration at /etc/haproxy/haproxy.cfg
Check HAProxy is really running on all our controllers
# salt 'ctl*' cmd.run 'ps aux | grep haproxy'
For a particular service, you can check that haproxy is listening on its port
# salt 'ctl*' cmd.run 'netstat -tulnp | grep 5000'
As you can see HAProxy is listening on keepalived VIP on all three nodes, instead in the pacemaker case where it is only started on the active node,
HAProxy bind on the VIP, on the controllers that doesn’t have it, it’s also possible because the following parameter has been set inside /etc/sysctl.conf
net.ipv4.ip.nonlocal_bind = 1
Controllers > memcached | keystone
Install memcached and Keystone on the first node to avoid to see a failure when trying to create endpoints from two nodes in parallel. Also run it locally or it will fail due to a bug in the current release of Salt which is currently worked on.
ctl01# salt-call state.sls memcached,keystone
When its done, run on the two remaining controllers
ctl02# salt-call state.sls memcached,keystone
ctl03# salt-call state.sls memcached,keystone
Now it should all be green, re-run the state if that’s not your case.
You can have a look at parameters for Keystone
ctl01# salt-call pillar.data keystone
Check that everything looks good for Keystone
ctl01# source ~/keystonerc
ctl01# keystone user-list
ctl01# keystone tenant-list
ctl01# keystone endpoint-list
Great ! It’s time for a break ;)
Controllers > Glance
Install Glance from your Salt Master
# salt 'ctl*' state.sls glance
The structure of the data is the same across all the services
# salt 'ctl01*' pillar.data glance
Controllers > Glusterfs.client
Execute the glusterfs client to mount Glance and Keystone Glusterfs directories
# salt 'ctl*' state.sls glusterfs.client
Check that our two Glusterfs volumes are mounted as shared volume on all three nodes.
# salt 'ctl*' cmd.run 'df -h'
<snip>
172.16.10.254:/glance          18G   14G  3.0G  83% /var/lib/glance/images
172.16.10.254:/keystone-keys   18G   14G  3.0G  83% /var/lib/keystone/fernet-keys
<snip>
Glance configuration /etc/glance/glance-api.conf is using a standard filesystem_store_datadir of /var/lib/glance/images/ for image repository.
Check glance works properly by creating a Cirros image
ctl01# cd /root
ctl01# source ~/keystonerc
ctl01# wget http://download.cirros-cloud.net/0.3.4/cirros-0.3.4-i386-disk.img
ctl01# glance image-create --name "cirros-0.3.4" --is-public true --disk-format qcow2 --container-format bare --progress --file /root/cirros-0.3.4-i386-disk.img
ctl01# glance image-list
[=============================>] 100%
+------------------+--------------------------------------+
| Property         | Value                                |
+------------------+--------------------------------------+
| checksum         | 79b4436412283bb63c2cba4ac796bcd9     |
| container_format | bare                                 |
| created_at       | 2016-10-18T10:48:26.000000           |
| deleted          | False                                |
| deleted_at       | None                                 |
| disk_format      | qcow2                                |
| id               | a78f7062-f606-4bd4-927a-76284a437f77 |
| is_public        | True                                 |
| min_disk         | 0                                    |
| min_ram          | 0                                    |
| name             | cirros-0.3.4                         |
| owner            | aa55b506cd9d430c9505860ad292966b     |
| protected        | False                                |
| size             | 12506112                             |
| status           | active                               |
| updated_at       | 2016-10-18T10:48:32.000000           |
| virtual_size     | None                                 |
+------------------+--------------------------------------+
Check it is stored where you expect
ctl01# ls /var/lib/glance/images
a78f7062-f606-4bd4-927a-76284a437f77
Now re-run the keystone on ctl01 to recreate the fernet keys
ctl01# salt-call state.sls keystone
Check keys are there
ctl01# ls -alR /var/lib/keystone
You can use Salt to check it from your master
# salt 'ctl*' cmd.run 'ls -al /var/lib/keystone/fernet-keys'
Controllers > Cinder | Nova
When you have keystone running you pretty much can run all the rest ;) If you get failures, just re-run the states. But here we will keep our step by step approach.
Install Cinder and Nova, in this deployment we will use the LVM backend for Cinder
# salt 'ctl*' state.sls cinder,nova
Check Cinder status
ctl01# source ~/keystonerc
ctl01# cinder list
Check Nova status
ctl01# nova-manage service list
Binary           Host                                 Zone             Status     State Updated_At
nova-cert        ctl03.workshop.cloudlab.cz           internal         enabled    :-)   2016-10-14 14:56:56
nova-conductor   ctl03.workshop.cloudlab.cz           internal         enabled    :-)   2016-10-14 14:56:57
nova-consoleauth ctl03.workshop.cloudlab.cz           internal         enabled    :-)   2016-10-14 14:56:58
nova-scheduler   ctl03.workshop.cloudlab.cz           internal         enabled    :-)   2016-10-14 14:56:59

ctl01# source ~/keystonerc
ctl01# nova list
If you don’t see all of the services up and running, like in my case above, just update the allocation ratio, for example, as explained later in this article and re-run Nova state. Because we changed the configuration, services will be restarted which should hopefully fix the issue.
If you want to restart nova you can use the following built-in function
salt 'ctl*' service.restart nova-api
Controllers > Nova > cpu_allocation_ratio
Now Imagine you want to update the cpu allocation ratio, with OpenStack Salt its pretty easy. You would do the following
Clone the latest version of your model repository
# cd /srv/salt/reclass
# git remote -v
# git clone
Look around for the cpu variable
# git grep cpu
nodes/docker/openstack/nova-controller.yml:      cpu_allocation_ratio: 16.0
Add a line like
cpu_allocation_ratio: 1
In the nova:controller section of /srv/salt/reclass/classes/system/openstack/control/workshop.yml
Create a pull request and test the application locally by just re-running your states. To check what will be changes, you can first run your state in the dummy mode
ctl01# salt-call state.sls nova test=True
Easy isn’t it ?
Controllers > Neutron
Then install the Neutron API layer which abstract away OpenContrail SDN API.
# salt 'ctl*' state.sls neutron
You can try to create network/subnet
ctl01# source ~/.keystonerc
ctl01# neutron net-create --router:external=true  --shared external
ctl01# neutron subnet-create external 156.0.0.0/24
ctl01# neutron floatingip-create
OpenContrail
When installing OpenContrail it is recommended to start with the database backends to avoid any potential conflict when installing everything in one shot. It takes about 5 minutes to install Cassandra, Zookeeper*, Kafka*.
# salt 'ctl*' state.sls opencontrail.database
Check Cassandra Status
ctl01# nodetool status
Datacenter: datacenter1
=======================
Status=Up/Down
|/ State=Normal/Leaving/Joining/Moving
--  Address        Load       Tokens  Owns (effective)  Host ID                               Rack
UN  172.16.10.101  68.72 KB   256     66.1%             66b63122-1277-4662-9c9f-b41e8f74fd88  rack1
UN  172.16.10.102  84.7 KB    256     64.8%             9fab997e-536b-4150-8667-3eaac8eb91b9  rack1
UN  172.16.10.103  68.69 KB   256     69.1%             97217604-865e-4387-9531-7f2d3071c21c  rack1

ctl01# nodetool compactionstats
pending tasks: 0

ctl01# nodetool describecluster
Cluster Information:
Name: Contrail
Snitch: org.apache.cassandra.locator.DynamicEndpointSnitch
Partitioner: org.apache.cassandra.dht.Murmur3Partitioner
Schema versions:

    6403a0ff-f93b-3b1f-8c35-0a8dc85a5b66: [172.16.10.101, 172.16.10.102, 172.16.10.103]
Wait until everything is bootstrapped, in the last command above, make sure the Schema version is the same on all nodes and the cluster name is Contrail. If there is anything wrong try the following workaround on the affected controller
ctl01# rm -rf '/var/lib/cassandra/*'
ctl01# service supervisor-database restart
Now that Cassandra is ready, we need to make sure Zookeeper is ready too. Run the Zookeeper CLI
ctl01# /usr/share/zookeeper/bin/zkCli.sh
list all db in zookeeper
[zk: localhost:2181(CONNECTED) 0] ls /
[consumers, config, controller, admin, brokers, zookeeper, controller_epoch]
If not all nodes have the same list of db, restart Zookeper on the corresponding nodes.
ctl01 # service zookeeper restart
Check again and if you still have issues you can remove the following directory on the affected node and restart zookeeper from your Salt Master
ctl01# rm -rf /var/lib/zookeeper/version-2
cfg01# salt 'ctl*' cmd.run 'service zookeeper restart'
All our backends are now ready to continue with the rest of OpenContrail
# salt 'ctl*' state.sls opencontrail
When the previous state run ends, tt takes time, check contrail status
ctl02# contrail-status
Some services must only be active on a single node, you can check which node they run on
# salt 'ctl*' cmd.run 'contrail-status | egreg "svc|device|schema'
Contrail Web UI is accessible through https://172.16.10.254:8143, using admin/workshop as the default login/password. A rediction is also in place from HTTP/8080.
Conpute node
To provision your first compute node, run its state, we run it locally to get more feedback on what’s really happening live
cmp01# ssh 172.16.10.105
cmp01# salt-call state.apply -l info
To get more details on the different states that has been applied
cmp01# salt-call state.show_top
In our workshop lab, we have a single NIC card, so Salt state cannot be used to configure the network or it will cut out the connection, so for production deployment we are saying that is is much better to have at least two network card, one for dataplane and one for management, data plane network can then could be configured by Salt master without loosing the connectivity !!!
In our case you can configure it manually like that
cmp01# vi /etc/network/interfaces
auto lo
iface lo inet loopback

auto eth0
iface eth0 inet manual
pre-up ifconfig eth0 up
post-down ifconfig eth0 down

auto vhost0
iface vhost0 inet static
    pre-up /usr/lib/contrail/if-vhost0
    address 172.16.10.105
    network_name application
    netmask 255.255.255.0
    gateway 172.16.10.1
    dns-nameservers <YOUR DNS SERVER>
Reboot your compute node and check that your IP should be bound to vhost0, which is required for Contrail . Also check contrail status
cmp01# contrail-status
<snip>
if vrouter deployment fails, I mean if it isn’t active in the output above, try the following
cmp01# dpkg -l | grep cloud-init
cmp01# apt-get purge cloud-init
cmp01# reboot [to recreate the networking configuration]
Contrail Post installation
In the above contrail-status command output you should see something like
<snip>
contrail-control    initializing (No BGP configuration for self)
<snip>
It just means that you still need to configure BGP peers, you can do this from the Contrail UI but here we’ll be using a configuration script, run the following commands to register your controllers:
ctl01# /usr/share/contrail-utils/provision_control.py --api_server_ip 172.16.10.254 --api_server_port 8082 --host_name ctl01 --host_ip 172.16.10.101 --router_asn 64512 --admin_password workshop --admin_user admin --admin_tenant_name admin --oper add
ctl01# /usr/share/contrail-utils/provision_control.py --api_server_ip 172.16.10.254 --api_server_port 8082 --host_name ctl02 --host_ip 172.16.10.102 --router_asn 64512 --admin_password workshop --admin_user admin --admin_tenant_name admin --oper add
ctl01# /usr/share/contrail-utils/provision_control.py --api_server_ip 172.16.10.254 --api_server_port 8082 --host_name ctl03 --host_ip 172.16.10.103 --router_asn 64512 --admin_password workshop --admin_user admin --admin_tenant_name admin --oper add
To register your vRouter run
/usr/share/contrail-utils/provision_vrouter.py --host_name cmp01 --host_ip 172.16.10.105 --api_server_ip 172.16.10.254 --oper add --admin_user admin --admin_password workshop --admin_tenant_name admin
Contrail vRouter on your compute node should be active, re-check it with contrail-status.
Adding a Compute node
To check metadata for a compute node you can run reclass
ctl01# reclass -n cmp01.workshop.cloudlab.cz
The above metadata is generated from classes/system/reclass/storage/system/workshop.yml
If you want to add Compute Nodes that aren’t already part of our model, edit it at srv/salt/reclass/classes/system/reclass/storage/system/workshop.yml and add another compute node by just copying/editing an existing compute node
cmp03.workshop.cloudlab.cz:
      name: cmp03
      domain: workshop.cloudlab.cz
      classes:
      - system.linux.system.single
      - system.openstack.compute.workshop
      params:
        salt_master_host: ${_param:reclass_config_master}
        single_address: <COMPUTE_IP>
        opencontrail_compute_address: <COMPUTE_IP>
        opencontrail_compute_gateway: 172.16.10.1
        opencontrail_compute_iface: eth0
Run the reclass storage state to generate your new node yaml definition.
cfg01# salt 'cfg01*' state.sls reclass.storage
Controllers > collectd | sensu | heka | heat
Here is the list of controllers states
cfg01# salt 'ctl01*' state.show_top
ctl01.workshop.cloudlab.cz:
----------
base:
    - linux
    - ntp
    - salt
    - openssh
    - keepalived
    - haproxy
    - memcached
    - rabbitmq
    - git
    - keystone
    - python
    - collectd
    - sensu
    - heka
    - glusterfs
    - glance
    - nova
    - neutron
    - cinder
    - heat
    - opencontrail
    - galera
So far we’ve applied most of them apart collectd, sensu, heka and heat.
Let’s terminate our controllers deployments, by running the highstate on all of them
ctl01# salt-call  state.apply
ctl02# salt-call  state.apply
ctl03# salt-call  state.apply
Heka, Sensu, Collectd configuration files are generated from the metadata of each Salt formulas and stored respectively below /etc/heka/conf.d/, /etc/sensu/conf.d and /etc/collectd/conf.d.
Salt Master > Horizon
In our workshop lab, our Salt Master is the only node which gets a public IP so this is where Horizon will be deployed to be accessible from the outside world.
Run all states on the Salt Master to deploy everything including Horizon.
cfg01# salt-call state.apply
Horizon should the nbe available on http://172.16.10.100, default login/password is admin/workshop.
Metering
Apply the states to your metering node
# salt 'mtr*' linux,salt,openssh,ntp
# salt 'mtr*' state.highstate
Monitoring
To finish and to install the monitoring
# salt 'mon*' linux,salt,openssh,ntp
# salt 'mon*' state.sls git
# salt 'mon*' state.highstate
Debugging Salt
Salt can be run in debug mode with
cfg01# salt-call state.sls linux -l info or -l debug
Conclusion
Using the same tooling for deployment and operation is a big advantages when using Mirantis OpenStack Mk.20. Salt idempotent formulas to converge nodes based on state and its ability to do remote execution offers the best of both worlds. It then becomes possible to add new MySQL database for new projects, change passwords as well as deploying the environment from scratch. OpenStack Salt not only deploy OpenStack but allows to do life cycle mangement which is lacking from many deployment tooling around.
Our infrastructure is now versionned, documented to give us the ability to audit at any point in time, it’s no more necessary and even forbidden to do any manual hack on any live systems or not required to introduce any thrid party tooling to maintain the environment in operation.
Today the workflow is based on git and Salt mostly, individual services can map to bare metal or VM’s but in a near future we’ll see how Gerrit, Jenkins* and Artifactory* could be integrated to provide a full CI/CD environment for your private cloud. In a near future, Gerrit will be used to push review of Infrastructure model updates, it will then trigger Jenkins which will do the git mirror and merge on the Salt Master. Then you can pick manually any deploy operations you want to execute from Jenkins.
Finally, the same Model Driven Infractucture is currently evolving to offer the capability to deploy OpenStack on top of Kubernetes.
Stay tuned…
Links
- tcp cloud mk.20
- OpenStack Salt documentation
- Deploy OpenStack Salt on OpenStack howto
- OpenStack Vagrant deployment
- Salt bootstrap script
- tcp cloud KVM images