Deploying Ceph using Crowbar 2.0
For quite some time now the Crowbar team have been refactoring their cloud unboxer solution. It is is not yet ready for public consumption, but if you want to see what they’ve got, it’s already possible. Victor Lowther have just released the first CB20 compatible workload which is Ceph, a distributed storage solution from Inktank. This article will build up on the previous one which details the process of building a Crowbar ISO, let see how it differs if you want to see the latest and greatest of Crowbar 2.0. If you really don’t know what we are talking about, just start from the beginning.
Building CB 2.0 (development) ISO
You first need a build machine with all the dependencies, you’ll find all steps involved in our previous article
So let’s suppose you’ve got everything ready, a Ubuntu 12.04 server with PostgreSQL 9.3 installed. All the required Gems and packages. You’ll also need the Ubuntu 12.04 ISO in the cache directory and Sledgehammer built as detailled in previous article.
If you have all of this ready, you can now clone the Crowbar repository
git clone https://github.com/crowbar/crowbar.git
Select the Development release and master build like this
./dev switch development/master
Instruct Crowbar build system that you want Ceph Barclamp to be part of the developement/master build
echo master > releases/development/master/barclamp-ceph
Before building it you need to clone Victor Lowther Ceph Barclamp
git clone https://github.com/VictorLowther/barclamp-ceph.git barclamps/ceph
cd barclamps/ceph
git submodule update --init
git checkout master
Victor forked the official Ceph cookbook, which is integrated in the Ceph Barclamp as a git submodule. He is also using the official Apache2 cookbook from Opscode, also integrated as a submodule.
Now you can start the build process like this
cd ~/crowbar
./dev build --os ubuntu-12.04 --update-cache
After a while you should get the following ISO
~/crowbar/crowbar-development_master.3906.dev-ubuntu-12.04
Transfert it to your workstation
scp user@crowbar-builder:~/crowbar/crowbar-development_master.3906.dev-ubuntu-12.04 .
Boot ISO and install Crowbar Admin Node
You can now use KVM or VMware Fusion/Workstation to boot this newly built ISO, it will autodeploy a Crowbar 2.0 admin node but won’t install it. Once your VM is booted, just log in using
login: crowbar
password: crowbar
and install the admin node like this :
sudo su -
/opt/dell/bin/install-crowbar crowbar.lab.int --no-screen --wizard
The --wizard option tells Crowbar to stop provisioning the admin node before the configuration steps. It will let you customize the setup before hand, which is really a great improvement compared to Crowbar 1.7 where we had to make sure our network.json file was correct or we had to start all over again :(
At the end of the installation you’ll have to reboot your admin node as you can see below
Admin node deployed.
Script done, file is /var/log/install.log
/
When the Crowbar installation is complete -- Please reboot the Admin node.
If it failed you can investigate in the /var/log/install.log file.
Configure Crowbar Admin node
So now you should be able to connect to the Crowbar web UI available by default at
http://192.168.124.10:3000
Make sure you don’t use Safari or Midori, there is a compatibility issue with them that prevent the 2 buttons we need to function properly. It seems to be related to jQuery support.
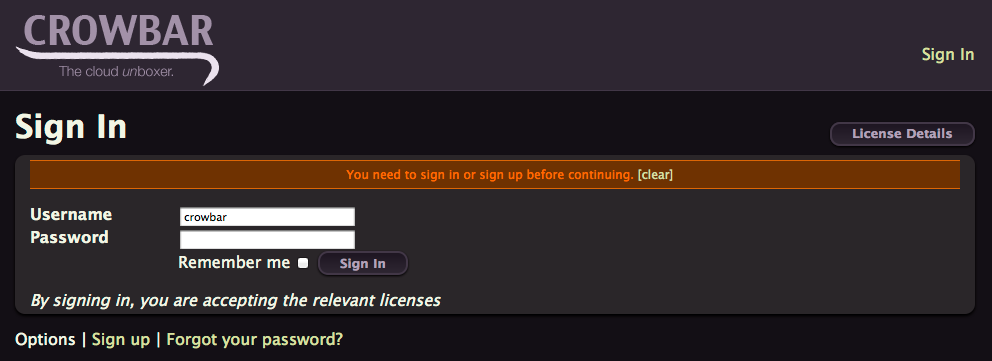
log in using
login: crowbar
password: crowbar
As you can see below, because we used earlier the --wizard option, no nodes are registered, not even the admin one.
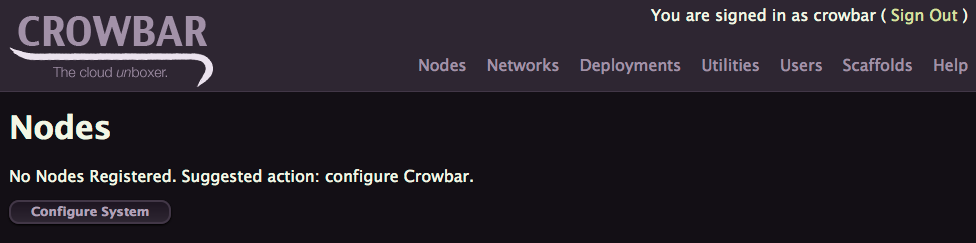
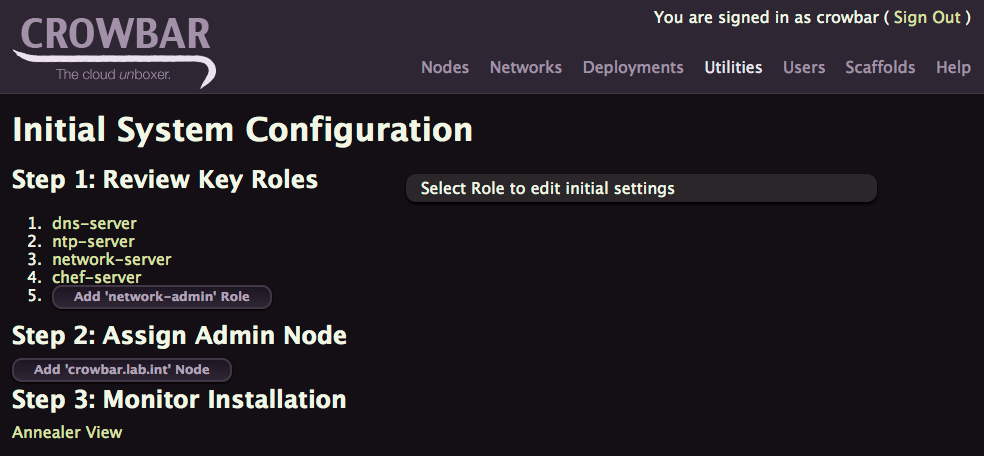
Click on Configure System
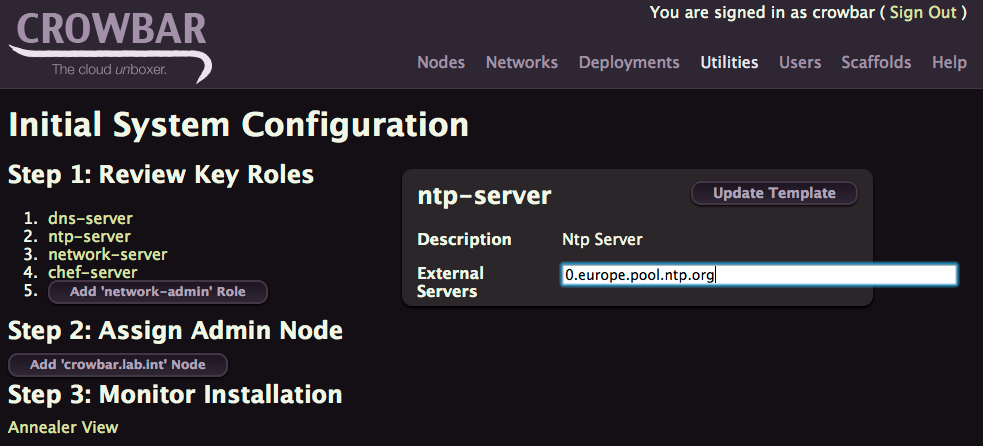
Click on ntp-server fill out the form with 0.europe.pool.ntp.org and click Update Template
To get back to the Initial Configuration Screen, just click in the Utilities > Bootstrap menu.
Now click on network-server
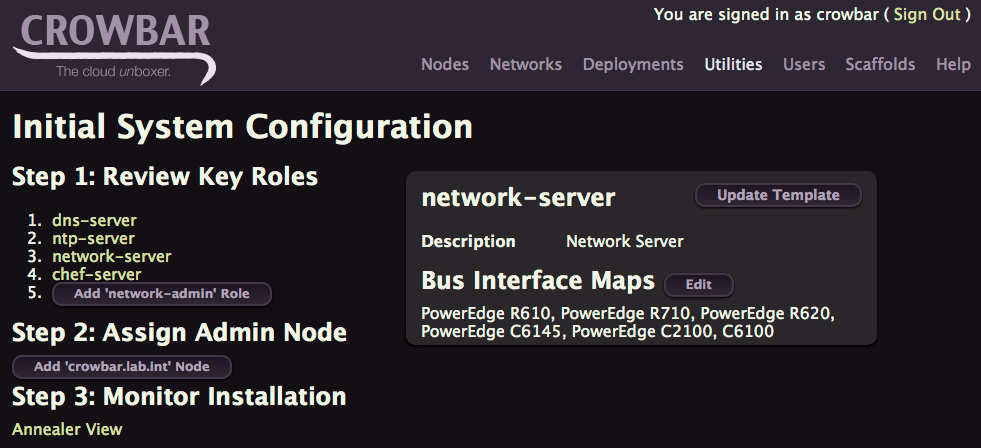
Now you can click on Edit to update the Bus Interface Map.
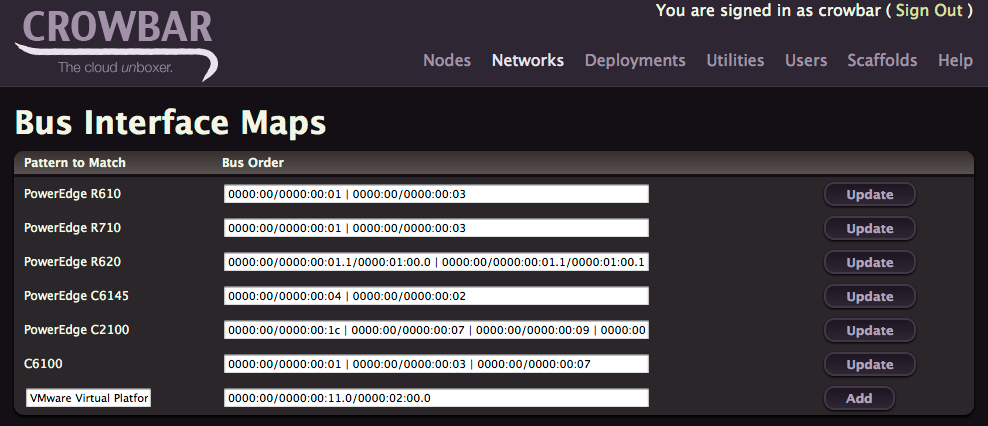
If you are using VMware Fusion add the line above with
VMware Virtual Platform 0000:00/0000:00:11.0/0000:02:00.0
and click Add
If you are on another platform, you can check PCI Bus details with
ls -al /sys/class/net
But this step is optional, if you don’t configure any interface Map, the interfaces will be named 1g0, 1g1, … based on the PCI Bus Order and speed. If you have 10G card it will be named 10g0, 10g1, ….
Click in the Utilities > Bootstrap menu to go back to the Initial Configuration Screen and click Add 'network-admin' Role
Start the provisionning workflow
You can now click on Add 'crowbar.lab.int' Node to start the admin node provisionning workflow.
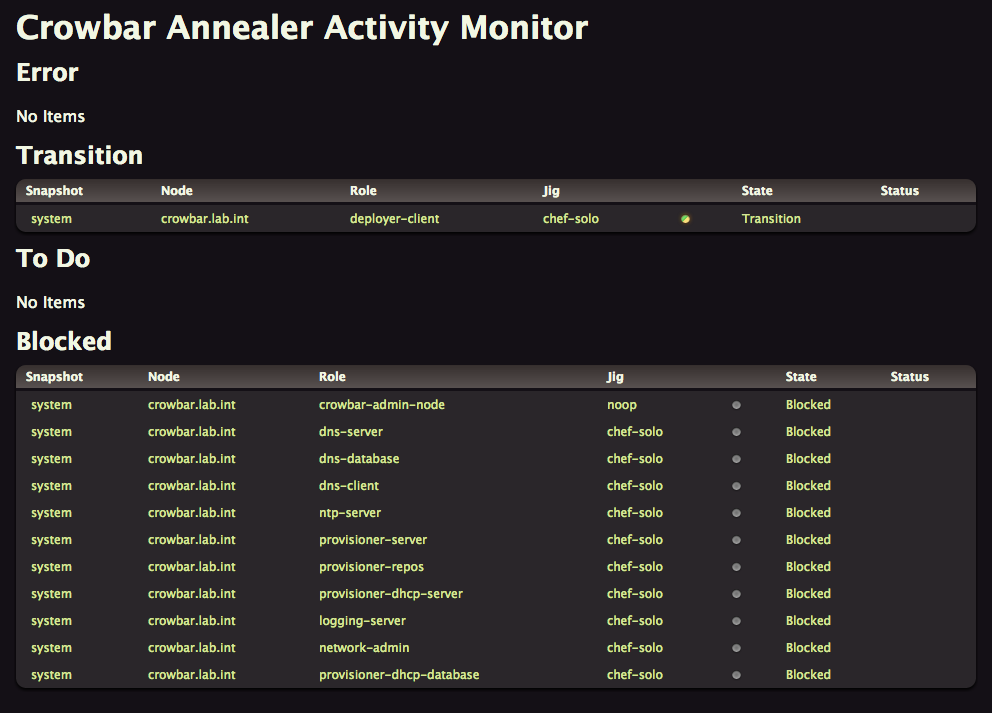
With Crowbar 2.0 you can now observe the work in progress, just click on the Annealer View button to see everything happening in real-time. Ten tasks can be ran in parallel, some of them will be Blocked until they get all their dependencies ready.
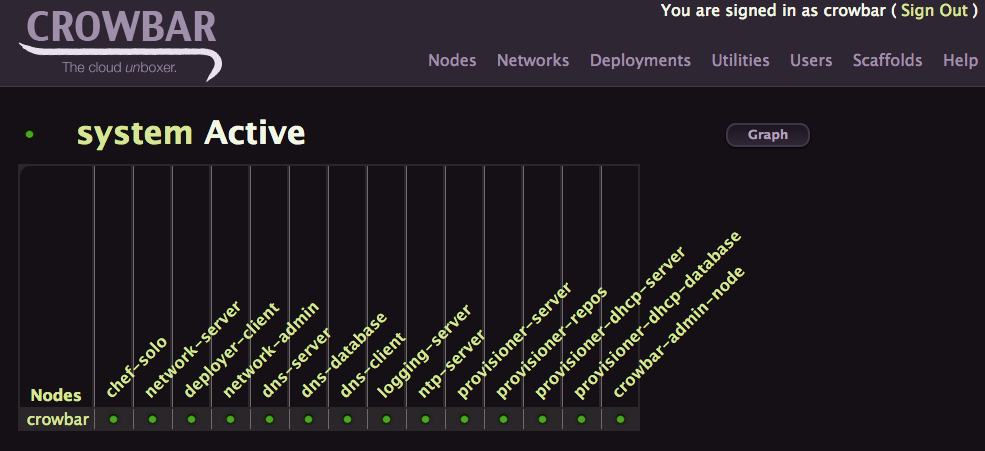
When everything is done, you can now click on Deployments > System menu to confirm everything is green now
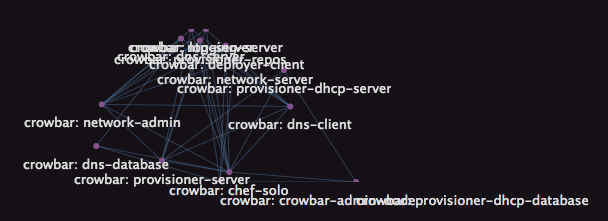
If you click Graph, it will give you the complete Graph that the Annealer traversed to converge the admin node. As it is today it’s not really usable but it’s just the result of a 2 hour hack.
If you go back to the Deployments > System View, you can click each green or red ball to get all the details, including the log output of this Node Role deployment, this is really great to troubleshoot problems that can happen. And trust me, you’ll get some.

You can even click on Retry to start over the process.
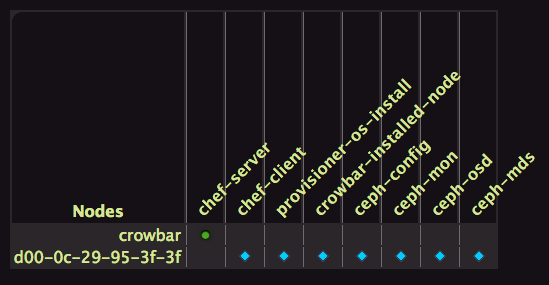
Another great view is the Functional view accessible from Deployments > System Overview Menu
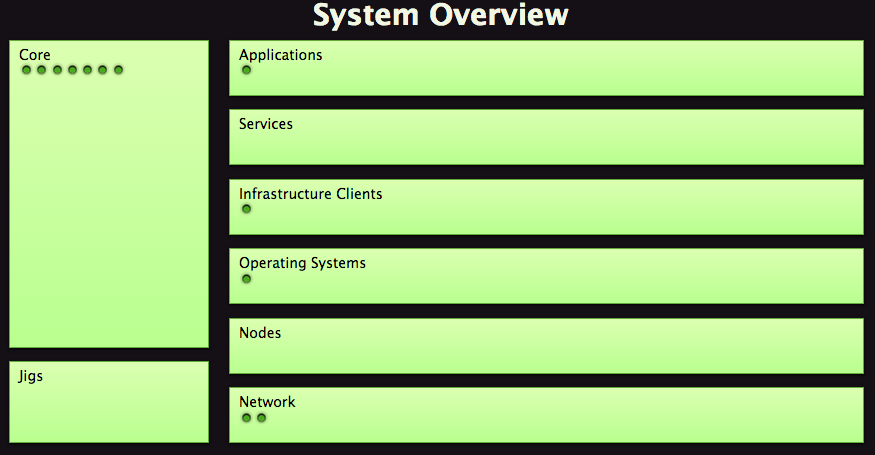
Each dots represent a node role.
Adding a node
To be able to use our admin node to deploy Ceph, we first need to boot at least another VM on the admin network. It will automatically PXE boot. Crowbar will then discover this new node. Make sure you have at least two disks attached to your instance, one for the Operating System, the other one dedicated to Ceph storage. Make sure you have at least two Nics created for this VM, the first one connected to the admin network (192.168.124.0/24), the second one on the Ceph Network.

After a while you’ll see it appearing in the Crowbar Node page

And after few minutes it should become green

The hostname is based on the Mac address of the Nic connected on the admin network prepended with the letter d.
Creating a Ceph Network
For the Ceph cluster to be operational, it needs a network. Create one named ceph by clicking on the Network Menu. You should have something like this after you click on Add Network

We will use the second Nic (1g1) of our node for Ceph. The first one (1g0) is reserved for the admin network.
Creating the Ceph Deployment
To install Ceph on this node, you first have to create a new deployment named ceph.
To do that click on the Deployment menu. Type ceph and click Add.

You should reach this page
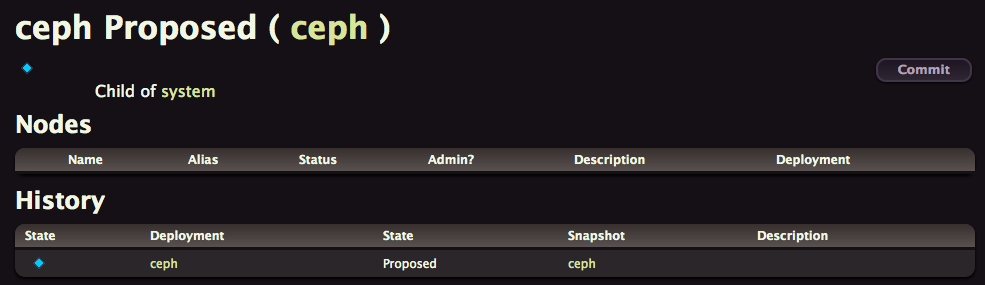
Click on Commit and then on Propose
The first thing to do now is to add the new node to this deployment. Click Add nodes, assign the ceph deployment to your node by selecting ceph for your node in its deployment list.

Click Save and get back to the Deployment > Ceph page. As you can see, your node appear here now.

Almost there, you now have to add the main three Ceph Roles to your deployment, the other dependencies will be added automatically by Crowbar, this is the beauty of this 2.0 version which add dependency management, that’s really a great improvement.
Start by selecting ceph-mon role in the list and click Add Role. Do the same for ceph-osd and ceph-mds. You should now get something like this
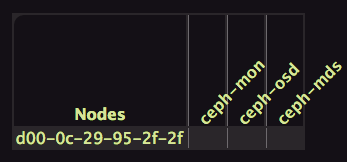
To provision a Role on a Node you just have to click on the intersection, easy isn’t it. Here we are only using one node but you could have more and distribute the roles accordingly. As soon as you click below ceph-mon, crowbar automatically adds the dependencies. Click below each role to get a similar result.
On this screenshot we’ve also added a Chef-Server on our Crowbar admin node. But by the time you read this the 2.0 version should be fixed and should deploy it automatically at provisioning time. For an unknow reason it wasn’t the case for me, so I’ve manually added the chef-server role to admin and that solved it.
To start the provisioning workflow click on Commit.
After a while you should have all Ceph Roles deployed and Operational. You are now a lucky owner of a Ceph environment deployed by Crowbar 2.0.
I’m really gratefull from all the work that Rob, Victor and all are contributing to improve Crowbar. Big thanks guys.
Conclusion
The first time I heard from the Crowbar team they were planing to refactor Crowbar with a different architecture, decoupling from Chef with Jigs instead, adding a database, I wondered if it was a good idea. Crowbar 1.6 works well today, and after quite some time Crowbar 2.0 is not yet there.
But after spending some time with the current master branch, I really think they are headed in the right direction with lots of great additions.
Here is a summary of the differences between Crowbar 1.x and 2.0
- Chef upgrade to version 11, crowbar now also use chef-solo
- Rails 3, Ruby 1.9
- PostgreSQL used to store Crowbar data instead of Chef databags.
But the main architecture benefit is the addition of the Annealer which traverse the graph of dependencies to order the roles deployment to make sure each role gets the upstream role deployed and ready before they start their own stuff. Crowbar Annealer can manage as much as 10 parallel tasks.
The second great thing that is really usefull to troubleshoot Crowbar runs, it’s the capability to access log output per Node Role easily from the Web UI. If you click on the deployment details on a red light, you’ll easily see what’s wrong with that role.
There are plenties of other improvement, like late bindings, really usefull for low level network configuration stuff or the way they now plan to package Barclamps per Workload. Ideally they would like to have one Barclamp for OpenStack with multiple roles embedded instead of the current situation where we have one Barclamp per OpenStack component.
But don’t take my enthousiasm wrongly, it is still early days for Crowbar 2.0. The only workflow that can be deployed is Ceph and isn’t feature complete yet. The one thing that bugged me the most is the lack of delete button for Deployment or Node Role, If you messed up, it’s there forever. It’s maybe possible to clean things from the Crowbar API or CLI but I’m not there yet. Stay tuned.