Deploying OpenStack Grizzly using Crowbar RC1
Crowbar is a cloud unboxer that use Chef, meaning it can deploy an OpenStack or Hadoop environment in a breeze. In this article we will use the first release candidate, codename pebbles (build 3476) for OpenStack Grizzly to deploy a demo lab running on VMware Fusion.
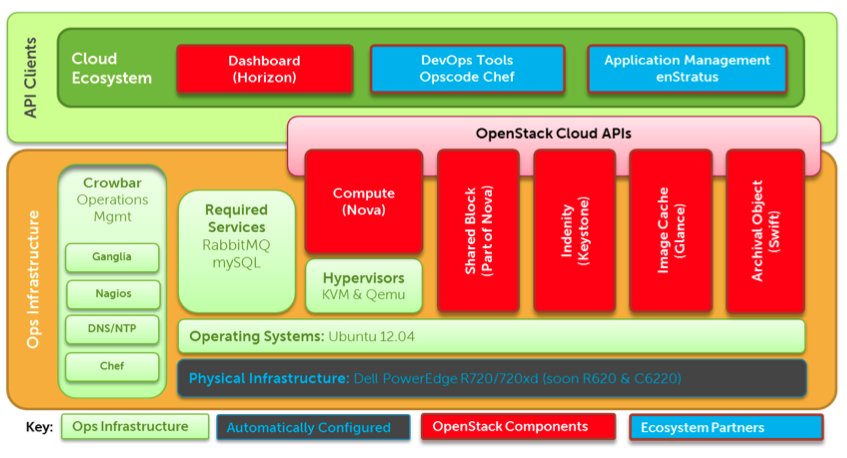
If you don’t know much about Crowbar for OpenStack you can learn about it by reading our previous blog post. Crowbar connect together a lot of moving parts.
This article is based on the 1.6 branch but there is a refactoring in progress for 2.0, the target architecture will abstract Configuration Management as a Jig, as you can see below.
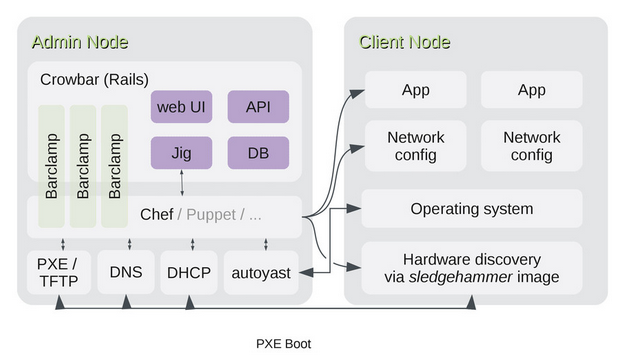
As of now, Crowbar is heavily dependant on Chef which is hardwired into the Rails frontend rather than being in a barclamp.
For more information consult the User documentation or look at another diagram
High Level Overview of the installation
To build a lab environment with OpenStack Grizzly using Crowbar, The cloud unboxer, we’ll have to follow this agenda :
- Configure VMware Fusion networking
- Provision an admin VM
- Design and configure your OpenStack networking environment
- Install the Crowbar software on the Admin node
- Provision an OpenStack controller VM
- Configure and Deploy the OpenStack services via the Crowbar Web UI
- Troubleshooting
Configure VMware Fusion Networking
You first need to prepare the virtual networking infrastructure, create the following networks within VMware Fusion:
- Public Network (public, nova-floating and VTEPs)
- Private Network (nova-fixed, inter-instance communication only)
- Storage Network (for Ceph or Swift, no user access)
- Admin Network (PXE booting, bmc or bmc_vlan)
Use VMware Fusion preferences menu to create them:
| Network Name | CIDR | VMware Fusion Network Naming |
|---|---|---|
| Admin | 192.168.124.0/24 | vmnet9 |
| Public Network | 192.168.126.0/24 | vmnet11 |
| Private Network | 192.168.123.0/24 | vmnet12 |
| Storage network | 192.168.125.0/24 | vmnet10 |
Note: It could be been great if VMware Fusion could tolerate renaming to a less obscure naming for the different networks: vmnet9, ..
Provision an Admin Node
You can now deploy a Crowbar admin node which will then be used to provision the other nodes.
You first need to download RC–1 ISO or any updated one.
Create a new VM with the following profile.
| Param | Value |
|---|---|
| OS Type | Linux Red Hat Linux 6 64bit |
| CPU | 2 vCPU |
| Ram | 4096 MB |
| Disk | 8 GB |
| vNic | vmnet9 |
The vNic should be connected to the admin network (vmnet9).
Associate the downloaded ISO to the CDROM.
Beware, If you don’t provide enough raw capacity to the VM the installation will fail.
Power on this VM to start the admin node installation. After a little while, a login prompt will appear in the console.
But Before doing anything on this VM, it’s a good idea to snapshot it, you may need a fresh one if you reach a dead end.
Connect over SSH to your newly provisionned (login/password = crowbar/crowbar)
ssh -l crowbar 192.168.124.10
Design and Configure Networking environment
Networking configuration is the most important phase of a Crowbar deployment. You have to plan carefully your network design, here is an example extracted from SUSE Cloud documentation.
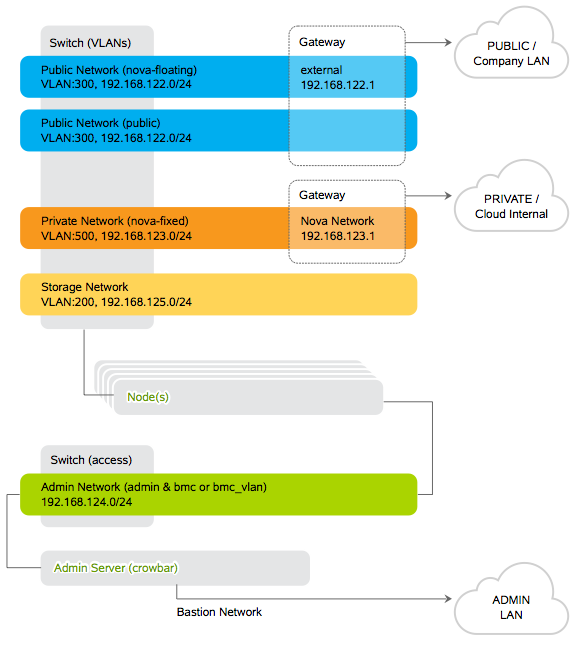
To simplify things a bit, in our lab we kept as much as possible the default addressing provided by Crowbar RC1, it’s mostly the same as the one in this diagram except for the Public network (192.168.126.0/24).
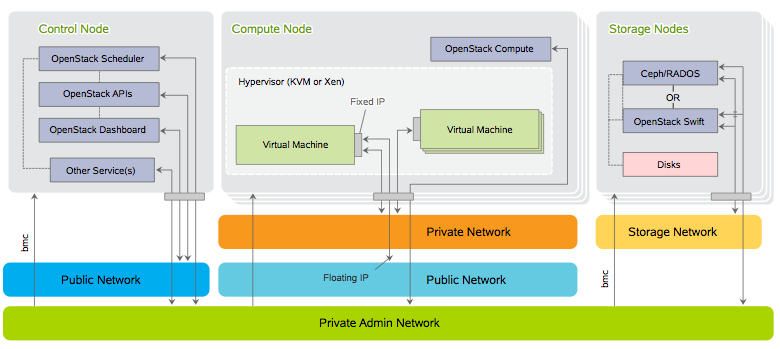
Here is the communication flows between OpenStack components
To configure the network setup edit the following file
$ vi /opt/dell/barclamps/network/chef/data_bags/crowbar/bc-template-network.json
You can find an example that you can use as is for your own deployment here.
If you aren’t on VMware Fusion, to get the pattern (product name) of you Hardware type:
$ sudo dmidecode | grep -i product
If you need your bus order, shutdown your admin node, add 4 more vNics and Run the following commands:
$ ls -al /sys/class/net
In our example we get
eth0 -> ../../devices/pci0000:00/0000:00:11.0/0000:02:00.0/net/eth0
eth1 -> ../../devices/pci0000:00/0000:00:11.0/0000:02:01.0/net/eth1
eth2 -> ../../devices/pci0000:00/0000:00:11.0/0000:02:02.0/net/eth2
eth3 -> ../../devices/pci0000:00/0000:00:11.0/0000:02:03.0/net/eth3
So eth0 has PCI bus position 0000:02:00.0 (domain 0000, bus 02, device 00 function 0) And eth1 has PCI bus position 0000:02:01.0 (domain 0000, bus 02, device 01 function 0)
You can also use Udev command, by the way Udev provides a persistent device naming system through the /dev directory:
udevadm info -a -p /sys/class/net/eth0/
If you cannot determine the exact bus path of your nics, you can check for it after the fact in a deployed node with:
crowbar machines show <machine_name> | grep path
The pattern you see in the conduit_map, ././.* gives you a lot of flexibility. It’s meant to specify:
<mode>/<number of 1Gb interfaces>/<role>
Like in the following examples:
 .*/4/nova-multi-controller
 team/2/.*
 single/.*/.*
For more details regarding this network setup, consult the annotated network JSON file on the wiki or the following Readme.
Beware, if you need to modify the network setup, you’ll have to start everything from scratch, the Crowbar team is currently coding a functionnality that will enable us to change networking after deployment but for now, double check your file before going to the next step.
Crowbar Installation
Now to install crowbar itself:
sudo -i
cd /tftpboot/ubuntu_dvd/extra
./install <systemname.yourdomain.com>
You can now wait a little while in front of the installation logs
tail -50f /var/log/install.log
Or you can also attach your terminal to the screen session
sudo screen -r -S crowbar-install
If installation fails, you have to double check your network JSON file for syntax errors. You’ll get more details about the error in the following logging file.
/var/log/crowbar/barclamp_install/network.log
But you can also use the following commands to check the syntax of all the data_bags
chmod u+x /opt/dell/barclamps/crowbar/bin/validate_bags.rb
/opt/dell/barclamps/crowbar/bin/validate_bags.rb /opt/dell/chef/data_bags
On you think you’ve corrected your error, you can restore your VM to the last Snapshot and start over.
Crowbar Services
When installation will be complete all services will be running and accessible at the following addresses:
- SSH Service - SSH crowbar@192.168.124.10, credentials are crowbar
- Crowbar UI - http://192.168.124.10:3000, credentials are crowbar/crowbar
- Nagios UI - http://192.168.124.10/nagios3, credentials are nagiosadmin/password
- Ganglia UI - http://192.168.124.10/ganglia, credentials are nagiosadmin/password
- Chef UI - http://192.168.124.10:4040, credentials are admin/password
You should be able to access the Crowbar UI to continue with your OpenStack deployment. But before you need to provision another VM.
Provision an OpenStack VM
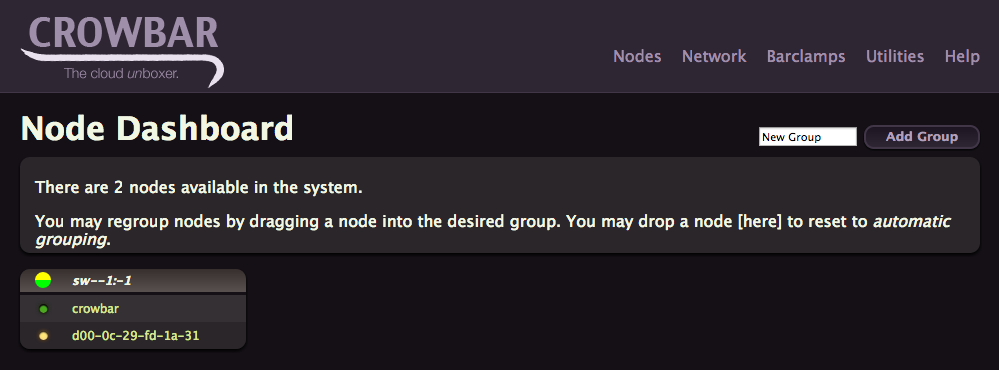
As you can see in the Crowbar UI, you only have one node running, the admin one. You need to create an OpenStack Controller node VMs using VMware Fusion with the following profiles
| Profile for one OpenStack Controller Node | |
|---|---|
| OS Type | Linux Red Hat Linux 6 64bit |
| CPU | 1 vCPU |
| Ram | 1024 MB |
| Disk | 16 GB |
| Nic 1, intf0 | vmnet9 / admin (PXE boot) / 192.168.124.0/24 |
| Nic 2, intf1 | vmnet11 / public & floating & NVP VTEP / 192.168.126.0/24 |
| Nic 3, intf2 | vmnet12 / fixed / 192.168.123.0/24 |
| Nic 4, intf3 | vmnet10 / Storage / 192.168.125.0/24 |
Don’t forget to enable hypervisor application in the VM settings to be able to use KVM instead of QEMU.
For the sake of simplicity we are putting everything (Horizon, Glance, Keystone, Nova, Quantum, Cinder) on the same VM.
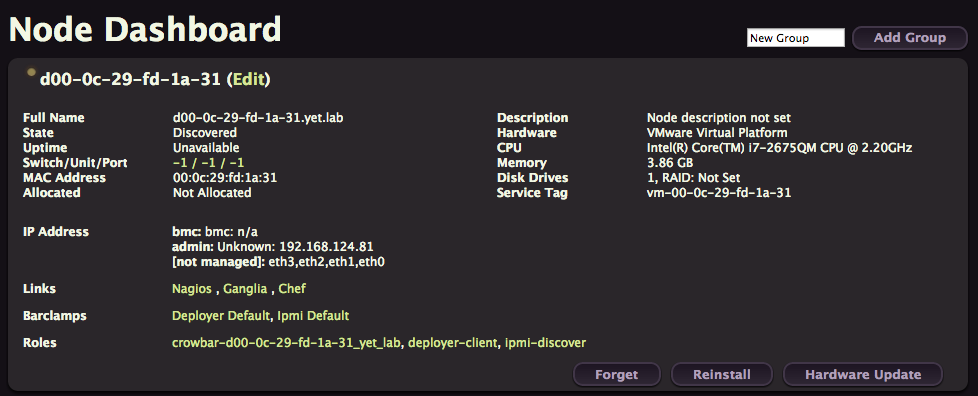
Power on this new node, by being connected to vmnet9, the admin node will be able to automatically PXE boot and prepare it for service provisioning. After a while you should see in the Crowbar UI the node with a flashing yellow light.
If you click on it, you’ll get a lot of details about your node, like its IP address. You’ll also see that the node doesn’t have any interesting barclamps or roles attached to it, just the barebone defaults.
Deploy OpenStack Services
Database
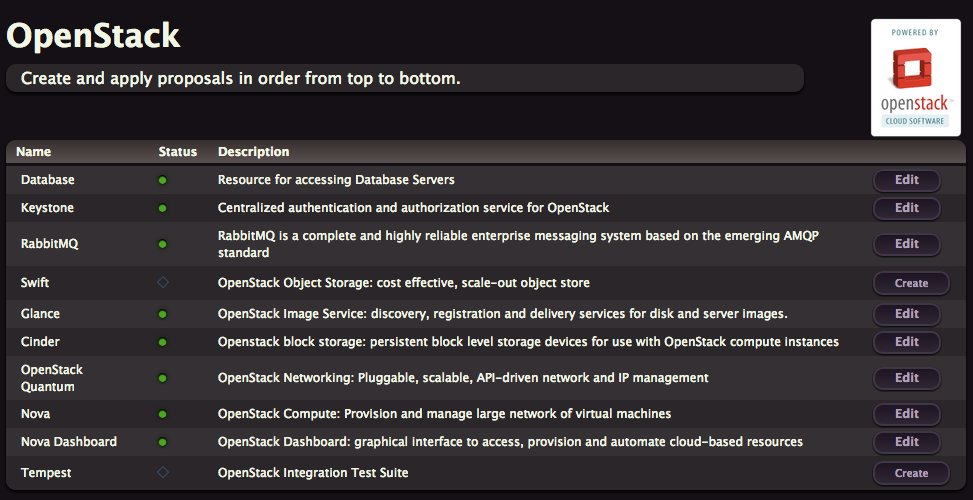
We can now start the deployment process of the components. To do that mouse over the Barclamps tab and click on OpenStack. You’ll get a list of all the related barclamps. A barclamp is a set of data, templates and other necessary logic for applying a particular role to a node, or to some set of nodes.
We’ll deploy almost each of them on our node, except Swift and Tempest. Start by clicking on the Create button for the Database one.
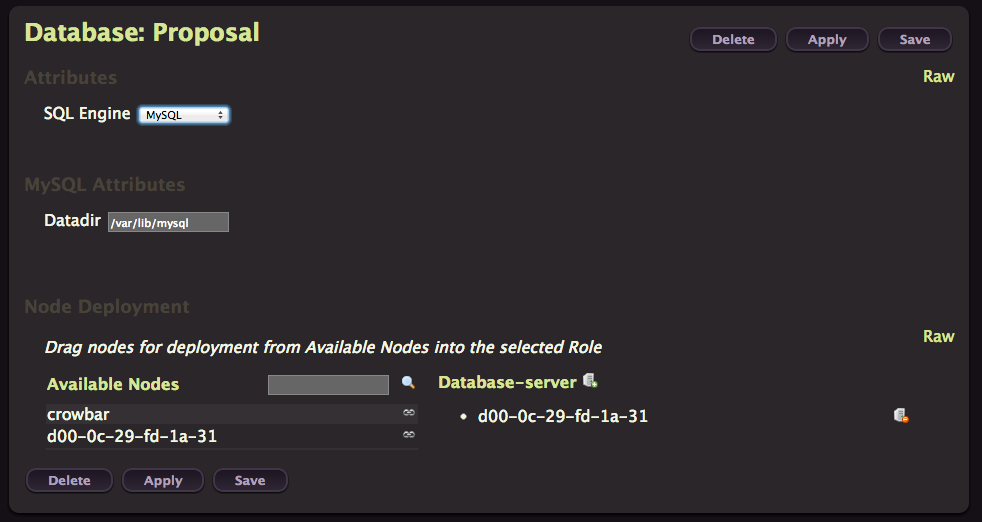
As you can see you can choose between MySQL and PostgreSQL. Our node is listed in the Database-server column on the right, so we just have to click on Apply to provision MySQL on our node. Easy isn’t it, that’s the beauty of Crowbar.
Watch the VM Console to see the installation happening, you have to wait a bit until it starts.
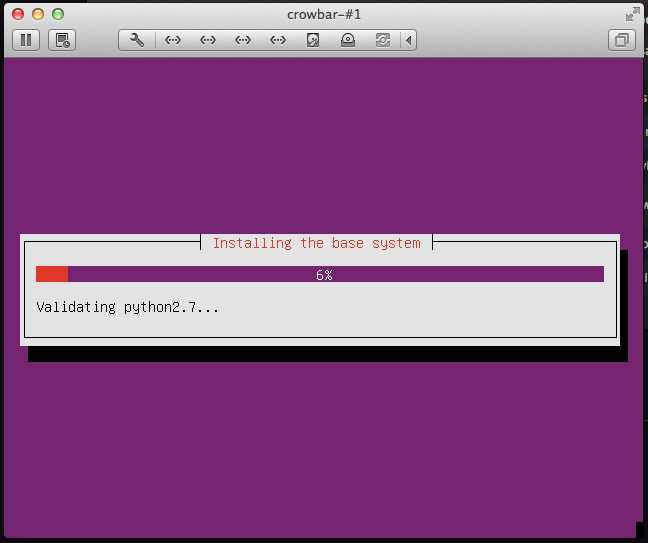
If you look at the main dashboard you’ll note that the light is now different, same thing if you look at the OpenStack barclamps, you’ll see a yellow flashing light in the database line.

You now have to wait until the light turns green. The node reboot two times and execute a chef-client runs to converge toward the assigned role. If you want to see more you can ssh to your node (crowbar/crowbar) and
tail -f /var/log/chef/client.log
If you’re lucky, at the end of the process you should see

If you get a Chef error, you can try to re-launch a run with
sudo chef-client
I’m sorry but you really need your DB to be deployed or you won’t be able to deploy any other OpenStack barclamps. So good luck ;)
Keystone
You know the drill, from the OpenStack barclamp list, click on Create in the Keystone line.
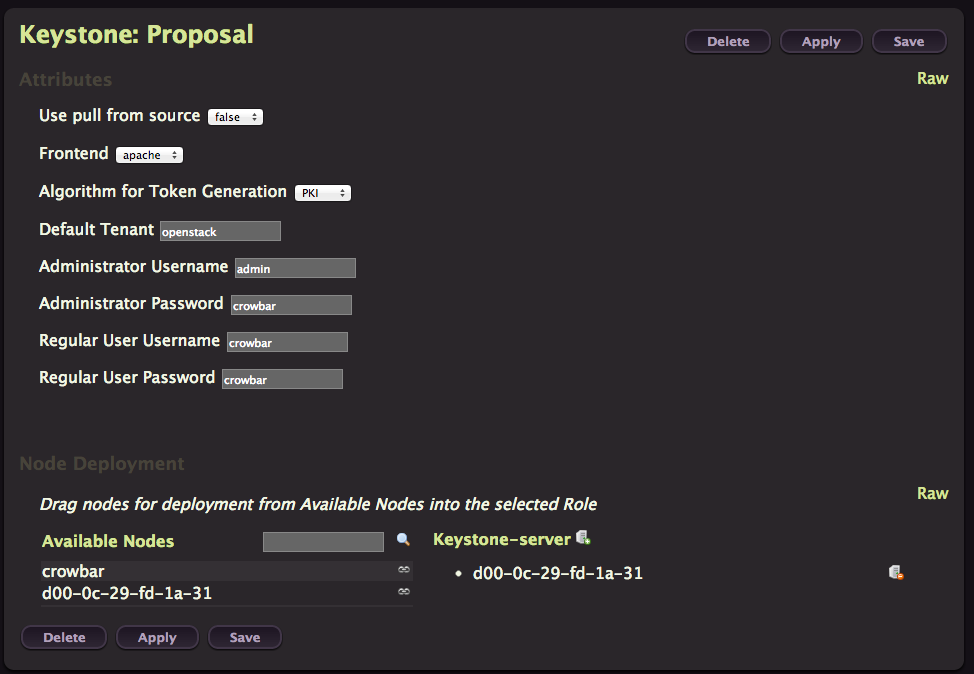
You don’t need to change anything here, just click on Apply. It’s faster then the previous one because the operating system have already been installed.
RabbitMQ
Click on Create to provision RabbitMQ on your node
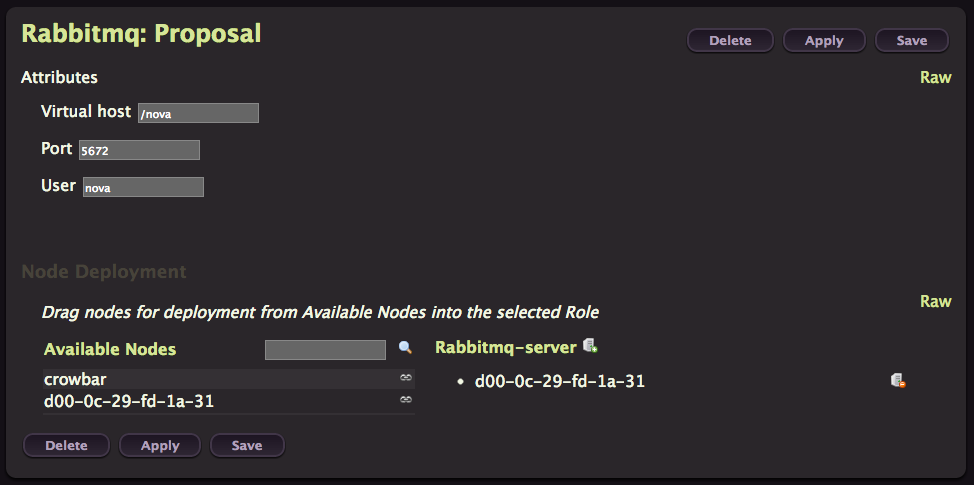
Just click Apply.
Glance
We aren’t deploying swift this time, so jump directly to Glance instead and click Create.
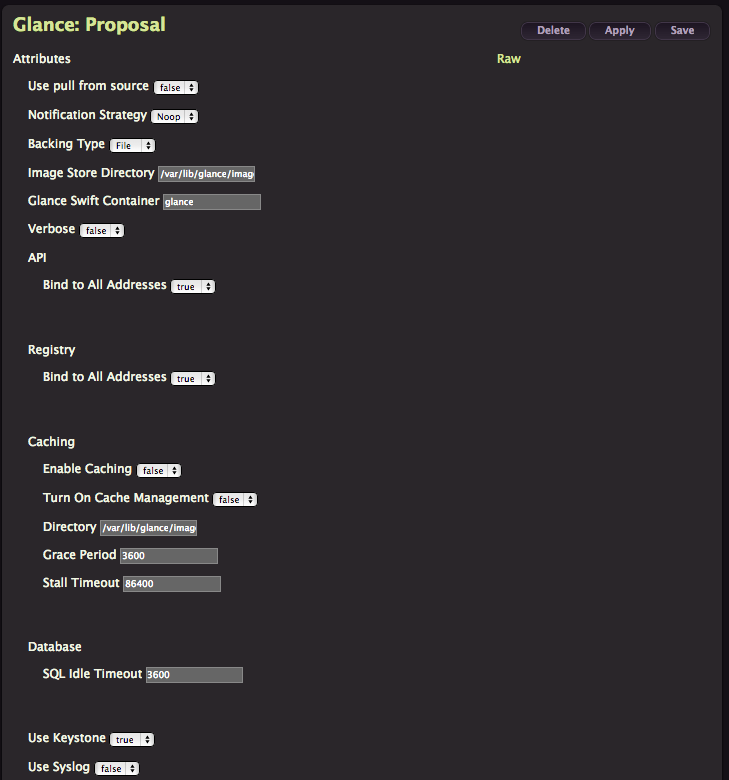
As you can see this one is heavier on options, but you can safely leave everything as default and Click Apply.
Images will be stored in
/var/lib/glance/images
Cinder
Now deploy Cinder using the same Create/Apply process, leave default values.
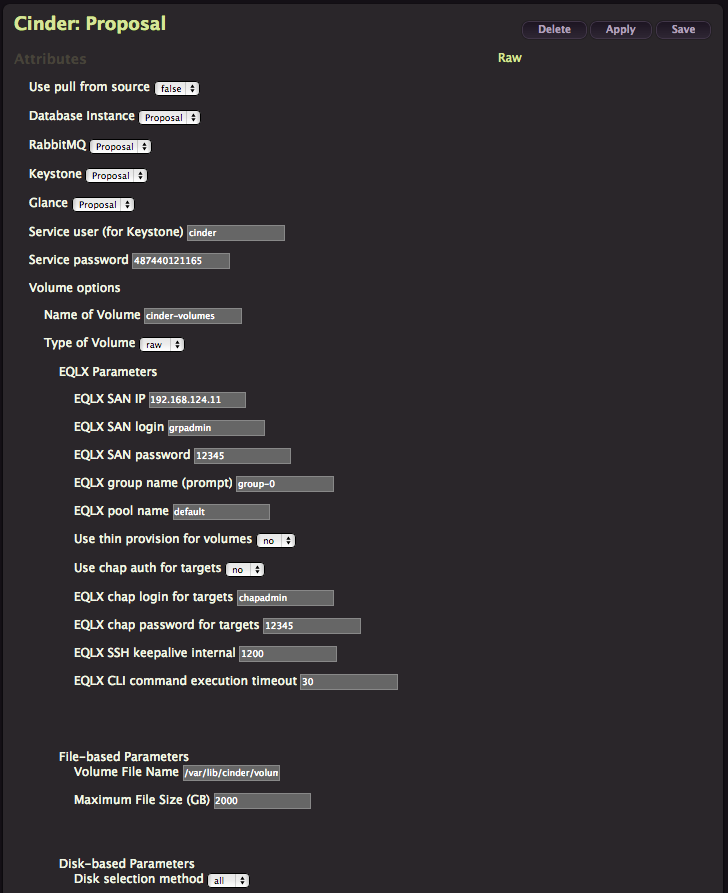
Don’t forget Crowbar comes from Dell, that explain why you have a lot of EqualLogics options here. But this is far from the only choice you have, my favorite is Ceph now supported by Inktank in partnership with Dell and integrated with Crowbar but you have to add the corresponding barclamps to your Crowbar admin node.
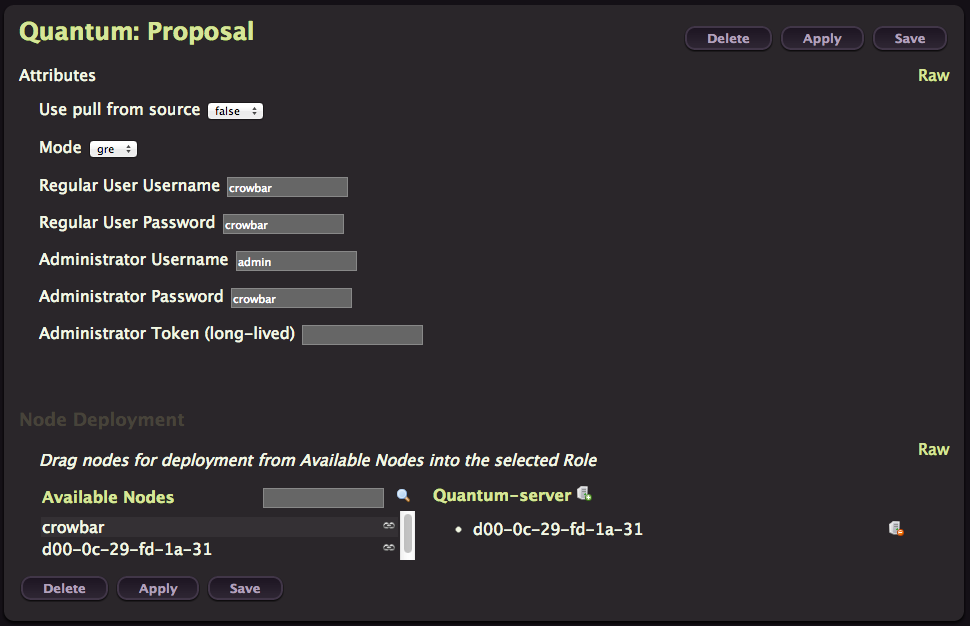
Quantum
We are almost done, deploy Quantum with default values.
Nova
This time you can change the Hypervisor to KVM before applying.
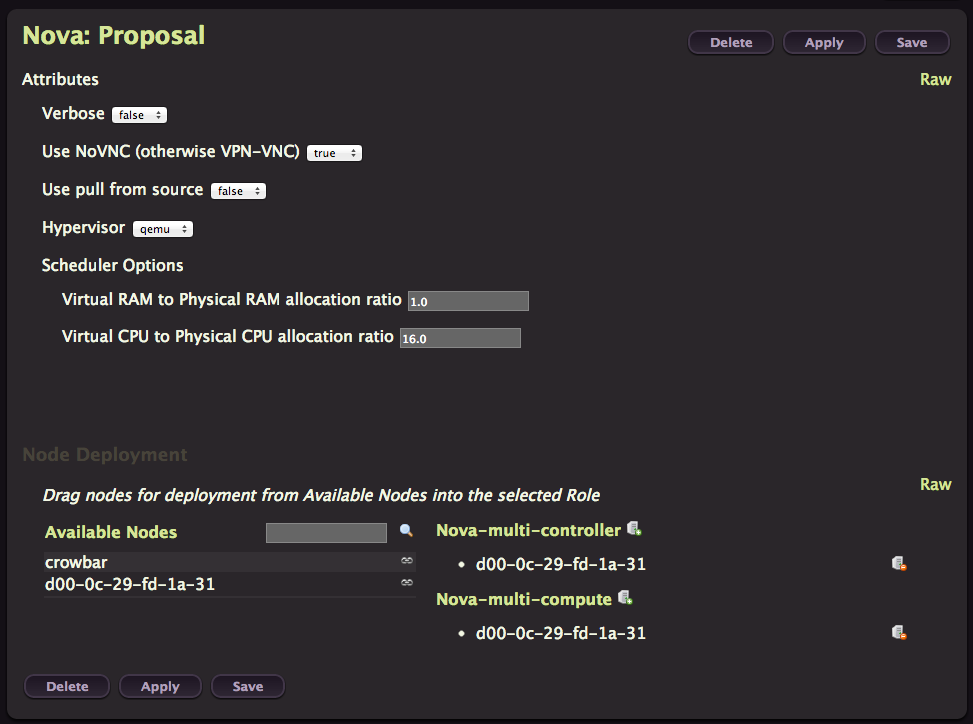
This proposal contain two different roles, controller or compute. So it’s quite easy to do a multi-node deployment by deploying one controller and multiple compute nodes.
Instances ephemeral disk will be create on the compute node here
/var/lib/nova
For more details on Nova barclamp, consult the wiki.
Nova Dashboard
This one should be named Horizon instead. Do as usual.
A Big gift, thanks Crowbar
At last, you have it. All lights greens, it Worked.
You should be able to authenticate to the Horizon Dashboard (admin/crowbar)
http://192.168.124.81
You can try to launch an instance, there is already an Ubuntu image available from Glance. Connect it to the floating network.

Troubleshooting
There is a little bug in this version of Crowbar that you can easily patch. The nova-dashboard Apache configuration template is buggy.
To patch it, follow this procedure on the admin node:
cd /root
knife cookbook download nova_dashboard
mv nova_dashboard-0.0.0 nova_dashboard
vi nova_dashboard/templates/default/nova-dashboard.conf.erb
Update the following line
Alias /static <%= @horizon_dir %>/openstack_dashboard/static
You can now upload the cookbook back to Chef-Server
knife cookbook upload nova_dashboard -o .
If you don’t want to wait until the next Chef runs happens, do on your OpenStack node
sudo chef-client
If a proposal fails you can look at the Chef client logs located n the node affected by the proposal
/var/log/chef/client.log
And also the logs of the service that failed to be deployed. Re-run chef-client and see what happens. Most of the errors you should get will be located in the bc-template-network.json databag.
To attach an IP address to a node, type the following command from your admin node.
crowbar network allocate_ip default <node-name> <network-name> <pool>
chef-client
VMware Fusion Sniffing
tcpdump doesn’t work on vmnet interfaces but your could use instead vmnet-sniffer provided by VMware in the following directory:
/Library/Application\ Support/VMware\ Fusion/vmnet-sniffer
Log Files
On the admin node:
| Path | Component |
|---|---|
| Syslog for nodes | /var/log/nodes/.log| |Proposal output, 1st thing to look when it fails|/opt/dell/crowbar_framework/log/d.log |
| PXE-booted node chef runs prior discovery by Crowbar | /install-logs/h*.log |
| Crowbar Web UI | /opt/dell/crowbar_framework/log/production.log |
| Chef Web UI | /var/log/chef/webui.log |
| Chef expander | /var/log/chef/expander.log |
| Chef client | /var/log/chef/client.log |
| Apache SOLR | /var/log/chef/solr.log |
On other nodes, depending on their roles:
| Path | Component |
|---|---|
| Chef Client log | /var/log/chef/client.log |
| Keystone | /var/log/keystone/keystone.log |
| rabbitmq | /var/log/rabbitmq/ |
| Nova | /var/log/nova |
| Ceph | /var/log/ceph/*.log |
Conclusion
Compared to Mirantis Fuel, Crowbar offers a lot more flexibility and functionalities, apart from the networking stuff everything could be done from the web interface. Each Barclamp can be fully customized to suit your need. There is a huge probability you can tweak it to match your requirements except if your require IPv6 support which isn’t supported yet. Crowbar automate all the infrastructure services like DHCP, DNS, NTP, PXE and TFTP.
Rob Hirschfeld and his team have great plans for 2.0, a little too ambitious for Grizzly so they had to fallback on the 1.x branch.
As of today there isn’t any High Availability architecture offered, it’s a work in progress. So Crowbar as it stands is great for Proof of Concept or Test & Dev environment where you need a lot of flexibility while Fuel by offering HA is positionning for Production environments but will require more manual editing of text files. Fuel Web UI isn’t flexible enough.
Crowbar integrate monitoring tools, Ganglia and Nagios are constantly monitoring the overall deployment and will auto discovers new nodes by using Chef search capability. Even if you don’t like those tools, that’s a good demonstration of the potential of integrating Configuration Management tools with a deployer like Crowbar.
You’ll also find a GUI to locate the node on the different switches, that’s a great and unique idea. But if you don’t like Web UI, everything could be done from CLI.
Fuel uses Puppet while Crowbar is currently based on Chef, so depending on your existing Configuration Management expertise you may prefer one or the other.
I almost forgot, Crowbar isn’t only for OpenStack, they’ve package a version to deploy Hadoop clusters.
Both are really great initiative to accelerate OpenStack deployment and by consequences its adoption rate too. If you need a supported option, SUSE integrate crowbar and SUSE Enterprise Linux in the SUSE Cloud solution.
Stay tuned for more devops articles.
Links
- Glossary
- Documentation from SUSE Cloud 1.0
- SUSE Crowbar 2.0 packages
- Current spring Trello board