Kubernetes by Ansible
Kargo (a.k.a Kubespray) is an initiative to deploy a Kubernetes cluster using Ansible. It will contrast with our previous Step by Step article by showing that we can deploy a cluster with a single command, a bit like the newly integrated SwarmKit feature announced in Docker 1.12 docker swarm init.
Introduction
As you’ve seen in our Step by Step article, deploying a Kubernetes cluster manually is a long, error prone and tedious process. This exercice was just meant as a learning exercice, to understand the different moving parts and how everything fits together.
Today our objective is to get a running Kubernetes cluster as fast as possible, to reach that objective we’ll be automating all of its deployment on top of vSphere with Kubespray which is using Ansible under the cover. It is like playing Kelsey Hightower recent challenge, where he asked engineers to deploy a cluster in less then 45’, without using kube-up.sh or any other official helper.
Requirements
Kargo support CoreOS, Debian, Ubuntu, Fedora and CentOS/RHEL, you’ll need at least 3 nodes running such OS. In my case, I’ll stick with CoreOS which is specifically built for that kind of use case.
These systems require Internet access to pull docker images and they require to allow SSH access from the Ansible (v2.x) Control Machine. The remote user (option –user) must be in the sudoers without password.
If you need details on how to prepare your Ansible control machine, consult my Ansible article.
Clone Kargo repository
Login to your Ansible Control Machine to clone the Kargo repository
cd ~
git clone https://github.com/kubespray/kargo.git
Ansible inventory
Still from your Ansible Control Machine, Create a ~/kargo/inventory/inventory.cfg inventory file
vi ~/kargo/inventory/inventory.cfg

k8s-01 ansible_ssh_host=192.168.1.202
k8s-02 ansible_ssh_host=192.168.1.203
k8s-03 ansible_ssh_host=192.168.1.204

[kube-master]
k8s-01
k8s-02

[etcd]
k8s-01
k8s-02
k8s-03

[kube-node]
k8s-02
k8s-03

[k8s-cluster:children]
kube-node
kube-master
Replace above the nodename and IPs with your own. Each INI section define the group of machines deployed for the respective roles. Here we’ll have 2 Kubernetes master, a 3-node etcd cluster, and 2 worker nodes.
Prepare CoreOS nodes
In my case, I won’t be using any public cloud environment for my Kubernetes automated deployment but instead my own Bulb lab. So I need to boostrap three CoreOS VMs on vSphere.
Start by downloading the latest CoreOS OVA image
curl -LO https://stable.release.core-os.net/amd64-usr/current/coreos_production_vmware_ova.ova
Upload this OVA to your vSphere datastore and deploy it three times by launching the Deploy OVF Template workflow from the vSphere Web UI.
Note: You don’t need to specify any parameters during the OVF deployment, you’ll provide them later by editing directly the VMX file of each VM. vApp parameters passing to VMX doesn’t seem to work so well for me :(

While the VMs are deploying create a cloud config file which contains your public SSH key
vi user_data

#cloud-config

ssh_authorized_keys:
  - "ssh-rsa AAAAB......."
Replace the ssh key by the public key of your ansible control machine, to allow it to access coreOS nodes passwordless.
Encode it as a base64 string
base64 user_data && echo
I2Nsb3VkLWNvbmZpZwoKaG9zdG5h.....
Before powering any VM up, ssh to the ESXi host where it has been deployed and edit the corresponding vmx file to add configuration parameters using the guest info interface
ssh root@<ESXi_IP>
vi /vmfs/volumes/datastore-1/k8s-01.bulb.int/k8s-01.bulb.int.vmx
And add the following content
guestinfo.hostname = "k8s-01.bulb.int"
guestinfo.interface.0.role = "private"
guestinfo.dns.server.0 = "192.168.1.221"
guestinfo.interface.0.route.0.gateway = "192.168.1.1"
guestinfo.interface.0.route.0.destination = "0.0.0.0/0"
guestinfo.interface.0.name = "en*"
guestinfo.interface.0.dhcp = "no"
guestinfo.interface.0.ip.0.address = "192.168.1.202/24"
guestinfo.coreos.config.data = "I2Nsb3VkLWNvb..."
guestinfo.coreos.config.data.encoding = "base64"
Replace hostname, dns, gateway, mac, interface name, IP address with your own.
The configdata is the base64 encoded string you’ve got above.
To tell vSphere to reload that file you need to get the ID of your VM, look for your VM in the list output of
vim-cmd vmsvc/getallvms
Reload the VMX
vim-cmd vmsvc/reload <Vmid>
Repeat this process for all your nodes and power them up, once booted you can check the VMX info has been seen by your VM
core@k8s-01$ /usr/share/oem/bin/vmtoolsd --cmd "info-get guestinfo.interface.0.dhcp"
core@k8s-01$ /usr/share/oem/bin/vmtoolsd --cmd "info-get guestinfo.coreos.config.data"
If you’ve got a DHCP assigned IP address, do not freak out, just reboot, it seems the VMX parameters saying we don’t want DHCP is set after an IP is already assigned, but that will get fixed after the second reboot.
CoreOS nodes require special care before you can start the Kargo provisionning.
First check that each node does have at least 400M of disk space in /opt/bin which should be writable.
sudo mkdir -p /opt/bin
Log back to your Ansible Control Machine to uncomment the variable ansible_python_interpreter in the file ~kargo/inventory/group_vars/all.yml
Finish the bootstrapping by running the Python bootstrap playbook
ansible-playbook -u core -e ansible_ssh_user=core -b --become-user=root \
                 -i inventory/inventory.cfg coreos-bootstrap.yml
.................
.trucated output.
.................
PLAY RECAP *********************************************************************
k8s-01                     : ok=10   changed=7    unreachable=0     failed=0
k8s-02                     : ok=10   changed=7    unreachable=0     failed=0
k8s-03                     : ok=10   changed=7    unreachable=0     failed=0
If not already bootstrapped, this playbook install an alternative, fast, python interpreter, pypy in /opt/bin, install pip and httplib2 required Python module.
Kargo Installation
Kargo does provide a command line interface, it’s an Ansible wrapper, we won’t be using it here but you can install it on your Ansible Control Machine with pip
sudo pip2 install kargo
If you don’t want to override default value using kargocli command line, you can now edit them
vi /etc/kargo/kargo.yml
Kubernetes Cluster Deployment
The beauty of automation comes now, to deploy your k8s cluster first makes sure you have your private key loaded on your Ansible control machine
eval `ssh-agent -s`
ssh-add
Deploy your cluster with this single command
ansible-playbook -i ./inventory/inventory.cfg -u core -e ansible_ssh_user=core -b cluster.yml
-u define the user that will be used to connect over SSH to the remote system
-b tells ansible to become root on the target system
It should terminate with such a message after less then 30’
PLAY RECAP *********************************************************************
k8s-01                     : ok=151  changed=22   unreachable=0    failed=0
k8s-02                     : ok=142  changed=3    unreachable=0    failed=0
k8s-03                     : ok=71   changed=9    unreachable=0    failed=0
If that’s not your case, re-run the above command.
Checking the k8s environment
To check that everything looks good you can login to your master node and list the worker node
ssh core@192.168.1.202
kubectl get nodes
k8s-02    Ready     7m
k8s-03    Ready     7m
As you can see above we have two worker nodes ready which correspond to the thing we’ve declared in our Ansible inventory.
You can also check for services that are currently declared within your cluster
kubectl get svc
NAME         CLUSTER-IP   EXTERNAL-IP   PORT(S)   AGE
kubernetes   10.233.0.1   <none>        443/TCP   17m
List the pods in the kube-system namespace with
kubectl get po --namespace=kube-system
NAME                             READY     STATUS    RESTARTS   AGE
dnsmasq-3da6b                    1/1       Running   0          9m
dnsmasq-cvywv                    1/1       Running   0          9m
flannel-k8s-02                   2/2       Running   0          9m
flannel-k8s-03                   2/2       Running   0          9m
kube-controller-manager-k8s-02   1/1       Running   0          9m
kube-proxy-k8s-02                1/1       Running   0          9m
kube-proxy-k8s-03                1/1       Running   0          9m
kube-scheduler-k8s-02            1/1       Running   0          9m
kubedns-5m773                    4/4       Running   0          8m
Great everything looks good !!!
Kubernetes Dashboard
In my previous Step by Step installation, I couldn’t successfully install Kubernetes Dashboard, lets try again here.
The corresponding k8s manifest should look like that
vi kubernetes-dashboard.yml

kind: Deployment
apiVersion: extensions/v1beta1
metadata:
  labels:
    app: kubernetes-dashboard
    version: v1.1.0
  name: kubernetes-dashboard
spec:
  replicas: 1
  selector:
    matchLabels:
      app: kubernetes-dashboard
  template:
    metadata:
      labels:
        app: kubernetes-dashboard
    spec:
      containers:
      - name: kubernetes-dashboard
        image: gcr.io/google_containers/kubernetes-dashboard-amd64:v1.1.0
        imagePullPolicy: Always
        ports:
        - containerPort: 9090
          protocol: TCP
        args:
          # Uncomment the following line to manually specify Kubernetes API server Host
          # If not specified, Dashboard will attempt to auto discover the API server and connect
          # to it. Uncomment only if the default does not work.
          # - --apiserver-host=http://my-address:port
        livenessProbe:
          httpGet:
            path: /
            port: 9090
          initialDelaySeconds: 30
          timeoutSeconds: 30
---
kind: Service
apiVersion: v1
metadata:
  labels:
    app: kubernetes-dashboard
  name: kubernetes-dashboard
spec:
  type: NodePort
  ports:
  - port: 80
    targetPort: 9090
  selector:
    app: kubernetes-dashboard
Deploy the dashboard with
kubectl create -f kubernetes-dashboard.yml
Look for the assigned NodePort with
kubectl describe svc kubernetes-dashboard
Name:                   kubernetes-dashboard
Namespace:              default
Labels:                 app=kubernetes-dashboard
Selector:               app=kubernetes-dashboard
Type:                   NodePort
IP:                     10.233.50.97
Port:                   <unset> 80/TCP
NodePort:               <unset> 30991/TCP
Endpoints:              172.17.0.3:9090
Session Affinity:       None
No events.
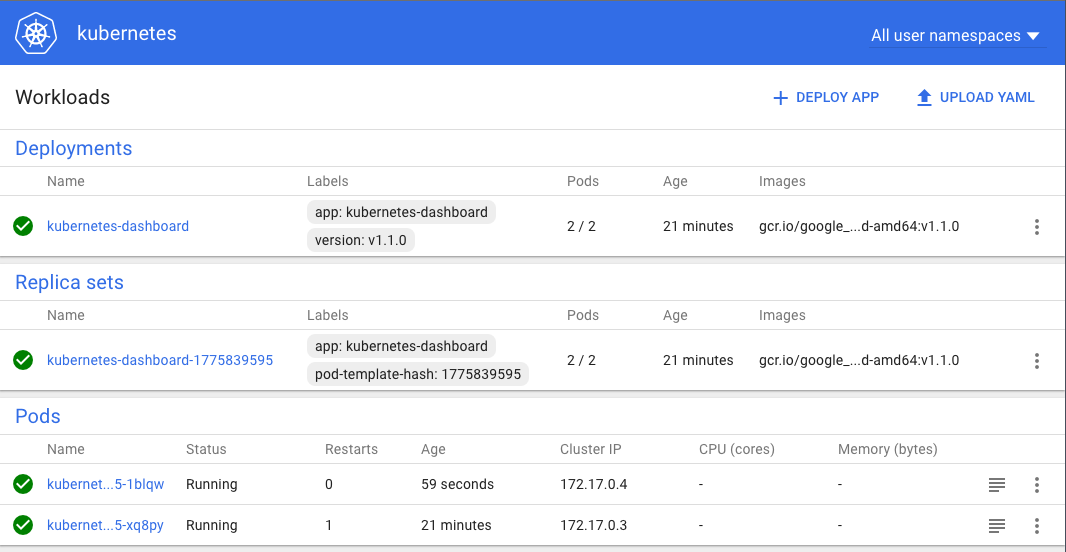
As you can see above you should then be able to connect on any node IP address on port 30991, so try to open
http://192.168.1.203:30991
You should then see the following dashboard
Conclusion
That conclude our Kubernetes by Ansible article, as you’ve seen it’s a lot simpler and faster to automate the deployment of k8s.
Kargo also works in Google Compute, OpenStack or Amazon, which is great for application portability. Hybrid cloud nirvana is around the corner ;)