Opscode Chef 101
Chef is an outstanding Ruby based configuration management system. It’s main reason for existance is to automate your infrastructure. It will help you bring your application to life, including all the dependencies like web and app servers, load balancers, dns, ntp, just to name a few. You’ll find hundreds of pre-built cookbooks on the Community web site. If you want to learn Chef the best starting point is the LearnChef web site. Today, we will show you how to quickly setup a Chef infrastructure easily step by step.
Before starting to deploy all the Chef components and if you have no ideas about what it(s all about, it’s a good idea to review the main concepts behind this configuration management solution. You’ll find a short overview in the official docs.
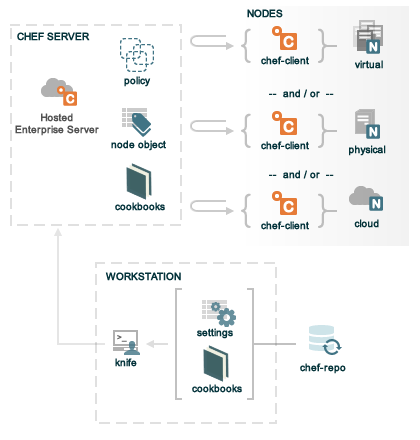
Quickly put you’ll need:
- A chef server - API server which stores cookbooks, node policies and metadata
- A workstation - to develop your cookbooks and run knife commands (CLI to interact with the Chef Server).
- A chef-repo - a git Repository - to keep track of your cookbooks, roles, Data bags and environments.
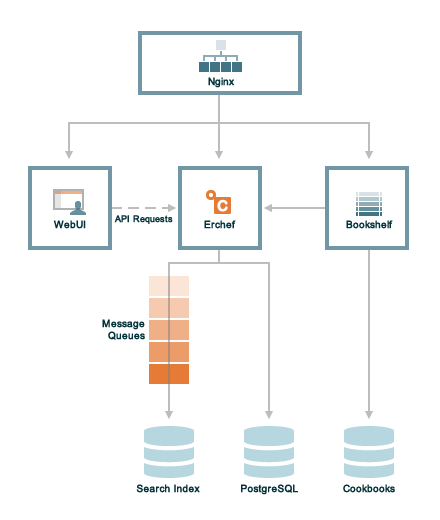
Chef Server
Chef Server is developed in Erlang. It uses an Nginx frontend to serve API request, RabbitMQ to send message to the Apache Solr indexer and a PostgreSQL repository.
Instead of using your own instance, if you are in a hurry, you can use the Enterprise Chef hosted solution from Opscode. it’s free up to 5 nodes and can easily scale.
Chef Server installation
But If you prefer you can install your own Chef Server on a brand new Ubuntu 12.04 system.
Note: In the remaining of the lab, we’ll use user as the Ubuntu user account, make sure you replace it with your own user account everywhere necessary. And If a command isn’t prefixed with chef-server> make sure you run it from the workstation node otherwise run it from the chef-server node.
To start the installation first update the hostname of this system:
chef-server> sudo hostname 'chef-server.lab.int'
chef-server> echo "chef-server.lab.int" | sudo tee /etc/hostname
Make sure then your VM is registered with your DNS server or update your /etc/hosts with a fully qualified domain name (FQDN) by adding such a line in it:
127.0.1.1 chef-server.lab.int chef-server
You can automate it like this:
chef-server> echo -e "127.0.1.1 `hostname` `hostname -s`" | sudo tee -a /etc/hosts
Install Chef-Server by following this process:
- go to http://www.opscode.com/chef/install/.
- click on the Chef Server tab
- select the correct Ubuntu release.
- select the latest version
- download and transfer the deb package to your node using
scp chef-server_11.0.8-1.ubuntu.12.04_amd64.deb <user>@chef-server.lab.int:/tmp/ - Install the package:
sudo dpkg -i /tmp/chef-server_11.0.8-1.ubuntu.12.04_amd64.deb - Reconfigure your Chef-Server environment with:
sudo chef-server-ctl reconfigure
Opscode engineers uses their own solution to install and manage a Chef-Server (Erchef) including all the dependencies (RabbitMQ, PostgreSQL, ..) that’s pretty damn smart. That’s one of the reason I like Chef so much, they make everything so simple for us simple humans. So that’s all you need, you can verify the installation of your Chef Server with sudo chef-server-ctl test
If you get any error message, check again the ability of the chef-server to resolve its hostname.
Before going to the next section, you can play around with Chef Server Web UI:
https://chef-server.lab.int (put in your server FQDN)
Workstation
To interact with your Chef Server, you now need to configure a Chef Workstation.
Omnibus installation
Let’s assume you’ll be using a Linux workstation as your favorite option, Chef also support Mac OS X and Windows but Linux makes everything easier at least for me. This article also assume a Debian based distribution. Let’s install the pre-requisites on this host with the following commands:
sudo apt-get update
sudo apt-get install build-essential wget git
It’s now time to configure git
git config --global user.name "user"
git config --global user.email "user@mail.com"
You have two options to install Chef on your workstation, if you already have Ruby installed on your system, use:
gem install chef
If not, don’t panic, you can use the Omnibus installer from Opscode which install Ruby and Chef in one simple step with:
curl -L https://www.opscode.com/chef/install.sh | sudo bash
This script retrieve your Platform details (distrib/version) from
/etc/lsb-release (Linux)
/etc/redhat-release (RedHat)
/etc/system-release (Fedora)
/etc/SuSE-release (SUSE)
/etc/release (Solaris)
/usr/bin/sw_vers (Mac OSX)
Note: If you have a distro based on Debian but with a customized name you’ll have to tweak your /etc/lsb-release first.
And then download and install the correct packages in our Debian case with
wget -O "/tmp/tmp.XXXXXXXX/chef_${version}_amd64.deb" https://www.opscode.com/chef/download?v=${version}&prerelease=false&p=debian&pv=6&m=x86_64
sudo dpkg -i <PKGNAME>
If you don’t like to run arbitrary code as root you can also do that on your own by manually downloading the Omnibus Installer.
After a while, the installation should finish with the following output
Downloading Chef  for ubuntu...
Installing Chef
Selecting previously unselected package chef.
(Reading database ... 195723 files and directories currently installed.)
Unpacking chef (from .../tmp.yIoE7Dqv/chef__amd64.deb) ...
Setting up chef (11.6.2-1.ubuntu.12.04) ...
Thank you for installing Chef!
You can check it was correctly installed with
apt-cache show chef
This Omnibus installation lives below /opt/chef, you’ll find all software versions installed in the following file:
/opt/chef/version-manifest.txt
If you are curious you can also dump package content with
dpkg -L chef
You can now add Chef to your PATH
echo 'export PATH="/opt/chef/embedded/bin:$PATH"' >> ~/.bash_profile && source ~/.bash_profile
Before going to the next step, test your installation by running:
chef-client -v
chef-repo
You now have to get an empty Chef repository from Opscode to get you started, to do that run the following commands on your workstation.
wget http://github.com/opscode/chef-repo/tarball/master
tar xvf master
mv opscode-chef-repo-f9d4b0c/ chef-repo
cd chef-repo/
Initialize it as a Git Repository
git init .
If you have an upstream repository on github you can connect it with (optional step)
git remote add origin git@github.com:<YOURACCOUNTHERE>/chef-repo.git
Add & Commit your repository
git add .
git commit -m "initial commit"
Push it upstream (optional step)
git push -u origin master
Note: If you prefer a shorter workflow, you can also directly clone Opscode github repository using
git clone git://github.com/opscode/chef-repo.git
Workstation configuration
We are almost ready to use our Chef infrastructure, we just need to connect our Workstation to our Chef Server. Create the following directory which will contain our configuration:
mkdir -p ~/chef-repo/.chef
Make sure git will ignore this directory, it contains sensitive informations
echo ".chef" >> .gitignore
Every requests comming to the server is authenticated using PKI so you need to copy the following files from your chef-server to your workstation
chef-server> scp /etc/chef-server/admin.pem <user>@workstation:/home/<user>/chef-repo/.chef/
chef-server> scp /etc/chef-server/chef-validator.pem <user>@workstation:/home/<user>/chef-repo/.chef/
When a chef-client connect for the first time, its /etc/chef/client.pem doesn’t exist, so it will use instead /etc/chef/validation.pem which is installed at the same time as chef-client itself (manually or via bootstrapping). This insure that each node can make an authenticated client request during its first chef-client run.
To create the initial .chef/knife.rb configuration, you first need to add the following line to your /etc/hosts of your workstation
<CHEF-SERVER-IPADDRESS> chef-workstation.lab.int
You can now run
knife configure -i \
  -u <user> \
  -s https://chef-server.lab.int:443 \
  -r /home/<user>/chef-repo \
  --admin-client-name admin \
  --admin-client-key /home/<user>/chef-repo/.chef/admin.pem \
  --validation-key /home/<user>/chef-repo/.chef/chef-validator.pem \
  --validation-client-name chef-validator
It will create a new user and generate the following configuration file /home/<user>/.chef/knife.rb:
log_level                :info
log_location             STDOUT
node_name                'user'
client_key               '/home/user/chef-repo/.chef/user.pem'
validation_client_name   'chef-validator'
validation_key           '/home/user/chef-repo/chef-validator.pem'
chef_server_url          'https://chef-server.lab.int:443'
syntax_check_cache_path  '/home/user/chef-repo/.chef/syntax_check_cache'
cookbook_path            [ '/home/user/chef-repo/cookbooks' ]
You can now confirm it works:
workstation> knife client list
You should get back the following
chef-validator
chef-webui
chef-validator will be used by new born nodes which will then borrow the identity of chef-validator from the /etc/chef/validation.pem private key installed at bootstrap time to register to the server and then get their own key.
Cookbooks
We are now ready to install the first cookbooks from Opscode community site:
knife cookbook site install apt
knife cookbook site install apache2
knife cookbook site install magic_shell
If you are curious you can explore cookbooks content, for example have a look inside metadata.rb, README.md and recipes/default.rb.
Your repository is automatically commited after each cookbook site installation, see:
git log
You can easily create a new cookbook
knife cookbook create aliases
To use the Light Weight Resource Provider (LWRP) of the magic_shell cookbook inside the newly created one, add the following line to the new cookbook metadata.rb which reside in cookbooks/aliases directory
depends 'magic_shell'
You can now use the corresponding LWRP in the aliases/recipes/default.rb default recipe like this
# Alias `h` to go home
magic_shell_alias 'h' do
  command 'cd ~'
end

# Alias `sites` to cd into apache
magic_shell_alias 'sites' do
  command "cd #{node['apache']['dir']}/sites-enabled"
end

# Set Nano as the default editor
magic_shell_environment 'EDITOR' do
      value 'nano'
end
Commit the newly created cookbook to your Git repository
git add cookbooks/aliases/
git commit -m "aliases cookbook created"
Upload the cookbooks to your Chef Server
knife cookbook upload --all
Bootstrap a node
To proceed to this section you first need another Ubuntu base OS available. You should normally be able to bootstrap the node using Knife:
knife bootstrap <NODE_IP_ADDRESS> \
  --ssh-user <userid> \
  --run-list "recipe[apt],recipe[aliases],recipe[apache2]" \
  --sudo
By default the boostrapping process will leverage the Omnibus Installer on your node using the following script.
But let’s customize it, you can find the default bootstrapping script below
gem contents chef | grep chef-full
For our lab we’ll use an offline based bootstrapping instead of downloading the Omnibus package from Opscode, just copy the default one first
cp <location from previous command>/chef-full.erb ~/chef-repo/.chef/bootstrap/ubuntu12.04-offline.erb
Now you can edit it to update the following part like that
cat >> /etc/hosts <<'EOP'
<CHEF_SERVER_IPADDRESS>     chef-server chef-server.lab.int
EOP

install_deb="http://chef-server.lab.int:3333/chef_11.6.2-1.ubuntu.12.04_amd64.deb"

if ! exists /usr/bin/chef-client; then
  if exists wget; then
    wget ${install_deb} -O chef_11.6.2-1.deb
    dpkg -i chef_11.6.2-1.deb
  elif exists curl; then
    curl -L ${install_deb} chef_11.6.2-1.deb
    dpkg -i chef_11.6.2-1.deb
The first section where we add a line to /etc/hosts is necessary if you don’t have any DNS resolver that can resolve chef-server.lab.int in this lab.
Before bootstrapping your node, serve the deb file from your Chef Server with Ruby:
/opt/chef-server/embedded/bin/ruby -run \
  -e httpd -- \
  -p 3333 \
  /home/<user>/chef_11.6.2-1.ubuntu.12.04_amd64.deb
Now you can bootstrap it using knife bootstrap command using --distro argument
knife bootstrap <NODE_IP_ADDRESS> \
  --node-name node-01
  --ssh-user <user> \
  --run-list "recipe[apt],recipe[aliases],recipe[apache2]" \
  --distro ubuntu12.04-offline \
  --sudo
Check that your node is now registered with your Chef Server
knife client list
knife node show node-01
SSH to your newly bootstraped node and check if everything looks good by running the following commands.
sites
h
echo $EDITOR
ps aux | grep apache
If you try to reach the hosted web site it displays a Not Found error, let’s go back to our apache2 cookbook to see how we can improve that. If you look into the cookbook/apache2/attributes/default.rb you’ll find multiple line saying, one for each supported platform:
default['apache']['default_site_enabled'] = false
Apache2 is an Opscode community cookbook, forking it is the last thing you want to do. So let’s create instead a Role to tweak how it gets applied to our node.
Roles
To create a webserver role, we have to first describe it in the chef-repo/roles/webserver.rb file like this
name "webserver"
description "Systems that serve HTTP and HTTPS"
run_list(
  "recipe[apt]",
  "recipe[aliases]",
  "recipe[apache2]"
)
default_attributes(
  "apache" => {
    "default_site_enabled" => true
  }
)
Upload this new role to your Chef Server
knife role from file webserver.rb
Edit your node to use this Role instead of the previous recipes
knife node edit <nodename>
update the run_list section like below
"run_list": [
  "role[webserver]"
]
remotly re-run chef-client
knife ssh -P <sshpassword> -a ipaddress 'name:node-01' "sudo chef-client"
It Works should now have replaced the previous Not Found error message.
Just for fun you can try to run the above command again to prove Chef is really idempotent meaning commands won’t be executed if it’s not necessary. You’ll see instead 0 resources updated .
Ohai
Ohai is a tool which will gather all the information of your node. To see all the information it’s gathering about a node, just run it
ohai | more
Chef Shell
While writing cookbook the Chef Shell can really save your life when it comes to troubleshooting. You can enter the shell from a root account with
node> chef-shell --client
You can then investigate around like this
node> help
node> nodes.list
node> webserver = nodes.show('NODENAME')
node> webserver.ipaddress
node> webserver.fqdn
node> search(:node, 'recipes:aliases')
node> exit
You can play around a bit if you want.
Knife OpenStack plugin
In our previous lab exercices we had to provision a VM on our own, but Chef can do better then that. Knife offers lots of plugin, like the OpenStack one that can be leveraged to easily provision VMs on OpenStack.
Install it with
sudo /opt/chef/embedded/bin/gem install knife-openstack unf --no-ri --no-rdoc
You now have to configure it by adding the following to your knife.rb
knife[:openstack_username] = "Your OpenStack Dashboard username"
knife[:openstack_password] = "Your OpenStack Dashboard password"
knife[:openstack_auth_url] = "http://cloud.mycompany.com:5000/v2.0/tokens"
knife[:openstack_tenant] = "Your OpenStack tenant name"
You can get the Identity API endpoint URL details from the API access tab within the OpenStack Horizon Dashboard.
You can now check if the connection is operational
knife openstack flavor list
To choose an image to bootstrap, select one from the following list
knife openstack image list
You can now bootstrap a node using, replace the Image ID by the one you got from the previous command.
knife openstack server create \
  --run-list 'role[webserver]' \
  --flavor 0 \
  --image 932cd617-26d3-4d0e-bb5b-f4ef28d9c085 \
  --ssh-user <user> \
  --node-name node-02.lab.int \
  --distro ubuntu12.04-offline
  --floating-ip
Check it was successfully created
knife openstack server list
If you want to clean up behind you
knife openstack server delete -N node-02.lab.int -P <INSTANCE_ID>
Use -P to also delete Chef client and node.
Conclusion
You now have a fully operational Chef infrastructure. It’s a good starting point to learn Chef by using Chef. Have fun.
Documentation
- Start here
- Chef Server Installation
- Chef 11 Server up and Running
- Berkshelf - Manage Cookbook dependencies
OpenStack related Links
- Knife Openstack
-
StackForge main OpenStack repository for Chef cookbooks. Look for repositories starting with
cookbook-* - Rackspace Private Cloud
- Chef for Openstack Google Groups
- Kitchen-Openstack - An OpenStack Nova driver for Test Kitchen 1.0!
- ChefConf2013 - Chef for OpenStack slides