vCops-5.6
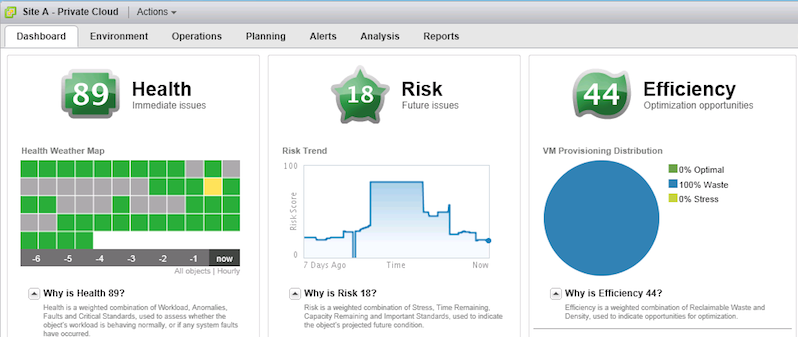
vCenter Operations Management Suite is a solution to easily get an high level overview of the Health, Risk and Efficience of a virtual datacenter. This latest release integrates with VMware Infrastructure Navigator which will give you an insight of all the applications deployed within your VMs as well as their inter-dependencies. vCops now also integrates with vCenter Configuration Manager with a fourth supermetric called Compliance. This is a condensed howto about installing and configuring vCops version 5.6, released November 29, 2012.
Product Packaging
vCenter Operations comes in three different packaged versions :
-
Standard:
- vSphere Performance and Health Monitoring with a vSphere Dashboard and Capacity Optimization.
-
Advanced:
- Custom Dashboards with role-based access
- Infrastructure Navigator 2.0
- vCenter Chargeback Manager 2.5
-
Enterprise:
- Adapters for EMC Symmetric and Netapp.
- Optional 3rd party adapters monitoring tools (SCOM, Tivoli, …)
- Optional Regulatory compliance content packs (PCI, HIPAA, SOX)
Enterprise License Agreement (ELA) gives you the opportunity to also get vFabric Hyperic 5.0 (OS & App/Middleware Monitoring) and vCenter Configuration Management 5.6.
-
Advanced:
- OS Resource Monitoring (CPU, RAM, Disk, Network for Linux, Windows, AIX, Solaris, HP-UX, Mac OSX)
- Application Monitoring (Apache, tc server, …)
- vSphere change and configuration management
-
Enterprise:
- OS-level change, configuration and patch management.
- App middleware & DB Moniroting (SQL, Exchange, Oracle, …)
Prerequisites and Architecture
You first have to request a product evaluation on vmware.com to get access to a virtual appliance (1.3 Go OVA) named VMware vCenter Operations Manager 5.6.0. That’s all you need for now.
Before starting your installation, it’s a good idea to read the release notes.
Our vCops vApp is distributed as an Open Virtualization Format (OVF) and contains two VMs:
-
UI VM: present the results of the analytics in the form of badges and scores using a web based application. There is 3 different UI:
- vSphere UI: standard dashboard
- Enterprise UI: to build custom UI
- Administration UI: interface to vCops maintenance and management tasks
-
Analytics VM: collects data from vCenter, vCenter Configuration Manager and 3rd party data sources: metrics, topology and change events. There are 4 main components :
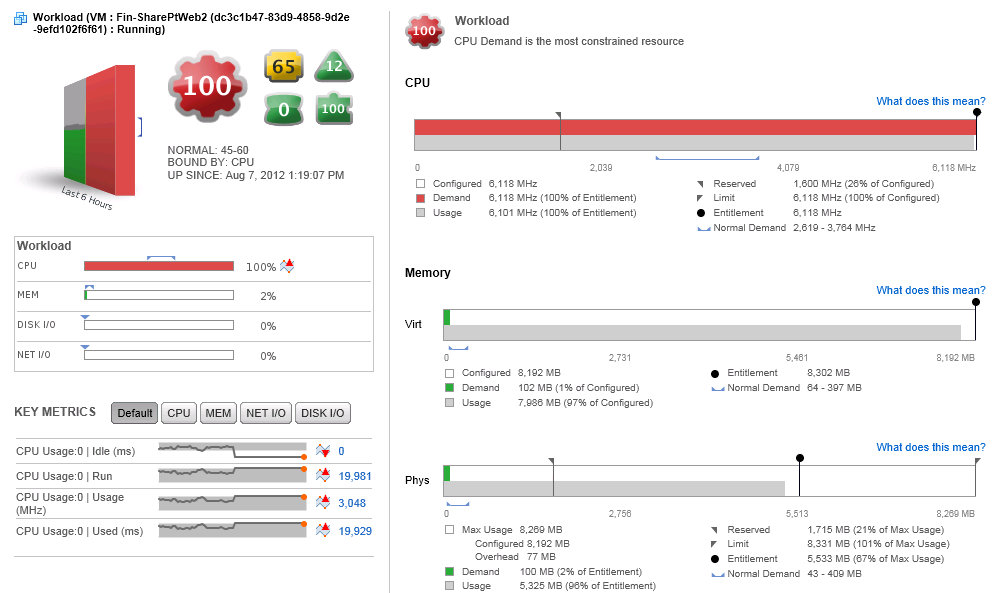
- Capacity and Performance Analytics: check incoming metrics fir abnormalities in real time, updates health, scores, and gerenates alerts if needed.
- Capacity Collector: Collects metrics and computes derived metrics
- FileSytem Database: Stores the collected metrics statistics (FSDB)
- Postgre DB: Stores all other data collected, including objects, relationships, events, dynamic thresholds, and alerts.
Gathering of all the metrics is done from an authenticated (PKI) SSL connection to the connected vCenters.
| The following Ports are used by vCops | |
|---|---|
| 22 | enables SSH access to the vCops vApp |
| 80 | redirects to port 443 |
| 443 | vCops admin portal and vCops Manager application |
| 1194 | Tunnel for the UI VM and Analytics VM |
Required Components/Informations:
- vCops license key
- vCenter version 4.0U2 or later
- ESX version 4.0 or later where to deploy the vApp
- Networking configuration (see below)
- vCenter Hostname or IP
- vCenter Password
- vCenter VirtualCenter Management Webservices must be running.
- Time synchronisation: ESX that host vCops and vCenter clock need to be in sync. vCops vApp clock is taken from the ESX host.
- IE 8.0/9.0 or Mozilla 3.6 or later with least 1024x768 pixels.
vApp resources requirements:
- for up to 1500 VMs: 600.000 metrics collected
- 4 vCPU (UI: 2, Analytics: 2)
- 16 GB RAM (UI: 7 GB, Analytics: 9 GB)
- 900G disk (UI: 100GB, Analytics: 800 GB)
- 1.500 IOPS
- up to 3000 VMs: 1.2 Million metrics
- 8 vCPU (UI: 7 GB, Analytics: 4 )
- 25 GB RAM (UI: 11 GB , Analytics: 14 GB)
- 1.8 TB disk (UI: 200GB, Analytics: 1.6 GB)
- 3.000 IOPS
- up to 6000 VMs: 2.5 Million metrics
- 16 vCPU (UI: 11 GB, Analytics: 14 GB)
- 34 GB RAM (UI: 13 GB, Analytics: 21 GB)
- 3.6 TB disk (UI: 400GB, Analytics: 3.2 GB)
- 6.000 IOPS
Note: Disk size need to be customized by the administrator by adding Hard Disk to VMs if the size of your environment requires it.
Installation
We are now ready to deploy the vCops OVA.
Configure Network Parameters
- connect to your vCenter (4.0+).
- click on your target datacenter
- click on the IP Pools tab
- click Add to add a new IP Pool
- select the IPv4 tab.
- type an IP pool name/IP Subnet and Gateway but do not Enable IP Pool checkbox, and do not specify a range of IP addresses.
- Select the DHCP tab.
- Select the IPv4 DHCP Present check box if a DHCP server is available on this network.
- Select the DNS tab and type the DNS server information.
- In the Associations tab, select the network for the IP pool.
- Use this network when you configure a virtual machine network in the vApp OVF Deployment Wizard.
- Click OK.
Deploy vCops vApp
- Connect to your vCenter
- Enable DRS in the cluster
- Verify that the VM network that you connect this vApp to has an IP Pool and select that network during the .ova deployment
- File > Deploy OVF Template
- Select Disk format, Thick provisioned eager-zeroed provides a 10% performance improvement (recommended)
- Select Fixed or DHCP IP allocation
- Finish
- Power on the vCops Manager vApp
- Check vCops VM IP address on Summary tab
Set ESX Host Time
- Select host in the inventory
- Configuration > Time Configuration > Properties to adjust time and click OK
Connect vCops to vCenter
- http://IP/admin l:admin p:admin
- update admin password (min 8 chars, one letter, one digit)
- update root password (vmware by default)
- type a name for the vCenter Server system (for reference only)
- type IP or FQDN of vCenter
- type registration credentials (require following access : Global: Licenses and Extension: Register extension, unregister extension, update extension.)
- you can optionally enter collection credentials (usefull if you want to limit vCops to a subset of your datacenter)
- click Save
Assign a license
- vCenter > Home > Licensing
- select Asset
- right click your vCenter Operations edition and select Change License Key
- select Assign a new license key to this solution
- click Enter Key and enter it
- click OK
SMTP/SNMP Configuration
- connect to http://IP/admin with your new password
- On the SMTP tab, select the Enable report email service check box.
- Type the SMTP server address and port number.
- Type the name and email address to use when sending alerts or reports.
- If required select the Server requires an encrypted connection check box and select the encryption protocol.
- If required select the Outgoing SMTP server requires authentication check box and type the credentials.
- Select the Enable SNMP check box and type the destination host, port, and community information.
- Click Update to apply your settings.
Verify installation
- click vCenter > vCenter Operations Manager icon or access it from your browser http://IP/
- ignore the certificate warnings that might appear.
- Look at the dashboard and verify that the inventory objects you expect to see appear.
Installing a vCops Adapter
- Obtain the PAK file for the adapter from VMware
- connect to http://IP/admin
- Update > Browse > locate your PAK file
- click Update and click OK
- Accept EULA and click OK
- Login to https://IP/vcops-custom/
- Select Admin > Support
- On the Info tab, click the Describe icon in the Adapters pane.
- Click Yes to start the describe process and click OK
- Verify Build number which should match the one you’ve uploaded.
Infrastructure Navigator Adapter
The Infrastructure Navigator adapter is an embedded adapter for vCops Advanced, it retrieves application-related information. You can customize it by modifying properties in the vin_adapter.properties file
| Property | Description | Default |
|---|---|---|
| workerThreadCount | Number of threads for retrieving Infrastructure Navigator documents from the vCenter Inventory service. You can configure up to 100 threads. | 10 |
| docBuilderCount | Number of DocumentBuilder objects for parsing Infrastructure Navigator data documents. You can configure up to 100 objects. | 10 |
| syncInterval | Time interval, in minutes, that the adapter synchronizes its entire local cache with the vCenter Operations Manager Advanced server. | 60 |
| certCheckEnabled | Boolean value that determines whether the adapter checks the vCenter Operations Manager Advanced server certificate. | true in a vApp installation, false otherwise |
| vin20Enabled | Boolean value that determines whether to retrieve and process application-related information that is available only in Infrastructure Navigator 2.0. | true |
/data/vcops/log/adapters/VinAdapter Infrastructure Navigator adapter log files
/data/vcops/log Collector log files on Analytics VM
To get more information you can set for a short interval DEBUG level logging.
Upgrading
You can upgrade a vCops , 5.0.1, 5.0.2, 5.0.3 vAPP to vCenter Operation Manager 5.6x. It will require the following disk space :
| Resource | Min requirement |
|---|---|
| UI VM | Disk 1: 4GB & Data Disks: 250 GB |
| Analytics VM | Disk 1: 4 GB & Data Disks: 120 GB |
If you don’t have enough available disk space, you can add virtual disks to the UI VM.
Now to upgrade follow this procedure :
- Save the .pak file of the latest vCenter Operations Manager Build ot your local storage
- login to http://IP/admin
- Update > Browse and select .pak file
- click Update
- Accept the EULA and click OK
- Accept and confirm the update
- login back to check the Status tab
- login to vSphere Client or Custom UI to verify vCops interface is fine.
That’s it we leave you with that. Enjoy vCops 5.6.